Samsung SCD5000 User Manual (ENGLISH) - Page 104
Deleting Recorded Pictures Using DELETE Menu, Selecting Images To Delete, Deleting All Images At Once
 |
UPC - 036725301085
View all Samsung SCD5000 manuals
Add to My Manuals
Save this manual to your list of manuals |
Page 104 highlights
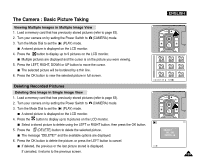
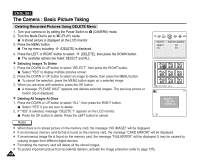
ENGLISH The Camera : Basic Picture Taking Deleting Recorded Pictures Using DELETE Menu 1. Turn your camera on by setting the Power Switch to (CAMERA) mode. 2. Turn the Mode Dial to set to (PLAY) mode. A stored picture is displayed on the LCD monitor. 3. Press the MENU button. The top menu including (DELETE) is displayed. 4. Press the LEFT or RIGHT button to select (DELETE), then press the DOWN button. The available options are listed: SELECT and ALL. ✤ Selecting Images To Delete 1. Press the DOWN or UP button to select "SELECT", then press the RIGHT button. Select "YES" to display multiple pictures screen. 2. Press the DOWN or UP button to select an image to delete, then press the MENU button. To cancel the selection, press the MENU button again on a selected image. 3. When you are done with selection, press the OK button. A message "PLEASE WAIT" appears and deletes selected images. The previous picture or motion clip is displayed. ✤ Deleting All Images At Once 1. Press the DOWN or UP button to select "ALL", then press the RIGHT button. Select "YES" if you are sure to delete. 2. If "YES" is selected, message "DELETE ?" appears on the LCD monitor. Press the OK button to delete. Press the LEFT button to cancel. Notes ✤ When there is no stored picture on the memory card, the message "NO IMAGE!" will be displayed. ✤ If an erroneous memory card format is found on the memory card, the message "CARD ERROR!" will be displayed. ✤ If an erroneous image file is found on the memory card, the message "FILE ERROR" will be displayed. It may be caused by copying images from different digital devices. ✤ Formatting the memory card will delete all the stored images. ✤ To protect important picture from accidental deletion, activate the image protection (refer to page 135). 104
-
 1
1 -
2
-
3
-
4
-
5
-
6
-
7
-
8
-
9
-
10
-
11
-
12
-
13
-
14
-
15
-
16
-
17
-
18
-
19
-
20
-
21
-
22
-
23
-
24
-
25
-
26
-
27
-
28
-
29
-
30
-
31
-
32
-
33
-
34
-
35
-
36
-
37
-
38
-
39
-
40
-
41
-
42
-
43
-
44
-
45
-
46
-
47
-
48
-
49
-
50
-
51
-
52
-
53
-
54
-
55
-
56
-
57
-
58
-
59
-
60
-
61
-
62
-
63
-
64
-
65
-
66
-
67
-
68
-
69
-
70
-
71
-
72
-
73
-
74
-
75
-
76
-
77
-
78
-
79
-
80
-
81
-
82
-
83
-
84
-
85
-
86
-
87
-
88
-
89
-
90
-
91
-
92
-
93
-
94
-
95
-
96
-
97
-
98
-
 99
99 -
 100
100 -
 101
101 -
 102
102 -
 103
103 -
 104
104 -
 105
105 -
 106
106 -
 107
107 -
 108
108 -
 109
109 -
110
-
111
-
112
-
113
-
114
-
115
-
116
-
117
-
118
-
119
-
120
-
121
-
122
-
123
-
124
-
125
-
126
-
127
-
128
-
129
-
130
-
131
-
132
-
133
-
134
-
135
-
136
-
137
-
138
-
139
-
140
-
141
-
142
-
143
-
144
-
145
-
146
-
147
-
148
-
149
-
150
-
151
-
152
-
153
-
154
-
155
-
156
-
157
-
158
-
159
-
160
-
161
-
162
-
163
-
164
-
165
-
166
 |
 |
