Samsung SCD5000 User Manual (ENGLISH) - Page 109
The Camera : Advanced Techniques, Setting the Focus, Vibration Warning
 |
UPC - 036725301085
View all Samsung SCD5000 manuals
Add to My Manuals
Save this manual to your list of manuals |
Page 109 highlights
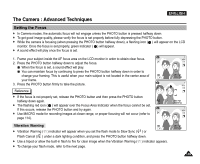
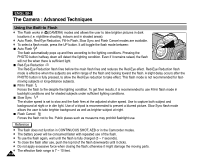
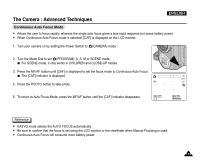
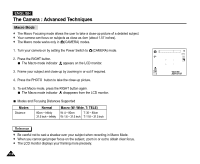
The Camera : Advanced Techniques ENGLISH Setting the Focus ✤ In Camera modes, the automatic focus will not engage unless the PHOTO button is pressed halfway down. ✤ To get good image quality, please verify the focus is set properly before fully depressing the PHOTO button. ✤ While the camera is focusing (when pressing the PHOTO button halfway down), a flashing icon ( ) will appear on the LCD monitor. Once the focus is set properly, green indicator ( ) will appear. ✤ A sound effect will play once the focus is set. 1. Frame your subject inside the AF focus area on the LCD monitor in order to obtain clear focus. 2. Press the PHOTO button halfway down to adjust the focus. When the focus is set, a sound effect will play. You can maintain focus by continuing to press the PHOTO button halfway down in order to change your framing. This is useful when your main subject is not located in the center area of your frame. 3. Press the PHOTO button firmly to take the picture. Reference ✤ If the focus is not properly set, release the PHOTO button and then press the PHOTO button halfway down again. ✤ The flashing red icon ( ) will appear over the Focus Area Indicator when the focus cannot be set. If this occurs, release the PHOTO button and try again. ✤ Use MACRO mode for recording images at closer range, or proper focusing will not occur (refer to page 114). Vibration Warning ✤ Vibration Warning ( ) indicator will appear when you set the flash mode to Slow Sync ( ) or Flash Cancel ( ) under a dark lighting condition, and press the PHOTO button halfway down. ✤ Use a tripod or allow the built-in flash to fire for clear image when the Vibration Warning ( ) indicator appears. ✤ To change your flash mode, refer to the next page. 109
-
 1
1 -
2
-
3
-
4
-
5
-
6
-
7
-
8
-
9
-
10
-
11
-
12
-
13
-
14
-
15
-
16
-
17
-
18
-
19
-
20
-
21
-
22
-
23
-
24
-
25
-
26
-
27
-
28
-
29
-
30
-
31
-
32
-
33
-
34
-
35
-
36
-
37
-
38
-
39
-
40
-
41
-
42
-
43
-
44
-
45
-
46
-
47
-
48
-
49
-
50
-
51
-
52
-
53
-
54
-
55
-
56
-
57
-
58
-
59
-
60
-
61
-
62
-
63
-
64
-
65
-
66
-
67
-
68
-
69
-
70
-
71
-
72
-
73
-
74
-
75
-
76
-
77
-
78
-
79
-
80
-
81
-
82
-
83
-
84
-
85
-
86
-
87
-
88
-
89
-
90
-
91
-
92
-
93
-
94
-
95
-
96
-
97
-
98
-
99
-
100
-
101
-
102
-
103
-
 104
104 -
 105
105 -
 106
106 -
 107
107 -
 108
108 -
 109
109 -
 110
110 -
 111
111 -
 112
112 -
 113
113 -
 114
114 -
115
-
116
-
117
-
118
-
119
-
120
-
121
-
122
-
123
-
124
-
125
-
126
-
127
-
128
-
129
-
130
-
131
-
132
-
133
-
134
-
135
-
136
-
137
-
138
-
139
-
140
-
141
-
142
-
143
-
144
-
145
-
146
-
147
-
148
-
149
-
150
-
151
-
152
-
153
-
154
-
155
-
156
-
157
-
158
-
159
-
160
-
161
-
162
-
163
-
164
-
165
-
166
 |
 |
