Samsung SCH-R261 User Manual - Page 41
Edit Contact, Options, Sec Pause, Contacts, Set Speed Dial, Set as default
 |
View all Samsung SCH-R261 manuals
Add to My Manuals
Save this manual to your list of manuals |
Page 41 highlights
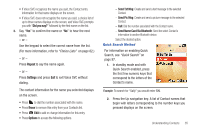
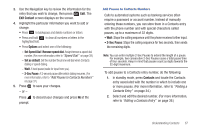
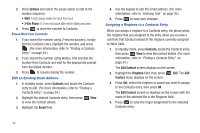
3. Use the Navigation key to review the information for the entry that you wish to change, then press Edit. The Edit Contact screen displays on the screen. 4. Highlight the particular information you want to add or change. • Press to backspace and delete numbers or letters. • Press and hold to clear all numbers or letters in the highlighted field. • Press Options and select one of the following: - Set Speed Dial / Remove speed dial: Assign/remove a speed dial number. (For more information, refer to "Speed Dial" on page 39.) - Set as default: Set the number the phone will dial when Contacts dialing or speed dialing. - Wait: A hard pause (waits for input from you). - 2-Sec Pause: A 2-second pause after which dialing resumes. (For more information, refer to "Add Pauses to Contacts Numbers" on page 37.) 5. Press to save your changes. - or - Press to discard your changes and press No at the prompt. Add Pauses to Contacts Numbers Calls to automated systems such as banking services often require a password or account number. Instead of manually entering these numbers, you can store them in a Contacts entry with the phone number and with special characters called pauses, up to a maximum of 32 digits. • Wait: Stops the calling sequence until the phone receives further input. • 2-Sec Pause: Stops the calling sequence for two seconds, then sends the remaining digits. Note: You can enter multiple 2-Sec Pauses to extend the length of a pause. For example, two consecutive 2-Sec Pauses cause a total pause time of four seconds. Keep in mind that pauses count as digits towards the 32-digit maximum. To add pauses to a Contacts entry number, do the following: 1. In standby mode, press Contacts and locate the Contacts entry associated with the number in which to include one or more pauses. (For more information, refer to "Finding a Contacts Entry" on page 34.) 2. Select and edit the desired number. (For more information, refer to "Editing a Contacts Entry" on page 36.) Understanding Contacts 37
-
 1
1 -
2
-
3
-
4
-
5
-
6
-
7
-
8
-
9
-
10
-
11
-
12
-
13
-
14
-
15
-
16
-
17
-
18
-
19
-
20
-
21
-
22
-
23
-
24
-
25
-
26
-
27
-
28
-
29
-
30
-
31
-
32
-
33
-
34
-
35
-
 36
36 -
 37
37 -
 38
38 -
 39
39 -
 40
40 -
 41
41 -
 42
42 -
 43
43 -
 44
44 -
 45
45 -
 46
46 -
47
-
48
-
49
-
50
-
51
-
52
-
53
-
54
-
55
-
56
-
57
-
58
-
59
-
60
-
61
-
62
-
63
-
64
-
65
-
66
-
67
-
68
-
69
-
70
-
71
-
72
-
73
-
74
-
75
-
76
-
77
-
78
-
79
-
80
-
81
-
82
-
83
-
84
-
85
-
86
-
87
-
88
-
89
-
90
-
91
-
92
-
93
-
94
-
95
-
96
-
97
-
98
-
99
-
100
-
101
-
102
-
103
-
104
-
105
-
106
-
107
-
108
-
109
-
110
-
111
-
112
-
113
-
114
-
115
-
116
-
117
-
118
-
119
-
120
-
121
-
122
-
123
-
124
-
125
-
126
-
127
-
128
-
129
-
130
-
131
-
132
-
133
-
134
 |
 |
