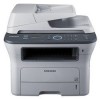
Samsung SCX 4826FN User Manual (ENGLISH) - Page 25
Installing the software, Add TCP/IP Port - features
 |
UPC - 635753614824
View all Samsung SCX 4826FN manuals
Add to My Manuals
Save this manual to your list of manuals |
Page 25 highlights
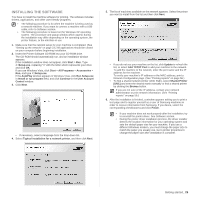
INSTALLING THE SOFTWARE You have to install the machine software for printing. The software includes drivers, applications, and other user friendly programs. • The following procedure is for when the machine is being used as a network machine. If you want to connect a machine with a USB cable, refer to Software section. • The following procedure is based on the Windows XP operating system. The procedure and popup window which appear during the installation may differ depending on the operating system, the printer feature, or the interface in use. 1. Make sure that the network setup for your machine is completed. (See "Setting up the network" on page 23.) All applications should be closed on your computer before beginning installation. 2. Insert the Printer Software CD-ROM into your CD-ROM drive. The CD-ROM should automatically run, and an installation window appears. If the installation window does not appear, click Start > Run. Type X:\Setup.exe, replacing "X" with the letter which represents your drive and click OK. If you use Windows Vista, click Start > All Programs > Accessories > Run, and type X:\Setup.exe. If the AutoPlay window appears in Windows Vista, click Run Setup.exe in Install or run program field, and click Continue in the User Account Control window. 3. Click Next. • If necessary, select a language from the drop-down list. 4. Select Typical installation for a network printer, and then click Next. 5. The list of machines available on the network appears. Select the printer you want to install from the list and then click Next. • If you do not see your machine on the list, click Update to refresh the list, or select Add TCP/IP Port to add your machine to the network. To add the machine to the network, enter the port name and the IP address for the machine. To verify your machine's IP address or the MAC address, print a Network Configuration page. (See "Printing reports" on page 56.) • To find a shared network printer (UNC Path), select Shared Printer [UNC] and enter the shared name manually or find a shared printer by clicking the Browse button. If you are not sure of the IP address, contact your network administrator or print network information. (See "Printing reports" on page 56.) 6. After the installation is finished, a window appears asking you to print a test page and to register yourself as a user of Samsung machines in order to receive information from Samsung. If you desire, select the corresponding checkbox(es) and click Finish. • If your machine does not work properly after the installation, try to reinstall the printer driver. See Software section. • During the printer driver installation process, the driver installer detects the location information for your operating system and sets the default paper size for your machine. If you use a different Windows location, you must change the paper size to match the paper you usually use. Go to printer properties to change the paper size after installation is complete. Getting started_ 25
-
 1
1 -
2
-
3
-
4
-
5
-
6
-
7
-
8
-
9
-
10
-
11
-
12
-
13
-
14
-
15
-
16
-
17
-
18
-
19
-
 20
20 -
 21
21 -
 22
22 -
 23
23 -
 24
24 -
 25
25 -
 26
26 -
 27
27 -
 28
28 -
 29
29 -
 30
30 -
31
-
32
-
33
-
34
-
35
-
36
-
37
-
38
-
39
-
40
-
41
-
42
-
43
-
44
-
45
-
46
-
47
-
48
-
49
-
50
-
51
-
52
-
53
-
54
-
55
-
56
-
57
-
58
-
59
-
60
-
61
-
62
-
63
-
64
-
65
-
66
-
67
-
68
-
69
-
70
-
71
-
72
-
73
-
74
-
75
-
76
-
77
-
78
-
79
-
80
-
81
-
82
-
83
-
84
-
85
-
86
-
87
-
88
-
89
-
90
-
91
-
92
-
93
-
94
-
95
-
96
-
97
-
98
-
99
-
100
-
101
-
102
-
103
-
104
-
105
-
106
-
107
-
108
-
109
-
110
-
111
-
112
-
113
-
114
-
115
-
116
-
117
-
118
-
119
-
120
-
121
-
122
-
123
-
124
-
125
-
126
-
127
-
128
-
129
-
130
-
131
-
132
-
133
-
134
-
135
-
136
-
137
-
138
 |
 |
