Samsung SHR-8162 User Manual - Page 46
Setting the Monitor, Monitor
 |
View all Samsung SHR-8162 manuals
Add to My Manuals
Save this manual to your list of manuals |
Page 46 highlights
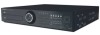
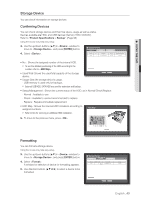
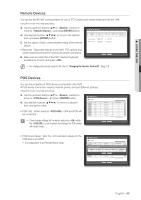
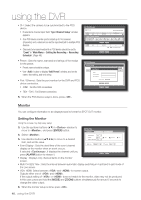
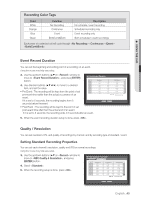
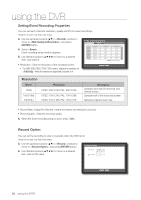
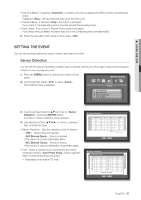
using the DVR • CH : Select the camera to be synchronized to the POS device. If selected a channel input field, "Sync Channel Setup" window appears. One POS device and be synchronized up to 16 cameras (channels), and a channel can not be synchronized to multiple POS devices. Channels to be synchronized to a POS device should be set to "Event" in "Main Menu > Setting the Recording > Recording Schedule". (Page 48) • Preset : Sets the name, start and end strings of the receipt for the preset. Preset name should be unique. Use button to display "Add Preset" window, and set its name, start string, and end string. • Port / Ethernet : Sets the port number for the DVR and POS device connection. COM1 : For RS-232C connections 7001~7016 : For Ethernet connections 5. When the POS Device setup is done, press . POS Device POS USE POS CH 1 None S2ync ChaNnonneel Setup 3 None 1 2 4 CH None 9 10 5 None 6 None 7 None 8 None Preset No preset No preset No preset 3 4 5 No preset 11 12 13 No preset OKNo presetCancel No preset No preset POS Device Setup Port/Ethernet None None None 6 7 8 None 14 15 16 None None None None Previous/Next Page OK Cancel POS Device PrPeOsSeUtSSE etup POS Device Setup POS 1No. 2 3 4 5 6 7 8 CH NNAaomdneed Preset Start None NoNneame Preset No preEsnedt No preset No preset NoSnetart Keyword No preset NoEnend Keyword None No preset No preset None None OKNo preset Cancel No preset Port/Ethernet Add Input char. SNeot ne Del None None None None None None None OK Cancel Previous/Next Page OK Cancel Monitor You can configure information to be displayed and its format for SPOT OUT monitor. Setting the Monitor Using the mouse may help easy setup. 3. Use the up/down buttons (▲▼) in window to move to , and press [ENTER] button. Monitor Monitor SPOT OUT Mode 4. Select . 5. Use direction buttons to move to a desired Event Display OFF Display Date Multi CH SEQ Time 5 sec Time CH Name Icon item, and set the value. • Event Display : Sets the dwell time of the event channel VGA 800x600 HDMI 480p display on the monitor when an event occurs. If selected , it displays the channel until you press [ALARM] button to release it. OK Cancel • Display : Displays only checked items on the monitor screen. • Multi CH SEQ Time : Sets the interval between automatic display switching in 4-split and 9-split mode of the Live screen. • VGA, HDMI: Select between and for screen output. Outputs either one of and . If the output setting of or does not match to the monitor, video may not be produced. In this case, press and hold the [MODE] and [ZOOM] buttons simultaneously for around 5 seconds to change the video output. 6. When the monitor setup is done, press . 46_ using the DVR
-
 1
1 -
2
-
3
-
4
-
5
-
6
-
7
-
8
-
9
-
10
-
11
-
12
-
13
-
14
-
15
-
16
-
17
-
18
-
19
-
20
-
21
-
22
-
23
-
24
-
25
-
26
-
27
-
28
-
29
-
30
-
31
-
32
-
33
-
34
-
35
-
36
-
37
-
38
-
39
-
40
-
 41
41 -
 42
42 -
 43
43 -
 44
44 -
 45
45 -
 46
46 -
 47
47 -
 48
48 -
 49
49 -
 50
50 -
 51
51 -
52
-
53
-
54
-
55
-
56
-
57
-
58
-
59
-
60
-
61
-
62
-
63
-
64
-
65
-
66
-
67
-
68
-
69
-
70
-
71
-
72
-
73
-
74
-
75
-
76
-
77
-
78
-
79
-
80
-
81
-
82
-
83
-
84
-
85
-
86
-
87
-
88
-
89
-
90
-
91
-
92
-
93
-
94
-
95
-
96
-
97
-
98
-
99
-
100
-
101
-
102
-
103
-
104
-
105
-
106
-
107
-
108
-
109
-
110
-
111
-
112
-
113
-
114
-
115
-
116
-
117
-
118
-
119
-
120
 |
 |