Samsung SWD-M100 User Manual (user Manual) (ver.f3) (English) - Page 62
Try to get e-mail settings, automatically from the Internet, Previous, Your name, Account display
 |
View all Samsung SWD-M100 manuals
Add to My Manuals
Save this manual to your list of manuals |
Page 62 highlights
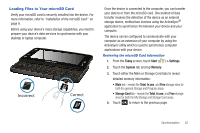
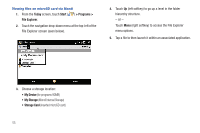
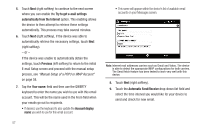
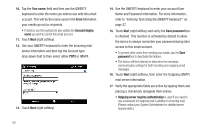
5. Touch Next (right softkey) to continue to the next screen where you can enable the Try to get e-mail settings automatically from the Internet option. This enabling allows the device to then attempt to retrieve these settings automatically. This process may take several minutes. 6. Touch Next (right softkey), if the device was able to automatically retrieve the necessary settings, touch Next (right softkey). - or - If the device was unable to automatically obtain the settings, touch Previous (left softkey) to return to the initial E-mail Setup screen and proceed with the manual setup process, see "Manual Setup of a POP3 or IMAP Account" on page 58. 7. Tap the Your name: field and then use the QWERTY keyboard to enter the name you wish to use with this email account. This will be the name used in the From field when your emails go out to recipients. • If desired, use the keyboard to also update the Account display name you wish to use for this email account. 57 • This name will appear within the device's list of available email accounts on your Messages screen. Note: Internet mail addresses carriers such as Gmail and Yahoo. The device is able to detect the appropriate IMAP configurations for both carriers. The Gmail fetch feature has been tested to work very well with this device. 8. Touch Next (right softkey). 9. Touch the Automatic Send/Receive drop-down list field and select the time interval you would like for your device to send and check for new email.
-
 1
1 -
2
-
3
-
4
-
5
-
6
-
7
-
8
-
9
-
10
-
11
-
12
-
13
-
14
-
15
-
16
-
17
-
18
-
19
-
20
-
21
-
22
-
23
-
24
-
25
-
26
-
27
-
28
-
29
-
30
-
31
-
32
-
33
-
34
-
35
-
36
-
37
-
38
-
39
-
40
-
41
-
42
-
43
-
44
-
45
-
46
-
47
-
48
-
49
-
50
-
51
-
52
-
53
-
54
-
55
-
56
-
 57
57 -
 58
58 -
 59
59 -
 60
60 -
 61
61 -
 62
62 -
 63
63 -
 64
64 -
 65
65 -
 66
66 -
 67
67 -
68
-
69
-
70
-
71
-
72
-
73
-
74
-
75
-
76
-
77
-
78
-
79
-
80
-
81
-
82
-
83
-
84
-
85
-
86
-
87
-
88
-
89
-
90
-
91
-
92
-
93
-
94
-
95
-
96
-
97
-
98
-
99
-
100
-
101
-
102
-
103
-
104
-
105
-
106
-
107
-
108
-
109
-
110
-
111
-
112
-
113
-
114
-
115
-
116
-
117
-
118
-
119
-
120
-
121
-
122
-
123
-
124
-
125
-
126
-
127
-
128
 |
 |
