Samsung SWD-M100 User Manual (user Manual) (ver.f3) (English) - Page 63
Setup E-mail, Internet e-mail
 |
View all Samsung SWD-M100 manuals
Add to My Manuals
Save this manual to your list of manuals |
Page 63 highlights
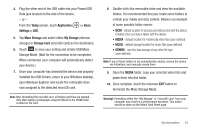
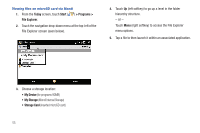
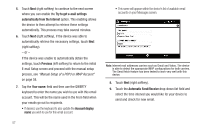
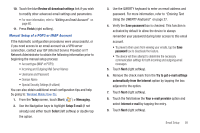
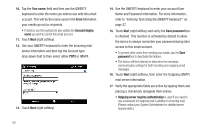
10. Touch the blue Review all download settings link if you wish to modify other advanced email settings and parameters. • For more information, refer to "Editing an Email Account" on page 60. 11. Press Finish (right softkey). Manual Setup of a POP3 or IMAP Account If the Automatic configuration procedures were unsuccessful, or if you need access to an email account via a VPN server connection, contact your ISP (Internet Service Provider) or IT Network Administrator to obtain the following information prior to beginning the manual setup process: • Account type (IMAP or POP3) • Incoming and Outgoing Mail Server Names • Username and Password • Domain Name • Special Security Settings (if utilized) You can also obtain additional email configuration tips and help by going to: Windows Mobile How-Tos. 1. From the Today screen, touch Start ( ) > Messaging. 2. Use the Navigation keys to highlight Setup E-mail (if not already) and either touch Select (left softkey) or double tap the option. 3. Use the QWERTY keyboard to enter an email address and password. For more information, refer to "Entering Text Using the QWERTY Keyboard" on page 27. 4. Verify the Save password box is checked. This function is activated by default to allow the device to always remember your password during later access to this email account. • To prevent other users from viewing your emails, tap the Save password box to deactivate the feature. • The device will then attempt to determine the necessary communication settings for both incoming and outgoing email messages. 5. Touch Next (right softkey). 6. Remove the check mark from the Try to get e-mail settings automatically from the Internet option by tapping the box adjacent to the option. 7. Touch Next (right softkey). 8. Touch the field below the Your e-mail provider option and select Internet e-mail by tapping the entry. 9. Touch Next (right softkey). Email Setup 58
-
 1
1 -
2
-
3
-
4
-
5
-
6
-
7
-
8
-
9
-
10
-
11
-
12
-
13
-
14
-
15
-
16
-
17
-
18
-
19
-
20
-
21
-
22
-
23
-
24
-
25
-
26
-
27
-
28
-
29
-
30
-
31
-
32
-
33
-
34
-
35
-
36
-
37
-
38
-
39
-
40
-
41
-
42
-
43
-
44
-
45
-
46
-
47
-
48
-
49
-
50
-
51
-
52
-
53
-
54
-
55
-
56
-
57
-
 58
58 -
 59
59 -
 60
60 -
 61
61 -
 62
62 -
 63
63 -
 64
64 -
 65
65 -
 66
66 -
 67
67 -
 68
68 -
69
-
70
-
71
-
72
-
73
-
74
-
75
-
76
-
77
-
78
-
79
-
80
-
81
-
82
-
83
-
84
-
85
-
86
-
87
-
88
-
89
-
90
-
91
-
92
-
93
-
94
-
95
-
96
-
97
-
98
-
99
-
100
-
101
-
102
-
103
-
104
-
105
-
106
-
107
-
108
-
109
-
110
-
111
-
112
-
113
-
114
-
115
-
116
-
117
-
118
-
119
-
120
-
121
-
122
-
123
-
124
-
125
-
126
-
127
-
128
 |
 |
