Samsung SWD-M100 User Manual (user Manual) (ver.f3) (English) - Page 67
Using ActiveSync to Con Your Outlook Exchange Settings, Exchange Settings
 |
View all Samsung SWD-M100 manuals
Add to My Manuals
Save this manual to your list of manuals |
Page 67 highlights
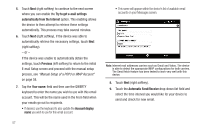
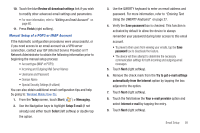
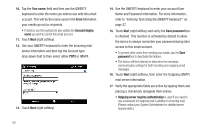
• Use automatic send/receive schedule when roaming to continue to check your email at predetermined intervals even if you are in a roaming area. 10. Select a deletion action within the When deleting messages: drop-down field to choose whether to automatically delete or retain messages on your email server when you delete those messages from your device. 11. Touch Done (left softkey) once you have completed your edits. 12. Continue onto the remaining screens to alter the Download Size settings (page 62). Changing the Download Size Settings 1. From the Today screen, touch Start ( ) > Messaging. 2. Use the Navigation keys to highlight the email account. 3. Touch Menu (right softkey) > Options and tap the Accounts tab. 4. Tap the desired email account from the onscreen list to then launch the Email Setup page. 5. Touch the Download Size Settings link. 6. Select a message format within the Message Format: drop-down field. This selection allows you to view your email messages as either HTML or Plain Text documents. 7. Select a message size limit within the Message download limit: drop-down field. This selection allows you to limit the size of files attached to email messages. 8. Touch Done (left softkey) once you have completed your edits and finish the process of altering the email settings. Using ActiveSync to Configure Your Outlook Exchange Settings This method of utilizing your built-in ActiveSync application works to not only assist in the Outlook Exchange Server® configuration process by wirelessly establishing the communication parameters with the remote server, but also help to then synchronize emails, contacts, and more, with your computer's current Outlook application. Before you can begin this process, you must: • Have an established data connection to the Web via either Wi-Fi or Mobile WiMAX. Email Setup 62
-
 1
1 -
2
-
3
-
4
-
5
-
6
-
7
-
8
-
9
-
10
-
11
-
12
-
13
-
14
-
15
-
16
-
17
-
18
-
19
-
20
-
21
-
22
-
23
-
24
-
25
-
26
-
27
-
28
-
29
-
30
-
31
-
32
-
33
-
34
-
35
-
36
-
37
-
38
-
39
-
40
-
41
-
42
-
43
-
44
-
45
-
46
-
47
-
48
-
49
-
50
-
51
-
52
-
53
-
54
-
55
-
56
-
57
-
58
-
59
-
60
-
61
-
 62
62 -
 63
63 -
 64
64 -
 65
65 -
 66
66 -
 67
67 -
 68
68 -
 69
69 -
 70
70 -
 71
71 -
 72
72 -
73
-
74
-
75
-
76
-
77
-
78
-
79
-
80
-
81
-
82
-
83
-
84
-
85
-
86
-
87
-
88
-
89
-
90
-
91
-
92
-
93
-
94
-
95
-
96
-
97
-
98
-
99
-
100
-
101
-
102
-
103
-
104
-
105
-
106
-
107
-
108
-
109
-
110
-
111
-
112
-
113
-
114
-
115
-
116
-
117
-
118
-
119
-
120
-
121
-
122
-
123
-
124
-
125
-
126
-
127
-
128
 |
 |
