Samsung UA46C5000 User Manual - Page 10
Connections, Basic Features
 |
View all Samsung UA46C5000 manuals
Add to My Manuals
Save this manual to your list of manuals |
Page 10 highlights
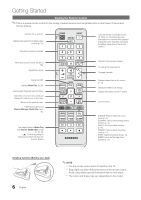
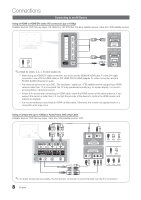
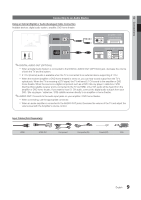
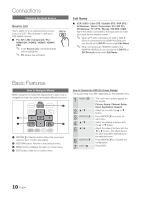
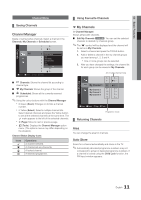
Connections Changing the Input Source Source List Use to select TV or an external input sources SOURCE such as a DVD / Blu-ray player / cable box / STB satellite receiver. ■■ TV / AV1 / AV2 / Component / PC / HDMI1/DVI / HDMI2 / HDMI3 / HDMI4 / USB ✎✎ In the SPoOuWrcEeR List, connectOeNd/OinFFputs will be highlighted. ✎✎ PC always stay aScOtUiRvCaE ted. Edit Name ■■ VCR / DVD / Cable STB / Satellite STB / PVR STB / AV Receiver / Game / Camcorder / PC / DVI PC / DVI Devices / TV / IPTV / Blu-ray / HD DVD / DMA: Name the device connected to the input jacks to make your input source selection easier. ✎✎ When a PC with a resolution of 1920 x 1080 @ 60Hz is connected to the HDMI IN 1(DVI) port, you should set to DVI PC mode under Edit Name. ✎✎ When connecting an HDMI/DVI cable to the HDMI IN 1(DVI) port, you should set to DVI PC or DVI Devices mode under Edit Name. Basic FTeTX/MaIX tures PRE-CH How to Navigate Menus Before using the TV, follow the steps below to learn how to navigate the menu and selecCHt LaISnTd adjust different functions. MENU MEDIA.P HDMI 3 TOOLS INFO 1 2 RETURN EEXXIITT 4 A B C D 1 ENTERE / SD.MirOeDcEtion bE.uSAtVtoINnG: MovDeUAtLhe cursor and select an item. Confirm the setting. 2 RETURN butPt.oMnO:DREeturnP.sSItZoE the pSrLeEvEioPus menu. 3 MENU button: Displays the main on-screen menu. 4 EXIT button: Exits the on-screen menu. How to Operate the OSD (On Screen Display) The access step may differ depending on the selected menu. 1 MENU m 2 ▲/▼ 3 ENTER E 4 ▲/▼ 5 ◄/► 6 ENTER E 7 EXIT e The main menu options appear on the screen: Picture, Sound, Channel, Setup, Input, Application, Support. Select an icon with the ▲ or ▼ button. Press ENTERE to access the sub-menu. Select the desired submenu with the ▲ or ▼ button. Adjust the value of an item with the ◄ or ► button. The adjustment in the OSD may differ depending on the selected menu. Press ENTERE to complete the configuration. Press EXIT. 10 English
-
 1
1 -
2
-
3
-
4
-
 5
5 -
 6
6 -
 7
7 -
 8
8 -
 9
9 -
 10
10 -
 11
11 -
 12
12 -
 13
13 -
 14
14 -
 15
15 -
16
-
17
-
18
-
19
-
20
-
21
-
22
-
23
-
24
-
25
-
26
-
27
-
28
-
29
-
30
-
31
-
32
-
33
-
34
-
35
-
36
-
37
-
38
-
39
-
40
-
41
-
42
-
43
-
44
-
45
-
46
-
47
-
48
 |
 |
