Samsung WB150F User Manual Ver.1.3 (English) - Page 99
Printing photos with a PictBridge photo printer - reset
 |
View all Samsung WB150F manuals
Add to My Manuals
Save this manual to your list of manuals |
Page 99 highlights
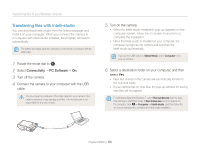
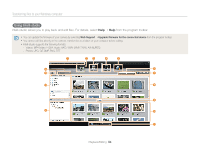
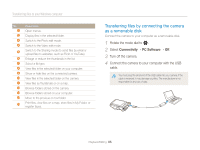
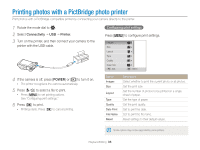
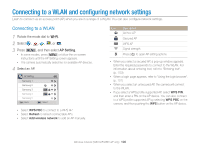
Printing photos with a PictBridge photo printer Print photos with a PictBridge-compatible printer by connecting your camera directly to the printer. 1 Rotate the mode dial to n. 2 Select Connectivity “ USB “ Printer. 3 Turn on the printer, and then connect your camera to the printer with the USB cable. Configuring print settings Press [m] to configure print settings. Images Size Layout Type Quality Date Print Exit Select 4 If the camera is off, press [POWER] or [P] to turn it on. • The printer recognizes the camera automatically. 5 Press [F/t] to select a file to print. • Press [m] to set printing options. See "Configuring print settings." 6 Press [o] to print. • Printing starts. Press [o] to cancel printing. Option Images Size Layout Type Quality Date Print File Name Reset Description Select whether to print the current photo or all photos. Set the print size. Set the number of photos to be printed on a single sheet of paper. Set the type of paper. Set the print quality. Set to print the date. Set to print the file name. Reset settings to their default values. Some options may not be supported by some printers. Playback/Editing 98
-
 1
1 -
2
-
3
-
4
-
5
-
6
-
7
-
8
-
9
-
10
-
11
-
12
-
13
-
14
-
15
-
16
-
17
-
18
-
19
-
20
-
21
-
22
-
23
-
24
-
25
-
26
-
27
-
28
-
29
-
30
-
31
-
32
-
33
-
34
-
35
-
36
-
37
-
38
-
39
-
40
-
41
-
42
-
43
-
44
-
45
-
46
-
47
-
48
-
49
-
50
-
51
-
52
-
53
-
54
-
55
-
56
-
57
-
58
-
59
-
60
-
61
-
62
-
63
-
64
-
65
-
66
-
67
-
68
-
69
-
70
-
71
-
72
-
73
-
74
-
75
-
76
-
77
-
78
-
79
-
80
-
81
-
82
-
83
-
84
-
85
-
86
-
87
-
88
-
89
-
90
-
91
-
92
-
93
-
 94
94 -
 95
95 -
 96
96 -
 97
97 -
 98
98 -
 99
99 -
 100
100 -
 101
101 -
 102
102 -
 103
103 -
 104
104 -
105
-
106
-
107
-
108
-
109
-
110
-
111
-
112
-
113
-
114
-
115
-
116
-
117
-
118
-
119
-
120
-
121
-
122
-
123
-
124
-
125
-
126
-
127
-
128
-
129
-
130
-
131
-
132
-
133
-
134
-
135
-
136
-
137
-
138
-
139
-
140
-
141
-
142
-
143
-
144
-
145
-
146
-
147
-
148
-
149
-
150
-
151
-
152
-
153
-
154
-
155
-
156
-
157
-
158
-
159
-
160
 |
 |
