Sanyo ICR-1000 Instruction Manual
Sanyo ICR-1000 Manual
 |
View all Sanyo ICR-1000 manuals
Add to My Manuals
Save this manual to your list of manuals |
Sanyo ICR-1000 manual content summary:
- Sanyo ICR-1000 | Instruction Manual - Page 1
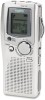
INSTRUCTION MANUAL Digital Voice Recorder ICR-1000 GB English D Deutsch F Français E Español - Sanyo ICR-1000 | Instruction Manual - Page 2
24 ALARM TIMER 25 BEFORE INSTALLING THE APPLICATION SOFTWARE 26 PLAYING BACK/EDITING A DATA FILE RECORDED WITH YOUR PC ......... 26 PC CONNECTION 28 CLEANING THE CABINET 30 TROUBLESHOOTING GUIDE 31 USER LICENSE AGREEMENT 33 Your SANYO product is designed and manufactured with high quality - Sanyo ICR-1000 | Instruction Manual - Page 3
of rectangles in the battery indicator ( ) disappear during recording, stop the recording immediately and replace the batteries. • Do not disconnect the respective development manufacturers. The symbols TM and ® are not shown in this manual. Accessories USB cable x 1 CD-ROM x 1 Case x 1 SD Card - Sanyo ICR-1000 | Instruction Manual - Page 4
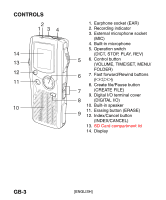
1 34 14 13 12 11 10 1. Earphone socket (EAR) 2. Recording indicator 3. External microphone socket (MIC) 4. Built-in microphone 5. Operation (F,E) 8. Create file/Pause button 7 (CREATE FILE) 9. Digital I/O terminal cover 8 (DIGITAL I/O) 10. Built-in speaker 9 11. Erasing button (ERASE - Sanyo ICR-1000 | Instruction Manual - Page 5
indicator 3. Alarm indicator 4. Voice activated system indicator 5. Insertion recording indicator 6. Battery indicator 7. Record indicator 8. Memory capacity indicator 9. Recorded date/time, and recording time mode indicators 10. User, folder, recording time, operation guides, etc. [ENGLISH] GB - Sanyo ICR-1000 | Instruction Manual - Page 6
POWER SUPPLY Batteries 1. Open the battery compartment lid. 2. Install two "AAA/LR03/HP16" batteries (attached). Observe proper polarity. 1 2 Battery indicator ( ) The line of rectangles is the battery gauge. Black rectangles show the battery condition while the unit is operating. : Full, good - Sanyo ICR-1000 | Instruction Manual - Page 7
work correctly with a different Digital Voice Recorder. • If the card is not inserted, "NO CARD" appears when the power is turned on. • When a SD Card is loaded, the unit automatically creates a VoiceRec folder, etc. Do not erase them. • Do not use a MultiMediaCard. • This unit supports the SD Card - Sanyo ICR-1000 | Instruction Manual - Page 8
turn on the power. The unit is now in stand-by mode. Example: USER-01 Author name Folder name BU 1/ 1 Current file number NEW Total file POWER OFF" appears briefly on the display. It prevents accidental playback or recording. Earphone Connect an earphone (not attached) to the EAR socket. ( - Sanyo ICR-1000 | Instruction Manual - Page 9
ADJUSTING THE DATE AND TIME 1. Slide the operation switch to "STOP". 2. Press and hold the MENU/FOLDER button down at least 2 seconds in the stop mode. "AUTHOR" appears. 3. Press the MENU/FOLDER button repeatedly until the date and time display appears. Example: 0:00 2006 AUG.01 MENU/ FOLDER + - Sanyo ICR-1000 | Instruction Manual - Page 10
OT Selecting the menu 1. Press and hold the MENU/FOLDER button down at least 2 seconds in the stop mode. Example: AUTHOR ID01 ID number USER-01 Author name 2. Press the MENU/FOLDER button repeatedly to select the desired menu. Each time the button is pressed, the display changes as follows - Sanyo ICR-1000 | Instruction Manual - Page 11
Selecting ID number/Author name ID01/USER-01 - ID99/USER-99 Note: Author name is automatically created. You can change it by using the PC software attached to the CD-ROM. EDIT: Selecting edit mode OVER WRITE: Overwirte recording INSERT: Insertion recording ("INSERT" appears on the display.) Date - Sanyo ICR-1000 | Instruction Manual - Page 12
VAS: Selecting Voice Activated System mode OFF: To start and stop recording manually ON: Recording begins when the microphone picks up sound, and stops automatically after the sound stops. "VAS" appears. Press the F or E button to set the microphone's sensitivity when recording begins. The VAS - Sanyo ICR-1000 | Instruction Manual - Page 13
BEEP: Selecting beep mode ON: Every time the operation buttons are pressed, a beep sound will be heard. OFF: No beep sound ERASE GUARD: Selecting erase guard mode OFF: You may erase the data. ON: You cannot erase the data. (" " appears on the display.) 12/24 (See Page 8.) LCD LEVEL: Selecting the - Sanyo ICR-1000 | Instruction Manual - Page 14
etc. (See Pages 10 - 11.) 3. Press the MENU/FOLDER button repeatedly to select the desired folder. 4. Slide the operation switch to DICT to start recording. The recording indicator lights and "REC" appears on the display. Example: USER-01 LE 1/ 1 0m01s 5. Slide the operation switch to STOP to stop - Sanyo ICR-1000 | Instruction Manual - Page 15
"REC" blink on the display. To resume recording, press the button again. Creating a new file number Press the CREATE FILE button in the stop mode. The new file number appears. Example: USER-01 USER-01 LE 1/ 1 x LE 2/ 2 END NEW Note: This unit can record up to approx. 6 hours in one file - Sanyo ICR-1000 | Instruction Manual - Page 16
FILE button to set the pause mode) where you want to start overwriting. 4. Slide the operation switch to DICT. Overwrite recording starts. Insertion recording Note: Previous recorded material will remain. 1. Select the "INSERT" edit mode. (See Page 10.) 2. Play back the file. (See Page 17.) 3. Slide - Sanyo ICR-1000 | Instruction Manual - Page 17
" features of ICR-1000 may not work properly on 512MB or greater SD Cards, due to the properties of larger SD Cards. All other features of the recorder will work normally 64MB 128MB 256MB 512MB 1GB 2GB LP Yes Yes Yes No No No Recording SP Yes Yes Yes No No No Time HQ Yes Yes Yes No No - Sanyo ICR-1000 | Instruction Manual - Page 18
Pages 9 - 10.) 3. Press the F or E button repeatedly to select the desired file. 4. Slide the operation switch to PLAY to start playback. Example: USER-01 BU 2/ 3 0m01s 5. Press the + or - VOLUME button as desired. • When playback stops, "END" appears on the display. 6. Slide the operation switch - Sanyo ICR-1000 | Instruction Manual - Page 19
while the button is being pressed. When the button is released, playback will continue. These buttons are also used in the stop mode. Review To review the recorded sound while playing back the selected file, slide and hold the operation switch to REV. It works within the selected file. To resume - Sanyo ICR-1000 | Instruction Manual - Page 20
mode. The display changes as follows: In the recording mode: Remaining recording time v Current day/time v Original display returns Example of remaining recording time: Author USER-01 REMAIN 1h24m Remaining recording time Note: • When the remaining recording time is more than one hour, it is - Sanyo ICR-1000 | Instruction Manual - Page 21
the INDEX/CANCEL button before pressing the TIME/SET button. Erasing one file 1. Press the F or E button to select the file to be erased. Example: USER-01 LE 3/ 5 0m09s 2. Press the ERASE button once. The file number blinks. Example: ERASE FILE LECT 3 3. While the display is blinking, press the TIME - Sanyo ICR-1000 | Instruction Manual - Page 22
display is blinking, press the TIME/SET button. "ERASE" appears briefly on the display. All memories in the selected folder are erased. "NEW" appears. Example: USER-01 LE 1/ 1 NEW Erasing Author ID 1. Press the ERASE button three times. The author blinks. Example: ERASE ID - Sanyo ICR-1000 | Instruction Manual - Page 23
" is blinking, press the TIME/SET button. "ERASE" appears briefly. All memories in all folders are erased. Example: USER-01 LE 1/ 1 NEW Note: The ERASE button will not function during recording or playback. When "ERASE ALL MEMORY" is implemented, all memories in all folders in the SD Card are erased - Sanyo ICR-1000 | Instruction Manual - Page 24
point you want to erase (Point A). The elapsed playing time blinks. Example: USER-02 LE 1/ 5 0m08s 4. Press the ERASE button. "ERASE START" between A and B designated in partial erasing. • "Partial Erase" feature of ICR-1000 may not work properly on 512MB or greater SD Cards, due to the properties - Sanyo ICR-1000 | Instruction Manual - Page 25
ERASE GUARD Erase guard functions to prevent accidental erasure. 1. Press and hold the MENU/FOLDER button down at least 2 seconds in the stop mode. 2. Press the MENU/FOLDER button repeatedly to select "ERASE GUARD". 3. Press the TIME/SET button. "OFF" blinks. ERASE GUARD OFF 4. Press the + or - - Sanyo ICR-1000 | Instruction Manual - Page 26
is the same as "In the stop or power off mode" as above. And it goes back to the previous point and resumes playback. During recording mode: No sound (" " blinks on the display.) GB-25 [ENGLISH] - Sanyo ICR-1000 | Instruction Manual - Page 27
Windows Millennium Edition/2000 Professional/XP Professional/XP Home Edition operating system with USB port. • You must install Microsoft Windows Media Player Ver. 6.4 or later. • Do not connect the unit to your PC yet. PLAYING BACK/EDITING A DATA FILE RECORDED WITH YOUR PC Digital voice recordings - Sanyo ICR-1000 | Instruction Manual - Page 28
/XP Home Edition Windows 2000 Professional Windows is a registered trademark of Microsoft Corporation. Other system names and product names generally are the registered trademarks or trademarks of the respective development manufacturers. The symbols TM and (R) are not shown in this manual. GB-27 - Sanyo ICR-1000 | Instruction Manual - Page 29
the POWER switch to OFF. 2. Connect the unit to the PC using the USB cable (attached) as shown in the illustration. USB port USB cable DIGITAL I/O terminal Note: • When the unit is connected to the PC, none of the operating buttons on the unit work. • When using a new SD Card, "ERASE - Sanyo ICR-1000 | Instruction Manual - Page 30
is to take After connection, the following screen will appear (Windows XP only). - For Windows ME/2000, this operation is not needed. The screen shots are of Windows XP. Adjust your settings to match your PC's environment. In this manual, [Take no action] is selected, [Always do the selected action - Sanyo ICR-1000 | Instruction Manual - Page 31
Windows Explorer When the Digital Voice Recorder is connected to a PC by the USB connection cable, the data recorded on the SD Card can be displayed by Windows Explorer as data on a removable device. The Digital Voice Recorder records surfaces. SERVICE UNITED KINGDOM For online support and - Sanyo ICR-1000 | Instruction Manual - Page 32
TROUBLESHOOTING GUIDE SYMPTOM POSSIBLE CAUSE CORRECTIVE ACTION The unit does not operate. Cancel the erase guard. Refer to "ERASE GUARD".(See Page 24.) "CANNOT INSERT" appears. Insertion recording is not available. "MEMORY FULL" appears. The memory capacity is full. Erase unnecessary files. Refer - Sanyo ICR-1000 | Instruction Manual - Page 33
the SD Card once, then insert it again. If it does not work, "ERASE ALL MEMORY". (See Page 22.) "LIMITED TIME" appears. Recording time is more than 6 hours. Record on a new file. "LOCKED CARD" appears. The write-protect of SD Card is locked. Set the write-protect switch to "Unlock". (See page - Sanyo ICR-1000 | Instruction Manual - Page 34
Licensee's use of a single SANYO SOFTWARE PRODUCT ("the Software") under the terms and conditions set forth herein.The Software shall include, but without limitation, computer software and related media materials, printed materials (documents such as user manuals), and electronic documents whether - Sanyo ICR-1000 | Instruction Manual - Page 35
use of the Software and may not be deemed under any circumstances to constitute a sale of the Software itself. 1. Grant Software Licensee may use the Software only in a single computer or on a computer network ("the Computer", including without limitation, workstation, terminal, and/or other digital - Sanyo ICR-1000 | Instruction Manual - Page 36
loan the Software to any party(ies). • User support service by Licensor Licensor may choose to provide user support service in accordance with the Licensor's policy set out in User Manual, On-line of any and all rights and titles in the Software not specifically provided herein. GB-35 [ENGLISH] - Sanyo ICR-1000 | Instruction Manual - Page 37
, Licensee may make a single copy of the Software. Except as specifically provided herein, Licensee shall refrain from making copy of the Software or its incidental documents such as user manual in any manner whatsoever. 5. DISCLAIMER OF WARRANTY: THE SOFTWARE IS DEEMED ACCEPTED BY LICENSEE UPON IT - Sanyo ICR-1000 | Instruction Manual - Page 38
Licensee fails to comply with the terms and conditions herein. Licensee may also terminate this Agreement at any time by destroying the Software and Documentation and all copies thereof. The provisions of sections 2, 3, 4, 5, 6 and 7 shall survive any termination of this Agreement. GB-37 [ENGLISH - Sanyo ICR-1000 | Instruction Manual - Page 39
MIT DEM PC AUFGENOMMENEN DATEI ... 26 PC VERBINDUNG 28 REINIGEN DES GEHÄUSES 30 FEHLERSUCHE 32 BENUTZERLIZENZVEREINBARUNG 34 Ihr SANYO Produkt wurde entworfen und hergestellt mit qualitativ hochwertigen Materialien und Komponenten, die recycelt und wiederverwendet werden können. Dieses Symbol - Sanyo ICR-1000 | Instruction Manual - Page 40
VORSICHTSMASSNAHMEN • Entfernen Sie die SD-Karte niemals, wenn das Gerät in Betrieb genommen wird. Andernfalls können die SD-Karte, der Inhalt der Karte sowie das Gerät beschädigt werden. • Unterbrechen Sie sofort die Aufnahme und legen Sie neue Batterien ein, wenn die Balken in der Batterie- - Sanyo ICR-1000 | Instruction Manual - Page 41
FOLDER) 11 7. Schnellvorlauf-/ Schnellrücklauftasten 7 (F, E) 8. Taste Datei erstellen/Pause 8 (CREATE FILE) 10 9. Digitale I/O-Buchsenabdeckung 9 (DIGITAL I/O) 10. Eingebauter Lautsprecher 11. Löschtaste (ERASE) 12. Index/Löschtaste (INDEX/CANCEL) 13. SD-Kartenfachdeckel 14. Display - Sanyo ICR-1000 | Instruction Manual - Page 42
123 4 5 6 15 16 VAS 17 INSERT F REC 7 E 8 REC DATE TIME HQ SP LP 9 10 18 19 15. Ein/Aus Schalter (POWER) 16. Aufnahmemodusschalter (REC MODE) 17. Schalter für Wiedergabegesch- windigkeit (SPEED CONTROL) 18. Batteriefachdeckel 19. Buchse externes Netzteil (EXT DC 3V, Geräteunterseite) - Sanyo ICR-1000 | Instruction Manual - Page 43
SPANNUNGSVERSORGUNG Batterien 1. Öffnen Sie den Batteriefachdeckel. 2. Legen Sie die zwei "AAA/LR03/HP16" Batterien ein (angebracht). Achten Sie dabei auf die richtige Polung. 1 2 Batterie-Anzeige ( ) Der Zustand der Batterien wird mit schwarzen Balken angezeigt. Die schwarzen Balken zeigen den - Sanyo ICR-1000 | Instruction Manual - Page 44
SD-KARTE • Wenn die neue SD-Karte benutzt wird, muss zuvor "ERASE ALL MEMORY" (Gesamtspeicher löschen) ausgeführt werden. (Siehe Seite 22.) • Andere SD-Karten, als die mit diesem Gerät formatierten, können nicht benutzt werden. Einlegen der SD-Karte 1. Öffnen Sie den SD-Karteneinschub. 2. Prüfen - Sanyo ICR-1000 | Instruction Manual - Page 45
POWER-Schalter (Geräterückseite) auf die Position ON, um das Gerät einzuschalten. Das Gerät ist nun im Stand-By Modus. Beispiel: USER-01 Autorname Ordnername BU 1/ 1 Aktuelle Dateinummer NEW Gesamte Dateianzahl Stellen Sie den POWER-Schalter im Stoppmodus auf OFF, um das Gerät auszuschalten - Sanyo ICR-1000 | Instruction Manual - Page 46
EINSTELLEN DER UHRZEIT UND DES DATUMS 1. Schieben Sie den Bedienungsschalter auf "STOP". 2. Die MENU/FOLDER-Taste im Stoppmodus für mindestens 2 Sekunden drücken und gedrückt halten. "AUTHOR" erscheint. 3. Drücken Sie mehrmals die MENU/FOLDER-Taste, bis das Datum- und Zeitdisplay erscheint. - Sanyo ICR-1000 | Instruction Manual - Page 47
v OT Anwählen des Menüs 1. Die MENU/FOLDER-Taste im Stoppmodus für mindestens 2 Sekunden drücken und gedrückt halten. Beispiel: AUTHOR ID01 ID Nummer USER-01 Autorname 2. Drücken Sie zum Anwählen des gewünschten Menüs mehrmals die MENU/FOLDER-Taste. Bei jeder Betätigung dieser Taste ändert - Sanyo ICR-1000 | Instruction Manual - Page 48
NEW Verschiedene Menü-Modi AUTHOR: Auswählen der ID Nummer / Autorname ID01/USER-01 - ID99/USER-99 Hinweis: Der Autorname wird automatisch erstellt. Sie können die Änderung vornehmen, indem Sie die PC-Software verwenden, welche der CDROM beigelegt wurde. EDIT: Anwählen des Editiermodus OVER WRITE - Sanyo ICR-1000 | Instruction Manual - Page 49
VAS: Auswählen des stimmenaktiviertes Systemmodus OFF: Zum manuellen Starten und Stoppen der Aufnahme ON: Die Aufnahme beginnt, wenn das Mikrofon Töne aufnimmt und stoppt automatisch bei Sprechpausen. "VAS" erscheint. Stellen Sie die Mikrofon-Empfindlichkeit beim Beginn von Aufnahmen mit der Taste F - Sanyo ICR-1000 | Instruction Manual - Page 50
BEEP: Auswählen des Signalton-Modus ON: Bei jeder Betätigung einer Betriebstaste ertönt ein Signalton. OFF: Kein Signalton ERASE GUARD: Auswählen des Schreibschutz Modus OFF: Sie können die Daten löschen. ON: Sie können die Daten nicht löschen. (" " erscheint auf dem Display.) 12/24 (Siehe Seite 8.) - Sanyo ICR-1000 | Instruction Manual - Page 51
. 4. Stellen Sie den Betriebsschalter auf DICT, um die Aufnahme zu starten. Die Aufnahmeanzeige leuchtet auf, und "REC" erscheint auf dem Display. Beispiel: USER-01 LE 1/ 1 0m01s 5. Stellen Sie den Betriebsschalter auf STOP, um die Aufnahme jederzeit zu stoppen. Betriebsschalter [DEUTSCH] D-13 - Sanyo ICR-1000 | Instruction Manual - Page 52
, um mit der Aufnahme fortzufahren. Erstellen einer neuen Dateinummer Drücken Sie im Stoppmodus die CREATE FILE-Taste. Die neue Dateinummer erscheint. Beispiel: USER-01 USER-01 LE 1/ 1 x LE 2/ 2 END NEW Hinweis: Dieses Gerät kann bis zu 6 Stunden in einer Datei aufnehmen. D-14 [DEUTSCH - Sanyo ICR-1000 | Instruction Manual - Page 53
an der END-Stelle. • Wenn Sie im Stoppmodus die INDEX/CANCEL-Taste drücken, können Sie zwischen "OVER WRITE" oder "INSERT" Editiermodus wechseln. • Bei "Insertion recording" (Einfügen von aufnahmen) kann die Startposition geringfügig verrückt werden. [DEUTSCH] D-15 - Sanyo ICR-1000 | Instruction Manual - Page 54
) und "Partial Erase" (Teillöschung) des ICR-1000 arbeiten eventuell nicht korrekt bei SDKartenkapazitäten von 512 MB und darüber. Dies wird den Eigenschaften der SD-Karten mit höherer Kapazität zugeschrieben. Alle anderen Funktionen des Recorders arbeiten bei allen SD-Kartengrößen problemlos - Sanyo ICR-1000 | Instruction Manual - Page 55
die F - oder E -Taste, um die gewünschte Datei auszuwählen. 4. Schieben Sie den Betriebsschalter auf PLAY, um die Wiedergabe zu starten. Beispiel: USER-01 BU 2/ 3 0m01s 5. Stellen Sie die + oder - VOLUME-Taste beliebig ein. • "END" erscheint auf dem Display, wenn die Wiedergabe gestoppt wird - Sanyo ICR-1000 | Instruction Manual - Page 56
Dateisuchlauf Wenn Sie die F - oder E -Taste während der Wiedergabe drücken, startet das Gerät den Vorwärts- oder Rückwärts-Suchlauf mit hoher Geschwindigkeit während die Taste gedrückt ist. Wenn Sie die Taste loslassen, wird die Wiedergabe fortgesetzt. Diese Tasten können auch im Stoppmodus - Sanyo ICR-1000 | Instruction Manual - Page 57
Aufnahmemodus: Verbleibende Aufnahmezeit v Aktuelles Datum/Uhrzeit v Es erscheint wieder das Original-Display Display-Beispiel noch verbleibender Aufnahmezeit: Autor USER-01 REMAIN 1h24m Verbleibende Aufnahmezeit Hinweis: • Wenn die Restaufnahmedauer mehr als eine Stunde beträgt, wird sie als - Sanyo ICR-1000 | Instruction Manual - Page 58
-Taste drücken. Löschen einer Datei 1. Drücken Sie die F - oder E -Taste, um die Datei, die gelöscht werden soll, auszuwählen. Beispiel: USER-01 LE 3/ 5 0m09s 2. Drücken Sie einmal die ERASE-Taste. Die Dateinummer blinkt. Beispiel: ERASE FILE LECT 3 3. Drücken Sie, während das Display blinkt - Sanyo ICR-1000 | Instruction Manual - Page 59
Display blinkt, die TIME/SET-Taste. "ERASE" erscheint kurz auf dem Display. Alle Speicher in dem angewählten Ordner werden gelöscht. "NEW" erscheint. Beispiel: USER-01 LE 1/ 1 NEW Löschen einer Autor ID 1. Drücken Sie dreimal die ERASE-Taste. Der Autor blinkt. Beispiel: ERASE ID - Sanyo ICR-1000 | Instruction Manual - Page 60
Sie, während "ERASE ALL MEMORY" blinkt, die TIME/SET- Taste. "ERASE" erscheint kurz. Alle Speicher werden in jedem Ordner gelöscht. Beispiel: USER-01 LE 1/ 1 NEW Hinweis: Während der Aufnahme oder Wiedergabe ist die ERASE-Taste außer Funktion. Wenn "ERASE ALL MEMORY" (Gesamtspeicher löschen) ausgef - Sanyo ICR-1000 | Instruction Manual - Page 61
Löschen beginnen möchten (Punkt A). Die bereits abgelaufene Wiedergabezeit blinkt. Beispiel: USER-02 LE 1/ 5 0m08s 4. Drücken Sie die ERASE-Taste. "ERASE kommen. * Die Funktion "Partial Erase" (Teillöschung) des ICR-1000 arbeitet eventuell nicht korrekt bei SD-Kartenkapazitäten von 512 MB und - Sanyo ICR-1000 | Instruction Manual - Page 62
SCHREIBSCHUTZ Der Schreibschutz schützt den Speicher vor versehentlichem Löschen. 1. Die MENU/FOLDER Taste im Stoppmodus für mindestens 2 Sekunden drücken und gedrückt halten. 2. Drücken Sie mehrmals die MENU/FOLDER-Taste, um "ERASE GUARD" auszuwählen. 3. Drücken Sie die TIME/SET-Taste. "OFF" blinkt - Sanyo ICR-1000 | Instruction Manual - Page 63
ALARM-TIMER Wenn die Alarm-Einschaltzeit erreicht wird, wird der Alarm wie unten gezeigt aktiviert: Im Stoppmodus oder im ausgeschaltetem Zustand: • Piepton für ca. 10 Sekunden. Im Wiedergabemodus: Der Vorgang ist der gleiche wie "Im Stoppmodus oder im ausgeschaltetem Zustand", siehe oben. Es - Sanyo ICR-1000 | Instruction Manual - Page 64
VOR DEM INSTALLIEREN DER ANWENDUNGSSOFTWARE • Sie benötigen Microsoft Windows Millennium Edition/2000 Professional/ XP Professional oder XP Home Edition und eine USB Schnittstelle auf Ihrem Computer. • Sie müssen den Windows Media Player Vers. 6.4 oder höher installiert haben. • Verbinden Sie das - Sanyo ICR-1000 | Instruction Manual - Page 65
Hinweis: Klicken Sie [Installation fortsetzen] oder [Ja] falls nachfolgende Anzeige erscheint. Windows XP Professional/XP Home Edition Windows 2000 Professional Windows ist ein eingetragenes Warenzeichen der Microsoft Corporation. Andere System- und Produktnamen sind normalerweise eingetragene - Sanyo ICR-1000 | Instruction Manual - Page 66
OFF. 2. Schließen Sie das Gerät wie in der Abbildung gezeigt mit dem USB- Kabel (angebracht) an den Computer an. USB Anschluss USB-Kabel DIGITAL I/O Buchse Hinweis: • Wenn das Gerät am PC angeschlossen ist, lassen sich die Bedienungstasten am Gerät nicht bedienen. • Wenn eine neue SD-Karte benutzt - Sanyo ICR-1000 | Instruction Manual - Page 67
ausw ä hlen Nach der Verbindung erscheint das folgende Fenster (nur Windows XP). - Unter Windows ME/2000 ist dieser Schritt nicht notwendig. Die Bildschirmdarstellungen stammen von Windows XP. Passen Sie Ihre Einstellungen entsprechend Ihrer PC Umgebung an. In diesem Handbuch wird [Keine - Sanyo ICR-1000 | Instruction Manual - Page 68
Hinsichtlich der Anzeige mit Windows Explorer Wenn der Digital Voice Recorder via USB-Kabel an einem PC angeschlossen ist, lassen sich die Daten auf der SD-Karte im Windows Explorer als Daten auf einem externen Speichermedium anzeigen. Der Digital Voice Recorder legt die Daten im Ordner "Voicerec" - Sanyo ICR-1000 | Instruction Manual - Page 69
SERVICE GERMANY (DEUTSCHLAND) Bei technischen Fragen zu der mitgelieferten SANYO Software oder bei einem technischen Defekt am Gerät finden Sie auf unserer Homepage im Servicebereich weitere Unterstützung. http://www.sbee.de Bei weitergehenden Fragen wenden - Sanyo ICR-1000 | Instruction Manual - Page 70
FEHLERSUCHE SYMPTOM MÖGLICHE URSACHE ABHILFEMASSNAHME Das Gerät funktioniert nicht. Die Batterien sind leer oder es wurden keine Batterien eingelegt. Legen Sie zwei neue "AAA/LR03/HP16"-Batterien ein. " " und "LOW BATT" erscheint. Die Batterien sind leer. Legen Sie zwei neue "AAA/LR03/HP16"- - Sanyo ICR-1000 | Instruction Manual - Page 71
SYMPTOM MÖGLICHE URSACHE ABHILFEMASSNAHME "FILE FULL" (Datei voll) erscheint. Es wurden bei einer Datei häufig "Einfügen von aufnahmen" und "Teillöschung" ausgeführt. Schließen Sie das Gerät an ihren PC an und speichern Sie die Backup-Daten. "NO CARD" erscheint. Die SD-Karte ist nicht eingelegt. - Sanyo ICR-1000 | Instruction Manual - Page 72
unabhängig davon, ob Sie eine Einzelperson oder ein Unternehmen sind, an SANYO Electric Co., Ltd. (hierin "Lizenzgeber" genannt) für die Benutzung eines einzelnen SANYO-SOFTWAREPRODUKTES (im weiteren "Software" genannt) als Lizenznehmer entsprechend den hierin gesetzten Ausführungen und Bestimmungen - Sanyo ICR-1000 | Instruction Manual - Page 73
gewährt dem Lizenznehmer lediglich die Lizenz für die einfache Benutzung und ist unter keinen Umständen dafür gedacht, den Verkauf der Software selbst zu erlauben. 1. Gewährung der Lizenz Der Lizenzgeber gewährt dem Lizenznehmer eine nicht exklusive, nicht unterlizenzfähige und nicht übertragbare - Sanyo ICR-1000 | Instruction Manual - Page 74
nicht preisgegeben wird. 3. Andere geistige Eigentumsrechte Der Lizenzgeber oder sein Lieferant besitzt alle Eigentumsrechte, -titel und -interessen an und zu der Software und seinen Dokumenten wie das Bedienungshandbuch und allen Kopien davon. Die Eigentumsrechte an allen Daten, die mit dieser - Sanyo ICR-1000 | Instruction Manual - Page 75
und Weise wie auch immer zu erstellen. 5. GARANTIEVERZICHTSERKLÄRUNG: ES WIRD ERACHTET, DASS DIE SOFTWARE VOM LIZENZNEHMER ENTSPRECHEND DER BENUTZUNG DURCH DEN LIZENZNEHMER AKZEPTIERT WIRD. DIE SOFTWARE WIRD DEM LIZENZNEHMER ÜBERLASSEN, SO WIE SIE IST UND OHNE GEWÄHRLEISTUNG IRGENDWELCHER ART BIS - Sanyo ICR-1000 | Instruction Manual - Page 76
Verlusten (inklusive der Gebühren für Anwälte und Sachverständige), die auf der Benutzung von irgendwelchem Inhalt der Software durch den Lizenznehmer basieren, die aus irgendwelchen geistigen Eigentumsansprüchen (inklusive Patente, Warenzeichen, Urheberrechte oder dem Bruch von Handelsgeheimnissen - Sanyo ICR-1000 | Instruction Manual - Page 77
sich nicht an die Ausführungen und Bestimmungen hierin hält. Der Lizenznehmer kann diese Vereinbarung jederzeit beenden, indem er die Software und die Dokumentation und alle Kopien davon zerstört. Die Bestimmungen der Abschnitte 2, 3, 4, 5, 6 und 7 bleiben nach der Beendigung dieser Vereinbarung - Sanyo ICR-1000 | Instruction Manual - Page 78
L'INSTALLATION DU LOGICIEL ........ 27 LECTURE/ÉDITION D'UN FICHIER DE DONNÉES ENREGISTRÉ AVEC VOTRE PC 27 CONNEXION AU PC 29 NETTOYAGE DU BOÎTIER 31 GUIDE DE DÉPANNAGE 32 ACCORD DE LICENCE 34 F-1 [FRANÇAIS] - Sanyo ICR-1000 | Instruction Manual - Page 79
Votre produit Sanyo est conçu et fabriqué avec des matèriels et des composants de qualité supérieure qui peuvent être recyclés et réutilisés. Ce symbole signifie que - Sanyo ICR-1000 | Instruction Manual - Page 80
PRÉCAUTIONS • Ne jamais retirer la Carte SD pendant le fonctionnement de l'appareil. Cela risque d'endommager la Carte SD, le contenu enregistré et l'appareil. • Si le pictogramme de rectangles indiquant l'état des piles ( ) disparaît pendant un enregistrement, arrêtez immédiatement l'opération - Sanyo ICR-1000 | Instruction Manual - Page 81
, MENU/ FOLDER) 6 7. Touches avance /retour rapide (F,E) 8. Touche Créer fichier/Pause 7 (CREATE FILE) 9. Couvercle de la prise E/S 8 numérique (DIGITAL I/O) 10. Haut-parleur intégré 9 11. Touche effacement (ERASE) 12. Touche Index/Annuler (INDEX/CANCEL) 13. Couvercle du compartiment de - Sanyo ICR-1000 | Instruction Manual - Page 82
123 4 5 6 15 16 VAS 17 INSERT F REC 7 E 8 REC DATE TIME HQ SP LP 9 10 18 19 15. Interrupteur alimentation (POWER) 16. Sélecteur mode enregistrement (REC MODE) 17. Touche vitesse de lecture (SPEED CONTROL) 18. Couvercle du compartiment des piles 19. Prise CC externe (EXT DC 3V, au bas de - Sanyo ICR-1000 | Instruction Manual - Page 83
DE... mauvais fonctionnement de l'appareil ou de l'affichage, effectuez les actions suivantes: 1. Ouvrez le logement des piles. 2. Appuyez sur le bouton RESET avec un stylo à bille fine ou un autre instrument. RESET 3. Reprenez l'opération. [FRANÇAIS] F-6 - Sanyo ICR-1000 | Instruction Manual - Page 84
é statique ou à des bruits d'origine électrique. • Les données enregistrées sur la carte peuvent ne pas être lues correctement sur un autre Digital Voice Recorder. • Si la carte n'est pas insérée, le message "NO CARD" apparaît dès la mise sous tension de l'appareil. • Lorsqu'une Carte SD est charg - Sanyo ICR-1000 | Instruction Manual - Page 85
Placez l'interrupteur POWER (au dos de l'appareil) sur la position ON pour le mettre sous tension. L'appareil est alors en mode veille. Exemple: USER-01 Nom de l'auteur Nom de dossier BU 1/ 1 Numéro de fichier actuel NEW Nombre total des fichiers Pour mettre l'appareil hors tension, placez - Sanyo ICR-1000 | Instruction Manual - Page 86
RÉGLAGE DE LA DATE ET DE L'HEURE 1. Faites glisser l'interrupteur de fonctionnement sur "STOP". 2. Appuyez sur la touche MENU/FOLDER et maintenez-la enfoncée pendant au moins 2 secondes en mode arrêt. "AUTHOR" s'affiche. 3. Appuyez sur la touche MENU/FOLDER plusieurs fois jusqu'à ce que la date - Sanyo ICR-1000 | Instruction Manual - Page 87
: Au bout de quelques secondes, la touche revient au mode veille sur l'affichage du dossier sélectionné. Le nom abrégé du dossier apparaît. Erase Exemple: USER-01 BU 1/ 1 NEW Le nom abrégé du dossier BUSI v BU LECT v LE OTHERS v OT Sélection de menu 1. Appuyez sur la touche MENU/FOLDER et - Sanyo ICR-1000 | Instruction Manual - Page 88
d'autres paramètres. 7. Appuyez sur la touche INDEX/CANCEL pour retourner à l'affichage d'origine. Exemple: USER-01 BU 1/ 1 NEW Modes de menu AUTHOR : Sélection d'un code ID/nom de l'auteur ID01/USER-01 - ID99/USER-99 Remarque: Le nom de l'auteur est automatiquement créé. Vous pouvez le changer en - Sanyo ICR-1000 | Instruction Manual - Page 89
VAS: Sélection du mode Système à commande vocale OFF: Démarre et arrête l'enregistrement manuellement ON: L'enregistrement commence dès que le microphone capte un son et il s'arrête automatiquement en même temps que le son. Le message"VAS" s'affiche. Appuyez sur la touche F ou E pour régler la - Sanyo ICR-1000 | Instruction Manual - Page 90
BEEP: Sélection du mode bip ON: Chaque fois que vous appuyez sur les touches d'opérations, vous entendrez un bip sonore. OFF: Pas de bip sonore ERASE GUARD: Sélection du mode de protection contre l'effacement OFF: Vous risquez d'effacer les données. ON: Vous ne pouvez pas effacer les données. (" " - Sanyo ICR-1000 | Instruction Manual - Page 91
siré. 4. Placez le sélecteur d'opérations sur DICT pour commencer l'enregistrement. L'indicateur d'enregistrement s'allume et le message "REC" s'affiche. Exemple: USER-01 LE 1/ 1 0m01s 5. Placez le sélecteur d'opérations sur STOP pour arrêter l'enregistrement à tout moment. Sélecteur d'opérations - Sanyo ICR-1000 | Instruction Manual - Page 92
éation d'un numéro pour un nouveau fichier Appuyez sur la touche CREATE FILE en mode arrêt. Le numéro du nouveau fichier apparaît. Exemple: USER-01 USER-01 LE 1/ 1 x LE 2/ 2 END NEW Remarque: Cet appareil peut enregistrer jusqu'à 6 heures dans un fichier. F-15 [FRANÇAIS] - Sanyo ICR-1000 | Instruction Manual - Page 93
ÉDITION D'ENREGISTREMENTS Enregistrement par écrasement Remarque: Cette méthode efface les données enregistrées antérieurement. 1. Sélectionnez le mode d'édition "OVER WRITE". (Voir page 11.) 2. Lisez le fichier. (Voir page 18.) Sélecteur d'opérations 3. Placez le sélecteur d'opérations sur STOP ( - Sanyo ICR-1000 | Instruction Manual - Page 94
Remarque: Les caractéristiques "Insertion d'enregistrement" et "Effacement partiel" du IC-1000 peuvent ne pas fonctionner correctement sur des Cartes SD de plus de 512 MO à cause des propriétés plus grandes des Cartes SD.Toutes les autres - Sanyo ICR-1000 | Instruction Manual - Page 95
F ou E plusieurs fois pour sélectionner le fichier désiré. 4. Placez le sélecteur d'opérations sur la position PLAY pour commencer la lecture. Exemple: USER-01 BU 2/ 3 0m01s 5. Appuyez sur la touche VOLUME (+ ou -) à votre gré. • A la fin de la lecture, le message "END" s'affiche. 6. Poussez - Sanyo ICR-1000 | Instruction Manual - Page 96
Recherche de fichier Selon la touche (F ou E)sur laquelle vous appuyez pendant la lecture et tant que vous la maintenez enfoncée, l'appareil effectuera une recherche accélérée en sens avant ou arrière. Lorsque vous relâchez la touche, la lecture reprend. Ces touches fonctionnent également en mode - Sanyo ICR-1000 | Instruction Manual - Page 97
suivantes: En mode enregistrement: Temps d'enregistrement restant v Jour/Heure v Affichage initial Exemple de temps d'enregistrement restant: Auteur USER-01 REMAIN 1h24m Temps d'enregistrement restant Remarque: • Lorsque la durée d'enregistrement restante est de plus d'une heure, elle - Sanyo ICR-1000 | Instruction Manual - Page 98
INDEX/CANCEL, puis sur la touche TIME/SET. Effacement d'un fichier 1. Appuyez sur la touche F ou E pour sélectionner le fichier à effacer. Exemple: USER-01 LE 3/ 5 0m09s 2. Appuyez une fois sur la touche ERASE. Le numéro du fichier clignote. Exemple: ERASE FILE LECT 3 3. Pendant que l'affichage - Sanyo ICR-1000 | Instruction Manual - Page 99
-01 LE 1/ 1 NEW Effacement de l'identifiant de l'auteur 1. Appuyez trois fois sur la touche ERASE. Le nom de l'auteur clignote. Exemple: ERASE ID USER-03 2. Pendant que l'affichage clignote, appuyez sur la touche TIME/SET. Le message "ERASE" s'affiche brièvement. L'identifiant de l'auteur est effac - Sanyo ICR-1000 | Instruction Manual - Page 100
" clignote, appuyez sur la touche TIME/SET. Le message "ERASE" s'affiche brièvement. Toutes les mémoires de tous les dossiers sont effacées. Exemple: USER-01 LE 1/ 1 NEW Note: La touche ERASE ne fonctionne pas pendant un enregistrement ou une lecture. Lorsque "EFFACER TOUTE LA MEMOIRE" est mis en - Sanyo ICR-1000 | Instruction Manual - Page 101
de l'effacement. (Point A) Le temps de lecture écoulé clignote. Exemple: USER-02 LE 1/ 5 0m08s 4. Appuyez sur la touche ERASE. Le message ée pour un effacement partiel. • Les caractéristiques "Effacement partiel" du IC-1000 peuvent ne pas fonctionner correctement sur des Cartes SD de plus de 512 MO - Sanyo ICR-1000 | Instruction Manual - Page 102
PROTECTION CONTRE L'EFFACEMENT Cette fonction permet d'empêcher un effacement involontaire. 1. Appuyez sur la touche MENU/FOLDER et maintenez-la enfoncée pendant au moins 2 secondes en mode arrêt. 2. Appuyez sur la touche MENU/FOLDER plusieurs fois pour sélectionner la fonction "ERASE GUARD". 3. - Sanyo ICR-1000 | Instruction Manual - Page 103
MINUTERIE DE L'ALARME A l'heure désignée pour le d'éclenchement de l'alarme, le message est activé de la manière indiquée ci-après: En mode arrêt ou hors tension: • Un bip est émis pendant environ 10 secondes. En mode lecture: L'opération se déroule de la même façon qu'en mode arrêt ou hors - Sanyo ICR-1000 | Instruction Manual - Page 104
/XP Edition Familiale et un port USB. • Installation de Microsoft Lecteur Windows Media, version 6.4 ou supérieure. • Ne connectez pas immédiatement . 3) Cliquez sur [OK]. 2. Suivez les instructions indiquées sur l'écran. 3. Lorsque l'installation est achevée, redémarrez Windows. F-27 [FRANÇAIS] - Sanyo ICR-1000 | Instruction Manual - Page 105
Remarque: Si l'écran ci-après apparaît, cliquez sur [Continuer] ou [Oui]. Windows XP Professionnel /XP Edition Familiale Windows 2000 Professionnel Windows est une marque déposée de Microsoft Corporation. Les autres noms de systèmes et de produits sont généralement des marques enregistrées ou des - Sanyo ICR-1000 | Instruction Manual - Page 106
la position OFF. 2. Connectez l'appareil au PC en utilisant le câble USB (joint) selon les indications de l'illustration. Port USB Prise DIGITAL I/O Câble USB Remarque: Lorsque l'appareil est connecté au PC, aucun des boutons de fonctionnement de l'appareil ne fonctionne. Lors de l'utilisation - Sanyo ICR-1000 | Instruction Manual - Page 107
ME/2000, cette opération n'est pas nécessaire. Les écrans sont ceux de Windows XP. Définissez vos paramètres en fonction de l'environnement de votre PC. Dans ce manuel, [Ne rien faire] est sélectionné, [Toujours effectuer I'action suivante] est - Sanyo ICR-1000 | Instruction Manual - Page 108
é à un PC au moyen d'un câble de connexion USB, les données enregistrées sur la Carte SD peuvent être affichées au moyen de Windows Explorer comme des données d'un dispositif amovible. L'enregistreur vocal numérique enregistre les données dans le dossier "Voicerec" dans la Carte SD. N'utilisez - Sanyo ICR-1000 | Instruction Manual - Page 109
GUIDE DE DÉPANNAGE SYMPTÔMES CAUSES POSSIBLES REMÈDES L'appareil ne fonctionne pas. Les piles sont déchargées ou ne sont pas installées. Mettez deux - Sanyo ICR-1000 | Instruction Manual - Page 110
SYMPTÔMES CAUSES POSSIBLES REMÈDES Le message "FILE FULL" s'affiche. L'enregistrement d'insertion et l'effacement partiel fréquents ont été effectués dans un fichier. Connectez votre PC puis enregistrez les données sauvegardées. Le message "NO CARD" apparaît. La Carte SD n'est pas insérée. - Sanyo ICR-1000 | Instruction Manual - Page 111
("le preneur de licence", individuel ou en tant que corporation) et SANYO Electric Co., Ltd. ("le donneur de licence") en ce qui concerne l'utilisation par le preneur de licence d'un seul PRODUIT LOGICIEL SANYO (ci-après dénommé "le logiciel") selon les termes et - Sanyo ICR-1000 | Instruction Manual - Page 112
Le logiciel couvert par cet accord est protégé par les conventions internationales, les traités sur les droits d'auteur et les lois et réglementations en vigueur. Cette licence constitue un octroi de licence au preneur de licence pour une simple utilisation du logiciel qui ne peut être vendu. 1. - Sanyo ICR-1000 | Instruction Manual - Page 113
technique") de temps à autre.Tout code de logiciel supplémentaire mis à la disposition du preneur de licence comme faisant partie du Support technique est considéré comme faisant partie du logiciel auxquel tous les termes et conditions de cet accord s'appliquent. Le donneur de licence a le droit - Sanyo ICR-1000 | Instruction Manual - Page 114
toutes les notices de propriété figurant dans l'original. Si un autre support original est nécessaire pour l'utilisation du logiciel sur un ordinateur stipulé EN AUCUN CAS LE DONNEUR DE LICENCE OU CES PRESTATAIRES DE SERVICE NE POURRONT ETRE TENUS POUR RESPONSABLES DES DOMMAGES DIRECTS, INDIRECTS, - Sanyo ICR-1000 | Instruction Manual - Page 115
CONNAISSANCE DE CETTE EVENTUALITE. LE DONNEUR DE LICENCE NE GARANTIT PAS QUE LE LOGICIEL NE CONTIENT PAS DE VIRUS OU DES DEFAUTS, LE LOGICIEL DE ROUTINE OU L'AUTRE LOGICIEL DESIGNE POUR LIMITER L'ACCES NON AUTORISE; OU POUR DESACTIVER, EFFACER OU DETERIORER AUTREMENT LE LOGICIEL, LE MATERIEL, OU LES - Sanyo ICR-1000 | Instruction Manual - Page 116
FRENTE A BORRADO 24 TEMPORIZADOR DE ALARMA 25 ANTES DE INSTALAR EL SOFTWARE DE APLICACIÓN 26 REPRODUCCIÓN/EDICIÓN DE UN FICHERO DE DATOS GRABADO ÍA DE SOLUCIÓN DE PROBLEMAS 31 CONTRATO DE LICENCIA 33 Los productos SANYO están diseñados y fabricados con materiales y componentes de alta calidad - Sanyo ICR-1000 | Instruction Manual - Page 117
son generalmente marcas comerciales registradas o marcas comerciales de sus respectivos fabricantes y desarrolladores.Los símbolos ™ y ® no se muestran en este manual. Accesorios Cable USB x 1 CD-ROM x 1 Funda x 1 Tarjeta SD (Inicializada) x 1 AAA/LR03/HP16 Pilas x 2 Notas sobre el ajuste del - Sanyo ICR-1000 | Instruction Manual - Page 118
/FOLDER) 7. Botones de avance y retroceso 6 (F,E) 8. Botón de crear fichero/pausa (CREATE FILE) 7 9. Tapa de terminales de entrada/ salida digital (DIGITAL I/O) 8 10. Altavoz interno 11. Botón de borrado (ERASE) 9 12. Botón de índice/cancelación (INDEX/CANCEL) 13. Tapa del compartimiento - Sanyo ICR-1000 | Instruction Manual - Page 119
123 4 5 6 15 16 VAS 17 INSERT F REC 7 E 8 REC DATE TIME HQ SP LP 9 10 18 19 15. Interruptor de encendido (POWER) 16. Interruptor del modo de grabación (REC MODE) 17. Interruptor de control de la velocidad de reproducción (SPEED CONTROL) 18. Tapa del compartimiento de las pilas 19. Toma de - Sanyo ICR-1000 | Instruction Manual - Page 120
ALIMENTACIÓN Pilas 1. Abra la tapa del compartimento de las pilas. 2. Coloque dos pilas "AAA/LR03/HP16" (suministrado). Observe que la polaridad sea correcta. 1 2 Indicador de las pilas ( ) La línea de rectángulos es el indicador de las pilas. Los rectángulos negros muestran el estado de las - Sanyo ICR-1000 | Instruction Manual - Page 121
lugares expuestos a la electricidad estática o ruido eléctrico. • Los datos grabados en la tarjeta puede que no funcionen correctamente con una grabadora digital distinta. • Si la tarjeta no está introducida, aparece "NO CARD" cuando se conecta la unidad. • Cuando se carga una Tarjeta SD, la unidad - Sanyo ICR-1000 | Instruction Manual - Page 122
úe el interruptor POWER (parte posterior de la unidad) en ON para conectar la unidad. La unidad se encuentra ahora en el modo en espera. Ejemplo: USER-01 Nombre del autor Nombre de la carpeta BU 1/ 1 Número de fichero actual NEW Número total de ficheros Para desconectar la unidad, sitúe el - Sanyo ICR-1000 | Instruction Manual - Page 123
AJUSTE DE LA FECHA Y HORA 1. Deslice el interruptor de funcionamiento hasta "STOP". 2. Mantenga pulsado el botón MENU/FOLDER al menos durante 2 segundos en el modo de parada. Aparece "AUTHOR". 3. Pulse el botón MENU/FOLDER repetidas veces hasta que aparezca la pantalla de la fecha y hora. - Sanyo ICR-1000 | Instruction Manual - Page 124
del menú 1. Mantenga pulsado el botón MENU/FOLDER al menos durante 2 segundos en el modo de parada. Ejemplo: AUTHOR ID01 Número de identificación USER-01 Nombre del autor 2. Pulse el botón MENU/FOLDER varias veces para seleccionar el menú deseado. Cada vez que pulse el botón, la pantalla de - Sanyo ICR-1000 | Instruction Manual - Page 125
1 NEW Varios modos de menú AUTHOR: Seleccionar el número de identificación/nombre del autor ID01/USER-01 - ID99/USER-99 Nota: El nombre del autor se crea automáticamente. Puede cambiar esto utilizando el software de PC incluido en el CD-ROM. EDIT: Selección del modo de edición OVER WRITE: Grabaci - Sanyo ICR-1000 | Instruction Manual - Page 126
VAS: Selección del modo del sistema activado por voz OFF: Para iniciar y detener la grabación manualmente ON: La grabación comienza cuando el micrófono capta el sonido y se detiene automáticamente cuando el sonido cesa. Aparece "VAS". Pulse el botón F o E para definir la sensibilidad del micrófono - Sanyo ICR-1000 | Instruction Manual - Page 127
BEEP: Selección del modo de pitido ON: Cada vez que se pulsen los botones de funcionamiento, se oirá un pitido. OFF: No se oye ningún pitido ERASE GUARD: Selección del modo de protección frente a borrado OFF: Puede borrar los datos. ON: No puede borrar los datos. (" " aparece en la pantalla). 12/24 - Sanyo ICR-1000 | Instruction Manual - Page 128
de funcionamiento en la posición DICT para iniciar la grabación. El indicador de grabación se ilumina y "REC" aparece en la pantalla. Ejemplo: USER-01 LE 1/ 1 0m01s 5. Sitúe el interruptor de funcionamiento en la posición STOP para detener la grabación en cualquier momento. Interruptor de - Sanyo ICR-1000 | Instruction Manual - Page 129
botón. Creación de un número de fichero nuevo Pulse el botón CREATE FILE en el modo de parada. Aparece el número de fichero nuevo. Ejemplo: USER-01 USER-01 LE 1/ 1 x LE 2/ 2 END NEW Nota: Esta unidad puede grabar un máximo de 6 horas en un archivo. [ESPAÑOL] E-14 - Sanyo ICR-1000 | Instruction Manual - Page 130
EDICIÓN DE LOS DATOS GRABADOS Grabación de sobrescritura Nota: Se borrará el material grabado anteriormente. 1. Seleccione el modo de edición "OVER WRITE". (Consulte la Interruptor de funcionamiento página 10). 2. Reproduzca el fichero. (Consulte la página 17). 3. Sitúe el interruptor de - Sanyo ICR-1000 | Instruction Manual - Page 131
Nota: Las funciones "Grabación de inserción" y "Borrado parcial" del ICR-1000 puede que no funcionen correctamente con Tarjetas SD de 512 MB o más, debido a las propiedades de las Tarjetas SD de mayor capacidad. Todas las demás funciones - Sanyo ICR-1000 | Instruction Manual - Page 132
E varias veces para seleccionar el fichero deseado. 4. Sitúe el interruptor de funcionamiento en la posición PLAY para iniciar la reproducción. Ejemplo: USER-01 BU 2/ 3 0m01s 5. Pulse el botón VOLUME + o - según desee. • Cuando se detiene la reproducción, aparece "END" en la pantalla. 6. Sit - Sanyo ICR-1000 | Instruction Manual - Page 133
Búsqueda de un fichero Si se pulsa el botón F o E durante la reproducción, la unidad buscará a alta velocidad en la dirección de avance o retroceso mientras el botón se mantiene pulsado. Cuando se suelte el botón, continuará la reproducción. Estos botones también se utilizan en el modo de parada. - Sanyo ICR-1000 | Instruction Manual - Page 134
el modo de grabación: Tiempo de grabación restante v Día/hora actual v Volver a la pantalla principal Ejemplo del tiempo de grabación restante: Autor USER-01 REMAIN 1h24m Tiempo de grabación restante Nota: • Cuando el tiempo de grabación restante es superior a una hora, éste se visualiza como - Sanyo ICR-1000 | Instruction Manual - Page 135
/ CANCEL antes de pulsar el botón TIME/SET. Borrado de un fichero 1. Pulse el botón F o E para seleccionar el fichero que desea borrar. Ejemplo: USER-01 LE 3/ 5 0m09s 2. Pulse el botón ERASE una vez. El número del fichero parpadea. Ejemplo: ERASE FILE LECT 3 3. Mientras la pantalla parpadea - Sanyo ICR-1000 | Instruction Manual - Page 136
-01 LE 1/ 1 NEW Borrado de la identificación del autor 1. Pulse el botón ERASE tres veces. El autor parpadea. Ejemplo: ERASE ID USER-03 2. Mientras la pantalla parpadea, pulse el botón TIME/SET. En la pantalla de visualización aparece brevemente "ERASE". La identificación del autor se borra. Ejemplo - Sanyo ICR-1000 | Instruction Manual - Page 137
la pantalla "ERASE ALL MEMORY" parpadea, pulse el botón TIME/SET. Aparecerá brevemente "ERASE". Se borran todas las memorias de todas las carpetas. Ejemplo: USER-01 LE 1/ 1 NEW Nota: El botón ERASE no funcionará durante la grabación o reproducción. Cuando se realice el "BORRADO DE TODA LA MEMORIA - Sanyo ICR-1000 | Instruction Manual - Page 138
cual desea borrar (punto A). El tiempo de reproducción transcurrido parpadea. Ejemplo: USER-02 LE 1/ 5 0m08s 4. Pulse el botón ERASE. "ERASE START" designado en el borrado parcial. • La función "Borrado parcial" del ICR-1000 puede que no funcione correctamente con Tarjetas SD de 512 MB o más, - Sanyo ICR-1000 | Instruction Manual - Page 139
PROTECCIÓN FRENTE A BORRADO Funciones de protección frente a borrado para evitar un borrado accidental. 1. Mantenga pulsado el botón MENU/FOLDER al menos durante 2 segundos en el modo de parada. 2. Pulse el botón MENU/FOLDER varias veces para seleccionar "ERASE GUARD". 3. Pulse el botón TIME/SET. " - Sanyo ICR-1000 | Instruction Manual - Page 140
TEMPORIZADOR DE ALARMA Cuando se alcance la hora de conexión de alarma, la alarma se activará según se muestra a continuación. En el modo de parada o de desconexión: • Pitido durante 10 segundos aproximadamente. Durante el modo de reproducción: El funcionamiento coincide con el descrito - Sanyo ICR-1000 | Instruction Manual - Page 141
ANTES DE INSTALAR EL SOFTWARE DE APLICACIÓN • El PC deberá ejecutar el sistema operativo Microsoft Windows Millennium Edition/2000 Professional/XP Professional/XP Home Edition y disponer de un puerto USB. • Deberá instalar el Reproductor de Windows Media versión 6.4 o posterior. • No conecte todavía - Sanyo ICR-1000 | Instruction Manual - Page 142
2000 Professional Windows es una marca comercial registrada de Microsoft Corporation. Otros nombres de sistemas y productos son generalmente marcas comerciales registradas o marcas comerciales de sus respectivos fabricantes y desarrolladores. Los símbolos TM y (R) no se muestran en este manual - Sanyo ICR-1000 | Instruction Manual - Page 143
POWER en OFF. 2. Conecte la unidad al PC utilizando el cable USB (suministrado) según se muestra en la ilustración. Puerto USB Cable USB Terminal DIGITAL I/O Nota: Cuando la unidad esté conectada al PC no funcionará ninguno de los botones de operación de la unidad. Cuando utilice una Tarjeta SD - Sanyo ICR-1000 | Instruction Manual - Page 144
Tras la conexión aparecerá la siguiente pantalla (sólo en Windows XP). - Este paso no es necesario en Windows ME/2000. Las pantallas siguientes son de Windows XP. Ajuste los parámetros para que coincidan con el entorno de su PC. En este manual, se ha seleccionado [No realizar ninguna acción], se ha - Sanyo ICR-1000 | Instruction Manual - Page 145
PC mediante el cable de conexión USB, los datos grabados en la Tarjeta SD podrán ser visualizados mediante Windows Explorer como datos de un dispositivo desmontable. La grabadora de voz digital graba los datos en la carpeta "Voicerec" de la Tarjeta SD. No utilice el Explorer para editar la carpeta - Sanyo ICR-1000 | Instruction Manual - Page 146
GUÍA DE SOLUCIÓN DE PROBLEMAS SÍNTOMA POSIBLE CAUSA ACCIÓN CORRECTORA La unidad no se pone en funcionamiento. Las pilas están descargadas o no están colocadas. Coloque dos pilas "AAA/LR03/HP16" nuevas. Aparecen " " y "LOW BATT". Las pilas están descargadas. Coloque dos pilas "AAA/LR03/HP16" nuevas. - Sanyo ICR-1000 | Instruction Manual - Page 147
SÍNTOMA POSIBLE CAUSA ACCIÓN CORRECTORA Aparece "FILE FULL". Se ha hecho frecuentemente en un archivo la grabación de inserción y el borrado parcial. Conecte a su PC después de guardar los datos de la copia de seguridad. Aparece "NO CARD". La Tarjeta SD no está introducida. Introduzca la Tarjeta SD. - Sanyo ICR-1000 | Instruction Manual - Page 148
PRODUCTO DE SOFTWARE SANYO ("el Software") de acuerdo con los términos y condiciones establecidos en el presente Contrato. El Software incluye, sin limitación, software de computadora y materiales en medios relacionados, materiales impresos (documentos tales como manuales de usuario) y documentos - Sanyo ICR-1000 | Instruction Manual - Page 149
Software de sistema El Licenciatario puede usar el Software sólo en una computadora individual o en una red de computadoras ("la Computadora", incluyendo pero no limitándose a una estación de trabajo, terminal y/u otro dispositivo digital separación o división del Software La presente licencia se - Sanyo ICR-1000 | Instruction Manual - Page 150
de propiedad intelectual El Otorgante de Licencia o su distribuidor es el propietario de todos los derechos, títulos e intereses relacionados con el Software y los documentos asociados, tales como el manual del usuario, y de todas las copias de los mismos. Todos los datos procesador con este - Sanyo ICR-1000 | Instruction Manual - Page 151
se especifique los contrario, el Licenciatario deberá abstenerse de hacer copias del Software o de los documentos asociados, tales como el manual de usuario, de cualquier forma posible. 5. RECHAZO DE GARANTÍAS: EL SOFTWARE SE CONSIDERA ACEPTADO POR EL LICENCIATARIO CUANDO ÉSTE HACE USO DEL MISMO - Sanyo ICR-1000 | Instruction Manual - Page 152
no cumple con los términos y condiciones del mismo. El Licenciatario también podrá poner término a este Contrato en cualquier momento destruyendo el Software y la documentación y todas las copias de éstos. Las disposiciones de las secciones 2, 3, 4, 5, 6 y 7 seguirán en vigor una vez que se haya - Sanyo ICR-1000 | Instruction Manual - Page 153
MEMO - Sanyo ICR-1000 | Instruction Manual - Page 154
MEMO - Sanyo ICR-1000 | Instruction Manual - Page 155
MEMO - Sanyo ICR-1000 | Instruction Manual - Page 156
source DC: DC 3V ("AAA/LR03/HP16" x 2) IMPORTANT INFORMATION Because its products are subject to continuous improvement, SANYO reserves the rights to modify product designs and specifications without notice and without incurring any obligation. This set complies with the EMC Directive 89/336 and
-
 1
1 -
 2
2 -
 3
3 -
 4
4 -
 5
5 -
 6
6 -
 7
7 -
8
-
9
-
10
-
11
-
12
-
13
-
14
-
15
-
16
-
17
-
18
-
19
-
20
-
21
-
22
-
23
-
24
-
25
-
26
-
27
-
28
-
29
-
30
-
31
-
32
-
33
-
34
-
35
-
36
-
37
-
38
-
39
-
40
-
41
-
42
-
43
-
44
-
45
-
46
-
47
-
48
-
49
-
50
-
51
-
52
-
53
-
54
-
55
-
56
-
57
-
58
-
59
-
60
-
61
-
62
-
63
-
64
-
65
-
66
-
67
-
68
-
69
-
70
-
71
-
72
-
73
-
74
-
75
-
76
-
77
-
78
-
79
-
80
-
81
-
82
-
83
-
84
-
85
-
86
-
87
-
88
-
89
-
90
-
91
-
92
-
93
-
94
-
95
-
96
-
97
-
98
-
99
-
100
-
101
-
102
-
103
-
104
-
105
-
106
-
107
-
108
-
109
-
110
-
111
-
112
-
113
-
114
-
115
-
116
-
117
-
118
-
119
-
120
-
121
-
122
-
123
-
124
-
125
-
126
-
127
-
128
-
129
-
130
-
131
-
132
-
133
-
134
-
135
-
136
-
137
-
138
-
139
-
140
-
141
-
142
-
143
-
144
-
145
-
146
-
147
-
148
-
149
-
150
-
151
-
152
-
153
-
154
-
155
-
156
 |
 |
INSTRUCTION MANUAL
Digital Voice Recorder
ICR-1000
GB
English
D
Deutsch
F
Français
E
Español