Sanyo PLC-XP100L Owners Manual - Page 49
Capture, Logo select, After capturing the projected image, go to the Logo select
 |
UPC - 086483068263
View all Sanyo PLC-XP100L manuals
Add to My Manuals
Save this manual to your list of manuals |
Page 49 highlights
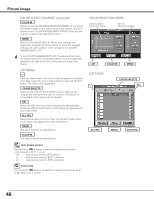
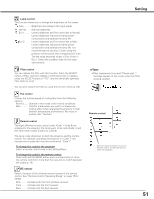
Setting Logo This function allows you to customize the screen logo with Logo select, Capture, and Logo PIN code lock functions. ✔Note: • When "On" is selected in the Logo PIN code lock function, Logo select and Capture functions cannot be selected. Logo select This function decides on the starting-up display from among the following options. User . . . . Show the image you captured. Default . . Show the factory-set logo. Off . . . . . Show the countdown display only. Capture This function enables you to capture an image being projected to use it for a starting-up display or interval of presentations. Select Capture and press the SELECT button. A confirmation box appears and select [Yes] to capture the projected image. After capturing the projected image, go to the Logo select function and set it to "User". Then the captured image will be displayed the next time you turn on the projector. To cancel the Capture function, select [No]. ✔Note: • Before capturing an image, select "Standard" in the Image Select Menu to capture a proper image. (pp. 38, 42) • A signal from a computer can be captured up to XGA (1024 X 768). • Certain signals may not be captured properly. • When capturing the image that has been adjusted by the Keystone function, the adjusted data is automatically reset and the projector captures an image without keystone correction. • When starting to capture a new image, the previously stored image is cleared even if you cancel the capturing. • Once you exit the Logo Menu after setting the Logo lock to "On," you are required to enter the PIN code every attempting to change the Logo setting. • User cannot be selected when the image is not captured. Logo Set the red frame pointer to the item and press the SELECT button. Select [Yes] to capture the projected image. Select [Yes] to stop capturing. Capture Set the red frame pointer to the item and press the SELECT button. 49
-
 1
1 -
2
-
3
-
4
-
5
-
6
-
7
-
8
-
9
-
10
-
11
-
12
-
13
-
14
-
15
-
16
-
17
-
18
-
19
-
20
-
21
-
22
-
23
-
24
-
25
-
26
-
27
-
28
-
29
-
30
-
31
-
32
-
33
-
34
-
35
-
36
-
37
-
38
-
39
-
40
-
41
-
42
-
43
-
 44
44 -
 45
45 -
 46
46 -
 47
47 -
 48
48 -
 49
49 -
 50
50 -
 51
51 -
 52
52 -
 53
53 -
 54
54 -
55
-
56
-
57
-
58
-
59
-
60
-
61
-
62
-
63
-
64
-
65
-
66
-
67
-
68
-
69
-
70
-
71
-
72
-
73
-
74
-
75
-
76
-
77
-
78
-
79
-
80
-
81
 |
 |
