Sanyo PLC XU115 Instruction Manual, PLC-XU115 Network Set Up - Page 36
Configuring security with the projector, Notes when entering characters
 |
UPC - 086483071393
View all Sanyo PLC XU115 manuals
Add to My Manuals
Save this manual to your list of manuals |
Page 36 highlights
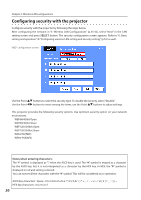
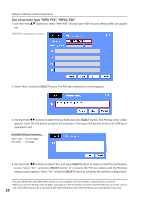
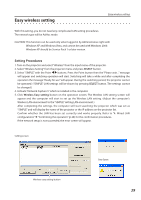
Chapter 5 Wireless LAN configurations Configuring security with the projector Configure security with the projector by following the steps below. After configuring the network in "5. Wireless LAN Configurations" (p.33-42), select "Next" in the LAN setting screen and press SELECT button. The security configuration screen appears. Refer to "6. Basic setting and operation" ➔ "Configuring wireless LAN setting and security setting" (p.53) as well. WEP configuration screen Use the Point ed buttons to select the security type. To disable the security, select "Disable." Use the Point 7 8 buttons to move among the items; use the Point ed buttons to adjust settings. This projector provides the following security options. Use optimum security option on your network environment. WEP64(40)bit Open WEP64(40)bit Share WEP128(104)bit Open WEP128(104)bit Share WPA-PSK(TKIP) WPA2-PSK(AES) Notes when entering characters: The "¥" symbol is displayed as "\" when the ASCII key is used. The "]" symbol is treated as a character by the ASCII key, but it is not interpreted as a character by the HEX key. In HEX, the "]" symbol is displayed in red and setting is denied. You can not set all the characters with the "]" symbol. This will be considered as no operation. ASCII key characters : Space - 0 to 9 A to Z a to z HEX key characters : 0 to 9 a to f 36
-
 1
1 -
2
-
3
-
4
-
5
-
6
-
7
-
8
-
9
-
10
-
11
-
12
-
13
-
14
-
15
-
16
-
17
-
18
-
19
-
20
-
21
-
22
-
23
-
24
-
25
-
26
-
27
-
28
-
29
-
30
-
 31
31 -
 32
32 -
 33
33 -
 34
34 -
 35
35 -
 36
36 -
 37
37 -
 38
38 -
 39
39 -
 40
40 -
 41
41 -
42
-
43
-
44
-
45
-
46
-
47
-
48
-
49
-
50
-
51
-
52
-
53
-
54
-
55
-
56
-
57
-
58
-
59
-
60
-
61
-
62
-
63
-
64
-
65
-
66
-
67
-
68
-
69
-
70
-
71
-
72
-
73
-
74
-
75
-
76
-
77
-
78
-
79
-
80
-
81
-
82
-
83
-
84
-
85
-
86
-
87
-
88
-
89
-
90
-
91
-
92
-
93
-
94
-
95
-
96
-
97
-
98
-
99
-
100
-
101
-
102
-
103
-
104
-
105
-
106
-
107
-
108
-
109
-
110
-
111
-
112
-
113
-
114
-
115
-
116
-
117
-
118
-
119
-
120
-
121
-
122
-
123
-
124
-
125
-
126
-
127
-
128
-
129
-
130
-
131
-
132
-
133
-
134
-
135
-
136
-
137
-
138
-
139
-
140
-
141
-
142
-
143
-
144
 |
 |
