Sanyo VCC-HD4600 VCC-HD4600 Manual - Page 12
Basic Connections, Control Terminal Connections, Connection to 24 VAC power supply - manual
 |
UPC - 086483075704
View all Sanyo VCC-HD4600 manuals
Add to My Manuals
Save this manual to your list of manuals |
Page 12 highlights
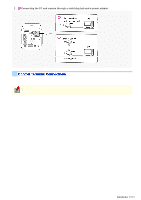
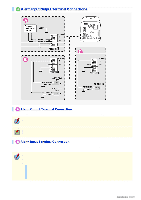
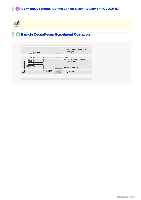
Perform the following connections according to the installation environment and application of your camera. Basic Connections A Power Connection B High-Definition Monitor Connection C Monitor connection for video adjustment D Network Connection Control Terminal Connections A Alarm Input/Output Terminal Connections B Remote Zoom/Focus Adjustment Operation Before attempting the following connections, be sure to turn off all components of your system. Improper connection may cause smoke or failures. Before attempting to connect each system component, carefully read the instruction manual that comes with it to familiarize yourself with the correct connection procedure. Attach the supplied power connector into the power terminal. Loosen the screws on the side face of the connector, connect the power cables to it, and tighten the screws. Connection method depends on the power supply (24 VAC or 12 VDC). A Connection to 24 VAC power supply Although the power terminals have no polarity, the earth grounding wire must be connected to the COM (GND) terminal. Introduction 12/23
-
 1
1 -
2
-
3
-
4
-
5
-
6
-
 7
7 -
 8
8 -
 9
9 -
 10
10 -
 11
11 -
 12
12 -
 13
13 -
 14
14 -
 15
15 -
 16
16 -
 17
17 -
18
-
19
-
20
-
21
-
22
-
23
-
24
-
25
-
26
-
27
-
28
-
29
-
30
-
31
-
32
-
33
-
34
-
35
-
36
-
37
-
38
-
39
-
40
-
41
-
42
-
43
-
44
-
45
-
46
-
47
-
48
-
49
-
50
-
51
-
52
-
53
-
54
-
55
-
56
-
57
-
58
-
59
-
60
-
61
-
62
-
63
-
64
-
65
-
66
-
67
-
68
-
69
-
70
-
71
-
72
-
73
-
74
-
75
-
76
-
77
-
78
-
79
-
80
-
81
-
82
-
83
-
84
-
85
-
86
-
87
-
88
-
89
-
90
-
91
-
92
-
93
-
94
-
95
-
96
-
97
-
98
-
99
-
100
-
101
-
102
-
103
-
104
-
105
-
106
-
107
-
108
-
109
-
110
-
111
-
112
-
113
-
114
-
115
-
116
-
117
-
118
-
119
-
120
-
121
-
122
-
123
-
124
-
125
-
126
-
127
-
128
-
129
-
130
-
131
-
132
-
133
-
134
-
135
-
136
-
137
-
138
-
139
-
140
-
141
-
142
-
143
-
144
-
145
-
146
-
147
-
148
-
149
-
150
-
151
-
152
-
153
-
154
-
155
-
156
-
157
-
158
-
159
 |
 |
