Sanyo VCC-HD4600 VCC-HD4600 Manual - Page 32
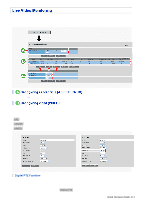
Click, in the configuration menu. - software download
 |
UPC - 086483075704
View all Sanyo VCC-HD4600 manuals
Add to My Manuals
Save this manual to your list of manuals |
Page 32 highlights
Before recording video, install a recording medium (SD memory card or external hard disk) on the camera and perform the following procedures. You can record the following videos or information on the media. Normal recording Alarm video recording Backup video recording in event of a network failure Manual video recording triggered by the emergency recording button Access and system logs In cases where both an SD memory card and an external hard disk drive are simultaneously connected, the hard disk drive takes precedence. The recorded video cannot be played back on the camera. To play back the recorded video, use the supplied downloader software (HDC Downloader) and playback software (DLViewer) to play back the video on the PC. 1 Click SD/HDD in the configuration menu. On the SD/HDD screen, you can format the recording media. Setting Item 1 SD MEMORY CARD/HDD 2 AREA (Ratio of the recording areas) 3 SIZE/FORMAT Default Setting NO USE NORMAL: 80 (Normal recording storage area) ALARM: 20 (Alarm/backup recording storage area) Displays the recording capacity of the media. Required Setting/Operation USE (Use the media for recording) Change the rate between the "NORMAL" and "ALARM" areas as needed. Check the storage capacity and click FORMAT . When finished formatting the SD memory card, close the SD MEMORY CARD screen. 2 Click RECORDING in the configuration menu. On the RECORDING screen, configure the recording settings as follows. Quick Operation Guide 9/14
-
 1
1 -
2
-
3
-
4
-
5
-
6
-
7
-
8
-
9
-
10
-
11
-
12
-
13
-
14
-
15
-
16
-
17
-
18
-
19
-
20
-
21
-
22
-
23
-
24
-
25
-
26
-
 27
27 -
 28
28 -
 29
29 -
 30
30 -
 31
31 -
 32
32 -
 33
33 -
 34
34 -
 35
35 -
 36
36 -
 37
37 -
38
-
39
-
40
-
41
-
42
-
43
-
44
-
45
-
46
-
47
-
48
-
49
-
50
-
51
-
52
-
53
-
54
-
55
-
56
-
57
-
58
-
59
-
60
-
61
-
62
-
63
-
64
-
65
-
66
-
67
-
68
-
69
-
70
-
71
-
72
-
73
-
74
-
75
-
76
-
77
-
78
-
79
-
80
-
81
-
82
-
83
-
84
-
85
-
86
-
87
-
88
-
89
-
90
-
91
-
92
-
93
-
94
-
95
-
96
-
97
-
98
-
99
-
100
-
101
-
102
-
103
-
104
-
105
-
106
-
107
-
108
-
109
-
110
-
111
-
112
-
113
-
114
-
115
-
116
-
117
-
118
-
119
-
120
-
121
-
122
-
123
-
124
-
125
-
126
-
127
-
128
-
129
-
130
-
131
-
132
-
133
-
134
-
135
-
136
-
137
-
138
-
139
-
140
-
141
-
142
-
143
-
144
-
145
-
146
-
147
-
148
-
149
-
150
-
151
-
152
-
153
-
154
-
155
-
156
-
157
-
158
-
159
 |
 |
