Sanyo VCC-HD5600 VCC-HD5600 Setup and Summary Manual - Page 7
VCC-MCH5600P - i
 |
View all Sanyo VCC-HD5600 manuals
Add to My Manuals
Save this manual to your list of manuals |
Page 7 highlights
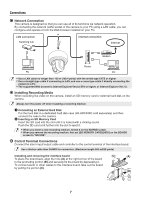
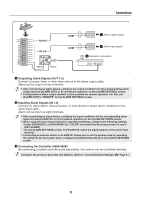
Connections ■ VCC-MCH5600P • Before attempting the following connections, be sure to turn off all components of your system. • Improper connection may cause smoke or failures. Before attempting to connect each system component, carefully read the instruction manual that comes with it to familiarize yourself with the correct connection procedure. ⦇ ⦈ ⦉ ⦊ ⦋ ⦈ Audio Jack Connection AUDIO OUT Jack (Black) Connect this jack via an audio cable to the audio input jack of an amplified speaker system or the monitor. AUDIO IN Jack (White) Use this jack to connect an external microphone to listen to the sound while monitoring the live video, or simultaneously record the video and sound. This terminal is compatible with a 3.5-mm diameter mono microphone or line mono signals (only the left channel in cases of stereo signals). 6
-
 1
1 -
 2
2 -
 3
3 -
 4
4 -
 5
5 -
 6
6 -
 7
7 -
 8
8 -
 9
9 -
 10
10 -
 11
11 -
 12
12 -
13
-
14
-
15
-
16
 |
 |
