Seagate Mirra Personal Server User Guide (Windows) - Page 54
Advanced Network Settings for Manual Addressing, Setting Up Multiple Users on One Computer, Advanced
 |
View all Seagate Mirra Personal Server manuals
Add to My Manuals
Save this manual to your list of manuals |
Page 54 highlights
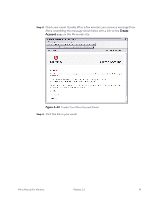
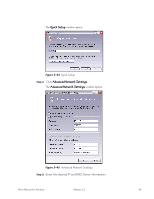
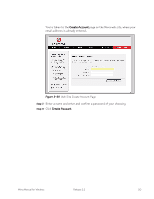
Step 4: Click OK to save your changes and close the Advanced Network Settings window. Step 5: Click OK again to close the Quick Setup window. For additional information about advanced network settings, see Advanced Network Settings for Manual Addressing. Advanced Network Settings for Manual Addressing Most modern routers and broadband modems are able to share your Internet connection using automatic address assignment (DHCP) for computers in your network along with address sharing (NAT). If your networking equipment does not include these features or you have other requirements or constraints, you may need to manually set an Internet address for Mirra. Contact your broadband Internet provider for more information about sharing your Internet connection and about the type of addressing required for your network. If static IP addressing is required, determine a static IP address or ask your Internet provider to do so. Use the Advanced Network Configuration option to enter this address information. If you use static IP addresses and want to move your Mirra to a different network, be sure to update the static IP address before moving the Mirra to avoid a conflict. Setting Up Multiple Users on One Computer If more than one person logs on to a computer that is backed up to a Personal Server, each person must create an individual Mirra Web Account in order to enable web access and file sharing for that individual's folders. To create a Web Account after another user has already installed and licensed a Mirra, Step 1: Log on to your computer (your user name must be different than the one used to install and license the Mirra software). Mirra Manual for Windows Release 2.2 46
-
 1
1 -
2
-
3
-
4
-
5
-
6
-
7
-
8
-
9
-
10
-
11
-
12
-
13
-
14
-
15
-
16
-
17
-
18
-
19
-
20
-
21
-
22
-
23
-
24
-
25
-
26
-
27
-
28
-
29
-
30
-
31
-
32
-
33
-
34
-
35
-
36
-
37
-
38
-
39
-
40
-
41
-
42
-
43
-
44
-
45
-
46
-
47
-
48
-
 49
49 -
 50
50 -
 51
51 -
 52
52 -
 53
53 -
 54
54 -
 55
55 -
 56
56 -
 57
57 -
 58
58 -
 59
59 -
60
-
61
-
62
-
63
-
64
-
65
-
66
-
67
-
68
-
69
-
70
-
71
-
72
-
73
-
74
-
75
-
76
-
77
-
78
-
79
-
80
-
81
-
82
-
83
-
84
-
85
-
86
-
87
-
88
-
89
-
90
-
91
-
92
-
93
-
94
-
95
-
96
-
97
-
98
-
99
-
100
-
101
-
102
-
103
-
104
-
105
-
106
-
107
-
108
-
109
-
110
-
111
-
112
-
113
-
114
-
115
-
116
-
117
-
118
-
119
-
120
-
121
-
122
-
123
-
124
-
125
-
126
-
127
-
128
-
129
-
130
-
131
-
132
-
133
-
134
-
135
-
136
-
137
-
138
-
139
-
140
-
141
-
142
-
143
-
144
-
145
-
146
-
147
-
148
-
149
 |
 |