Sennheiser MEB 114 Instruction Manual SpeechLine Wired - Page 23
Mounting microphones to the ceiling, button and then insert the microphone into the drilled hole.
 |
View all Sennheiser MEB 114 manuals
Add to My Manuals
Save this manual to your list of manuals |
Page 23 highlights
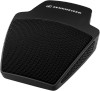
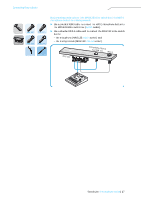
Mounting and installing the products MEB 102 Mounting microphones to the ceiling Some microphones of the IS series can also be mounted to a ceiling panel or wooden board of a suspended ceiling. A B MZH 30xx-L MZS 31 MZT 30 ME 34|35|36 MZH 30 MZC 30 MEB 102 XLR-3 MZH 3015w + MZT 30 C MZC 30 ME 34 + MZT 30 + MZH 30 + ME 36 ME 35 A) Mounting the MEB 102 boundary layer to the ceiling Once you have chosen a position for the product (see page 16): ̈ Drill a hole with a diameter of 25 mm through the ceiling panel or wooden board (plate thickness 10 mm - 65 mm). 10 mm - 65 mm 25 mm ̈ Slide the first rubber ring over the threaded bolt of the microphone button and then insert the microphone into the drilled hole. ̈ Slide the second rubber ring over the threaded bolt and tighten the hex nut. ̈ Connect a suitable cable (see page 26) and lay the cable. 22 | SpeechLine IS microphone series
-
 1
1 -
2
-
3
-
4
-
5
-
6
-
7
-
8
-
9
-
10
-
11
-
12
-
13
-
14
-
15
-
16
-
17
-
 18
18 -
 19
19 -
 20
20 -
 21
21 -
 22
22 -
 23
23 -
 24
24 -
 25
25 -
 26
26 -
 27
27 -
 28
28 -
29
-
30
-
31
-
32
-
33
-
34
-
35
-
36
-
37
-
38
-
39
-
40
-
41
-
42
-
43
-
44
-
45
-
46
-
47
 |
 |
