Sennheiser SK 500 G2 Instructions for Use - Page 42
Connecting the microphone/line cable, Attaching the microphones
 |
View all Sennheiser SK 500 G2 manuals
Add to My Manuals
Save this manual to your list of manuals |
Page 42 highlights
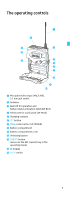
y The taking into account of the different voltage characteristics of primary cells (batteries) and accupacks. The battery status indications on the displays, the transmission of transmitter battery status information to the rack-mount receivers and the switch-off thresholds at the end of the operating time are corrected correspondingly. Due to the missing sensor, individual rechargeable battery cells will not be identified as accupacks. y The monitoring of the accupack temperature during charging in the L 2015 charger. y The prevention of improper charging of inserted primary cells (batteries). Due to the missing sensor, individual rechargeable battery cells will also not be charged in the L 2015 charger. Connecting the microphone/line cable The microphone/line input is designed for the connection of both condenser microphones and instruments (e.g. guitars). DC powering of the condenser microphones is via the microphone/line input. ̈ Connect the 3.5 mm jack plug ƹ from the microphone/ line cable to the 3.5 mm jack socket (MIC/LINE) ᕡ. ƹ ƺ³ ̈ Lock the 3.5 mm jack plug by screwing down the coupling ring ƺ. ̈ Via the operating menu, adjust the sensitivity of the microphone/line input (MIC/LINE) (see "Adjusting the sensitivity" on page 21). Attaching the microphones Use the microphone clips ƻ to attach the ME 2 or ME 4 clipon microphones to clothing (e.g. tie, lapel). ƻ ̈ Adjust the ME 3 headmic so that a comfortable and secure fit is ensured. 11
-
 1
1 -
2
-
3
-
4
-
5
-
6
-
7
-
8
-
9
-
10
-
11
-
12
-
13
-
14
-
15
-
16
-
17
-
18
-
19
-
20
-
21
-
22
-
23
-
24
-
25
-
26
-
27
-
28
-
29
-
30
-
31
-
32
-
33
-
34
-
35
-
36
-
 37
37 -
 38
38 -
 39
39 -
 40
40 -
 41
41 -
 42
42 -
 43
43 -
 44
44 -
 45
45 -
 46
46 -
 47
47 -
48
-
49
-
50
-
51
-
52
-
53
-
54
-
55
-
56
-
57
-
58
-
59
-
60
-
61
-
62
-
63
-
64
-
65
-
66
-
67
-
68
-
69
-
70
-
71
-
72
-
73
-
74
-
75
-
76
-
77
-
78
-
79
-
80
-
81
-
82
-
83
-
84
-
85
-
86
-
87
-
88
-
89
-
90
-
91
-
92
-
93
-
94
-
95
-
96
-
97
-
98
-
99
-
100
-
101
-
102
-
103
-
104
-
105
-
106
-
107
-
108
-
109
-
110
-
111
-
112
-
113
-
114
-
115
-
116
-
117
-
118
-
119
-
120
-
121
-
122
-
123
-
124
 |
 |
