Sennheiser SKM 5200 Instructions for use
Sennheiser SKM 5200 Manual
 |
View all Sennheiser SKM 5200 manuals
Add to My Manuals
Save this manual to your list of manuals |
Sennheiser SKM 5200 manual content summary:
- Sennheiser SKM 5200 | Instructions for use - Page 1
SKM 5200 Instructions for use 3 - Sennheiser SKM 5200 | Instructions for use - Page 2
instructions 5 Delivery includes 6 The SKM 5200 radio microphone 6 The operating controls 8 Indications and displays 9 Preparing the radio microphone for use 10 Inserting, removing and changing the power pack 10 Changing the microphone head 12 Switching the radio microphone microphone problems - Sennheiser SKM 5200 | Instructions for use - Page 3
-circuit and damage the electronics. Protect the radio microphone from damp and wet. Only use a slightly damp cloth to clean the radio microphone. Safety instructions for handling rechargeable batteries When used properly, rechargeable batteries are a safe and reliable energy source. However, if - Sennheiser SKM 5200 | Instructions for use - Page 4
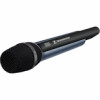
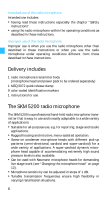
microphone transmitter body (microphone head and power pack to be ordered separately) 1 MZQ 3072 quick release clamp 9 color-coded identification markers 1 instructions for use The SKM 5200 radio microphone The SKM 5200 is a professional hand-held radio microphone transmitter that is easy to use - Sennheiser SKM 5200 | Instructions for use - Page 5
microphone has two channel banks. The channels of the channel bank "FIX" (fixed bank) have been factory pre-set to customer store frequencies. Variants y SKM 5200 y SKM 5200 BK y SKM 5200 NI (hematite-colored housing) (black housing) (nickel-colored housing) Suitable receivers y EM 1046 system ( - Sennheiser SKM 5200 | Instructions for use - Page 6
ቢ Alphanumeric display (not included in the delivery) · Body of radio microphone » Power pack ባ Level display for audio signal "AF" ቤ "RF" - appears when an RF signal is transmitted (not included in the delivery) ¿ Battery compartment locking mechanism ´ Antenna ብ "CH" - appears when the channel - Sennheiser SKM 5200 | Instructions for use - Page 7
current operating state of the radio microphone: µ LED lit up: The radio microphone is switched on and the capacity of the power pack is sufficient. LED flashing: The power pack is going flat (LOW BAT)! Transmitter activity indication A short time after switch-on, "RF" ቤ appears on the display panel - Sennheiser SKM 5200 | Instructions for use - Page 8
can either use the Sennheiser B 5000 battery box (1.5 V AA size batteries) or the rechargeable Sennheiser BA 5000 battery pack. For regular use, we recommend using the environmentally friendly rechargeable BA 5000 battery pack. Note: For battery pack operation of the radio microphone, only use the - Sennheiser SKM 5200 | Instructions for use - Page 9
(LOW BAT), the last segment starts flashing and the batteries must be changed. Recharging the BA 5000 battery pack Before using the BA 5000 battery pack for the first time or if you have not used it for several weeks, you must charge the battery pack completely. The L 50 charger can charge two BA - Sennheiser SKM 5200 | Instructions for use - Page 10
the cells. The BA 5000-1 battery pack measures the maximum capacity and therefore displays less than 100 % capacity for older cells - even when they have been fully charged. Changing the microphone head To change the microphone head of the SKM 5200: ̈ Unscrew the microphone head by turning it in the - Sennheiser SKM 5200 | Instructions for use - Page 11
panel; after a short pause, "RF" appears on the display panel. The LC display remains backlit for approx. 20 seconds. Note: y Remove the batteries or the battery pack when the radio mi- crophone will not be used for extended periods of time. y The radio microphone can only be switched off when - Sennheiser SKM 5200 | Instructions for use - Page 12
on the display panel without the ra- dio microphone transmitting. ̈ If the displayed frequency is the RF ቤ MHz wanted frequency, you can release the microphone. ̈ To remove the identification marker, press the two snap-in pins together while sliding the identification marker out of the guide - Sennheiser SKM 5200 | Instructions for use - Page 13
activated lock mode): Calling up the lock mode for deactivation y Pressing the button for 3 sec. (with deactivated lock mode): Switching the radio microphone off Cancelling the entry and returning to the display mode Cancelling the entry and returning with the last setting stored to the last - Sennheiser SKM 5200 | Instructions for use - Page 14
The automatic lock mode (autolock function) The radio microphone has a lock mode that prevents that the radio microphone is accidentally programmed while operating. When the autolock function is activated via the "LOCK" menu (see "Activating/deactivating the automatic lock mode - LOCK" on page - Sennheiser SKM 5200 | Instructions for use - Page 15
In setting mode, you can change the setting of the selected menu. By way of example of the "LOWCUT" menu, this section describes how to use the operating menu. Display mode SET/ON MHz Selection mode Setting mode MHz SET SET TUNE MHz SET MHz Current low-cut-frequency LOWCUT SET - Sennheiser SKM 5200 | Instructions for use - Page 16
display is shown on the display panel. Depending on the setting, the transmission frequency, the channel number or the name of the radio microphone is displayed. Displaying the menu settings in display mode In display mode, and with the lock mode activated, you can display the current menu - Sennheiser SKM 5200 | Instructions for use - Page 17
(variable bank) Entering a name Adjusting the microphone sensitivity Adjusting the low-cut frequency Selecting the standard The current setting that can be adjusted flashes on the display. Adjusting a setting ̈ Use the multi-function switch ¶ to adjust the setting of the selected menu. By briefly - Sennheiser SKM 5200 | Instructions for use - Page 18
Storing a setting UP SET ¶ DOWN ̈ Press the multi-function switch ¶ (switch position țSET) to permanently store a setting. "STORED" appears on the display panel, indicating that the setting has been stored. The display then returns to the top menu level. With most menus, new settings become - Sennheiser SKM 5200 | Instructions for use - Page 19
CH MHz Transmission frequ. 1 Sec. CH Current channel bank SET CHAN RF SET VAR. 20 Changing the channel bank and the channel CH ̆ / ̄: Channel VAR. 01...20 FIX.01...20 STORED SET TUNE RF MHz Current frequency on the selected channel Setting the frequencies for the - Sennheiser SKM 5200 | Instructions for use - Page 20
VAR. 01 RF dB VIEW RF SET FREQ RF Selecting the standard display Current standard display NAME RF CH / : FREQ, CHAN, NAME STORED SET RESET RF SET RST. NO RF RST. OK RF Loading the factory-preset default settings Security check / : OK, NO "reset" = OK: SET: radio microphone laods factory - Sennheiser SKM 5200 | Instructions for use - Page 21
has appeared on the display panel) does the transmitter operate on the transmission frequency of the new channel. be stored in the channel bank "VAR" (variable bank). The radio microphone is not transmitting while this adjustment is being made. Note: When you use intermodulation-free frequencies. 23 - Sennheiser SKM 5200 | Instructions for use - Page 22
by sliding the multi-function switch ¶ to the position ̆ (UP) or ̄ (DOWN). ̈ Confirm your selection by pressing the RF multi-function switch (switch position țSET). RF MHz MHz ̈ The current frequency of the selected channel is displayed. Change the frequency by sliding the multi-function - Sennheiser SKM 5200 | Instructions for use - Page 23
sensitivity - ATTEN Via the "ATTEN" menu, you can adjust the radio microphone's sensitivity by changing its input attenuation. ቩ The input attenuation is correctly adjusted when the level display for audio RF signal "AF" ቩ shows full deflection only dB AF during the loudest passages. The input - Sennheiser SKM 5200 | Instructions for use - Page 24
Microphone sensitivity of the SKM 5200 and the SKM 5000: SKM 5200: Setting in dB SKM 5000: Switch position -40 -30 -20 -10 0 1 2 Via the "VIEW" menu, you can select one of the following standard displays: RF RF RF CH MHz CCHH Transmission Channel frequency "FREQ" "CHAN" Name "NAME" The - Sennheiser SKM 5200 | Instructions for use - Page 25
last button. The lock mode protects the radio microphone from accidental programming. For daily use, we would recommend activating the autolock function. function is displayed. RF ̈ Change the setting by sliding the multi-function switch ¶ to the position ̆ (UP) or ̄ (DOWN). RF Select "LOC.ON" - Sennheiser SKM 5200 | Instructions for use - Page 26
or recharge the battery pack Transmitter cannot be switched off/ Settings cannot be changed Lock mode is activated Deactivate the lock mode (see "Deactivating the autolock function temporarily" on page 16) Receiver: No RF signal Transmitter and Set transmitter and receiver are not on - Sennheiser SKM 5200 | Instructions for use - Page 27
a minimum distance of 5 m between transmitting and receiving antennas. y Do not clasp the antenna section of the radio microphone with both hands. Tips for multi-channel operation y When operating a multi-channel system, make sure to only use intermodulation-free frequencies. Maintenance and care - Sennheiser SKM 5200 | Instructions for use - Page 28
(frequencies tunable in steps of 5 kHz) RF output power 50 mW (-3 dB) at 50 Sennheiser HiDyn plus™ Low-cut frequency (-3 dB) adjustable (flat, 120 Hz, 190 Hz) Sensitivity adjustable in steps of 1 dB from -40 to 0 dB Power supply via B 5000 (two AA size cells) or BA 5000 (battery pack - Sennheiser SKM 5200 | Instructions for use - Page 29
003761 ME 5002 microphone head 003823 MD 5005 microphone head 008474 Neumann KK 105 S microphone head 008476 Neumann KK 105 S-BK microphone head 008533 Neumann KK 104 S-BK microphone head 008534 Neumann KK 104 S microphone head 005273 B 5000-1 battery box 005274 BA 5000-1 battery pack incl. charging - Sennheiser SKM 5200 | Instructions for use - Page 30
dependent on the individual frequency of use. The guarantee period starts from the date of original purchase. For this reason, we recommend that the sales receipt be retained as proof of purchase. Without this proof (which is checked by the responsible Sennheiser service partner) you will not be - Sennheiser SKM 5200 | Instructions for use - Page 31
- Sennheiser SKM 5200 | Instructions for use - Page 32
Sennheiser electronic GmbH & Co. KG 30900 Wedemark, Germany Phone +49 (5130) 600 0 Fax +49 (5130) 600 300 www.sennheiser.com Printed in Germany Publ. 01/07 512717/A03
-
 1
1 -
 2
2 -
 3
3 -
 4
4 -
 5
5 -
 6
6 -
 7
7 -
8
-
9
-
10
-
11
-
12
-
13
-
14
-
15
-
16
-
17
-
18
-
19
-
20
-
21
-
22
-
23
-
24
-
25
-
26
-
27
-
28
-
29
-
30
-
31
-
32
 |
 |
3
Instructions for use
SKM 5200