Sennheiser ew 300 Instructions for Use - Page 45
Mounting the rubber feet, Attention, Connecting the antennas, Connecting the amplifier/mixing console - wireless
 |
View all Sennheiser ew 300 manuals
Add to My Manuals
Save this manual to your list of manuals |
Page 45 highlights
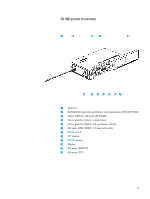
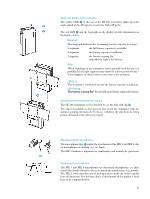
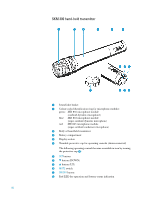
Mounting the rubber feet To ensure that the receiver cannot slip on the surface on which it is placed, four self-adhesive soft rubber feet are supplied. These feet are stuck into the recesses on the bottom side of the receiver. (N.B.: Do not use these feet if rackmounting the receiver). Ǡ Ensure that the recesses are clean and free from grease before fixing the feet. Attention! Some furniture surfaces have been treated with varnish, polish or synthetics which might cause stains when they come into contact with other synthetics. Despite a thorough testing of the synthetics used by us, we cannot rule out the possibility of discolouration, since we don't know your furniture. Connecting the antennas The EM 300 receiver can be used with either telescopic antennas (supplied) or remote antennas (available as accessories). The supplied telescopic antennas can be mounted quickly and easily to the rear of the receiver and are suitable for all applications where - good reception conditions provided - a wireless transmission system is to be used without a large amount of installation work. Ǡ Connect the telescopic antennas to BNC sockets ¸ and ¹ at the rear of the receiver. Pull the antennas out and align them upwards in a V-shape. If the receiver position is not the best antenna position for optimum reception, you can use remote antennas. These are available as accessories. Connecting the mains unit Ǡ Insert the DC connector on the power supply output cable into socket ᕧ at the rear of the receiver. Ǡ Pass the cable through the cable grip ᕦ. Connecting the amplifier/mixing console Ǡ Connect the amplifier/mixing console either - to the XLR-3M socket ᕨ or - to the 1/4" (6.3 mm) jack socket ᕩ. For information on balanced and unbalanced connection, please refer to the chapter "9 Overview". 45
-
 1
1 -
2
-
3
-
4
-
5
-
6
-
7
-
8
-
9
-
10
-
11
-
12
-
13
-
14
-
15
-
16
-
17
-
18
-
19
-
20
-
21
-
22
-
23
-
24
-
25
-
26
-
27
-
28
-
29
-
30
-
31
-
32
-
33
-
34
-
35
-
36
-
37
-
38
-
39
-
 40
40 -
 41
41 -
 42
42 -
 43
43 -
 44
44 -
 45
45 -
 46
46 -
 47
47 -
 48
48 -
 49
49 -
 50
50 -
51
-
52
-
53
-
54
-
55
-
56
-
57
-
58
-
59
-
60
-
61
-
62
-
63
-
64
-
65
-
66
-
67
-
68
-
69
-
70
-
71
-
72
-
73
-
74
-
75
-
76
-
77
-
78
-
79
-
80
-
81
-
82
-
83
-
84
-
85
-
86
-
87
-
88
-
89
-
90
-
91
-
92
-
93
-
94
-
95
-
96
-
97
-
98
-
99
-
100
-
101
-
102
-
103
-
104
-
105
-
106
-
107
-
108
-
109
-
110
-
111
-
112
-
113
-
114
-
115
-
116
-
117
-
118
-
119
-
120
-
121
-
122
-
123
-
124
-
125
-
126
-
127
-
128
-
129
-
130
-
131
-
132
-
133
-
134
-
135
-
136
-
137
-
138
-
139
-
140
-
141
-
142
-
143
-
144
-
145
-
146
-
147
-
148
-
149
-
150
-
151
-
152
-
153
-
154
-
155
-
156
-
157
-
158
-
159
-
160
-
161
-
162
-
163
-
164
-
165
-
166
-
167
-
168
-
169
-
170
-
171
-
172
-
173
-
174
-
175
-
176
-
177
-
178
-
179
-
180
-
181
-
182
-
183
-
184
-
185
-
186
-
187
-
188
-
189
-
190
-
191
-
192
-
193
-
194
-
195
-
196
-
197
-
198
-
199
-
200
-
201
-
202
-
203
-
204
-
205
-
206
-
207
-
208
-
209
-
210
-
211
-
212
-
213
-
214
-
215
-
216
-
217
-
218
-
219
-
220
-
221
-
222
-
223
-
224
 |
 |
