Sharp BP-70C45 Quick Start Guide - Page 5
Before Using The Machine
 |
View all Sharp BP-70C45 manuals
Add to My Manuals
Save this manual to your list of manuals |
Page 5 highlights
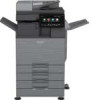
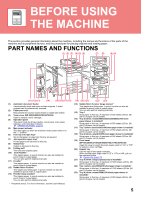
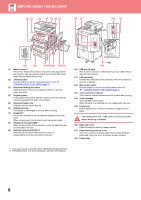
BEFORE USING THE MACHINE This section provides general information about the machine, including the names and functions of the parts of the machine and its peripheral devices, and the procedures for placing originals and loading paper. PART NAMES AND FUNCTIONS (1) (2) (3) (4) (5) (6) (7) (8) (9)(10) (11) (12)(13) (14) (15) (16) (17) (18) (1) Automatic document feeder It automatically feeds and scans multiple originals. 2-sided originals can be automatically scanned. (2) Paper pass unit* Relay between the machine and the finisher or saddle stitch finisher. (3) Toner cover (BP-50C55/50C65/70C55/70C65) Open to replace a toner cartridge. (4) Operation panel This panel hosts the [Power] button, touch panel, main power indicator, and information indicator. ► OPERATION PANEL (page 8) (5) Main power indicator This lamp lights up when the machine's main power switch is in the " " position. (6) Exit tray unit (right tray)* Set so that paper is output into this tray as required. (7) Job separator (upper tray)* Printed papers are delivered to this tray. (8) Output tray* Output is delivered to this tray. (9) Folding unit* This folds and outputs paper. (10) Inner finisher* This staples paper. A punch module can also be installed to punch holes in output paper. You can also perform stapling manually. (11) Finisher* This staples paper. A punch module can also be installed to punch holes in output paper. (12) Saddle Stitch Finisher* This staples and folds paper. A punch module can also be installed to punch holes in output paper. (13) Finisher (large stacker)* This staples paper. A punch module can also be installed to punch holes in output paper. You can also perform stapling manually. * Peripheral device. For more information, see the User's Manual. (19) (20) (21) (22) (23) (14) Saddle Stitch Finisher (large stacker)* This staples and folds paper. A punch module can also be installed to punch holes in output paper. You can also perform stapling manually. (15) Tray 1 Store paper in this tray. A maximum of 550 sheets (20 lbs. (80 g/m2)) of paper can be loaded. (16) Tray 2 (when a stand/550/2x550/3x550/550&2100 sheet paper drawer is installed)* Store paper in this tray. A maximum of 550 sheets (20 lbs. (80 g/m2)) of paper can be loaded. (17) Tray 3 (when a stand/2x550/3x550 sheet paper drawer is installed)* Store paper in this tray. A maximum of 550 sheets (20 lbs. (80 g/m2)) of paper can be loaded. (18) Tray 4 (when a stand/3x550 sheet paper drawer is installed)* Store paper in this tray. A maximum of 550 sheets (20 lbs. (80 g/m2)) of paper can be loaded. (19) Front cover (BP-50C26/50C31/50C36/50C45/70C31/70C36/70C45) Open this cover to switch the main power switch to "On" or "Off" to replace a toner cartridge. (20) Bypass tray Use this tray to feed paper manually. When loading paper larger than 8-1/2" x 11"R or A4R, pull out the extension guide. ► Bypass tray (page 15) (21) Tray 5 (when a large capacity tray is installed)* Store paper in this tray. A maximum of 3000 sheets (20 lbs. (80 g/m2)) of paper can be loaded. (22) Tray 3 (when a stand/550&2100 sheet paper drawer is installed)* Store paper in this tray. A maximum of 1200 sheets (20 lbs. (80 g/m2)) of paper can be loaded. (23) Tray 4 (when a stand/550&2100 sheet paper drawer is installed)* Store paper in this tray. A maximum of 900 sheets (20 lbs. (80 g/m2)) of paper can be loaded. 5
-
 1
1 -
 2
2 -
 3
3 -
 4
4 -
 5
5 -
 6
6 -
 7
7 -
 8
8 -
 9
9 -
 10
10 -
 11
11 -
12
-
13
-
14
-
15
-
16
-
17
-
18
-
19
-
20
-
21
-
22
-
23
-
24
-
25
-
26
-
27
-
28
-
29
-
30
-
31
-
32
-
33
-
34
-
35
-
36
-
37
-
38
-
39
-
40
-
41
-
42
-
43
-
44
-
45
-
46
 |
 |
