Sharp GX20 Service Manual - Page 5
Quickstart Guide, The Camera, Multimedia Messaging, Vodafone Live - review
 |
View all Sharp GX20 manuals
Add to My Manuals
Save this manual to your list of manuals |
Page 5 highlights
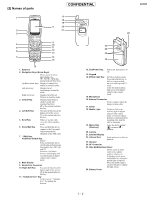
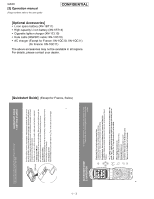
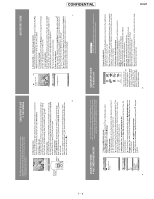
The GX20's built-in camera now lets you take video clips, as well as having digital zoom and even a flash. Once you've taken your video or picture you can save it, then send it to others at a mobile number or email address (see next page). QUICKSTART GUIDE 3: THE CAMERA 16 Stop External display F 1. Video Camera mode: Fine 0 x1 Go to the main Menu (press in Standby mode), select the Camera icon (you'll see the word 'Camera' in the red title bar), then press . Select Video Camera. 2. Recording a video clip: The screen becomes your viewfinder. You can zoom in (up to 4×) by pressing the key (the key zooms out again). You can also adjust the brightness using the and keys. Then press to start recording. When you've finished, press again. 3. Saving your video: Now you'll be offered the choice of Save or Preview. Choose Preview to review your clip, then press [Back]. If you're happy with the clip, select Save (it will be saved in My Stuff in the main Menu). If not, press [Cancel], and try again. Macro dial 4. Digital Camera mode: Choose Digital Camera in the Camera menu (or press the key in Standby mode). Press to take the picture. Press [Save] to save it (in My Stuff), or press [Cancel] and take it again. Tip: You can change the camera viewfinder to the external display (for taking pictures/ videos of yourself) by pressing the key. And you can adjust the Macro dial around the lens to take close-up shots ( ). iii QUICKSTART GUIDE G Hi there - wait til you see this! Options Back G To: abc 21/60 [email protected]| Options Clear 5. Add a sound file: ( symbol in message menu bar) Press [Options] and select Sound. To listen to the sounds, press [Options], then Play. Highlight the sound you want, press , then press [Back]. 6. Preview your message: Then press [Options], and select Preview Message. If you're happy with the message, press , then again to go to the To: screen. 7. Send to another mobile: Enter the number of the mobile phone you want to send it to. Press , then select Send and press again. If the receiving phone can't display Multimedia messages or video clips, they'll be sent a link to a web page they can view them on. Tip: Try sending it to yourself to see how it works! 8. Send to an email address: After Step 6, press [Options], and select Input Method. Choose abc and then press [Back]. Then write the email address (using the key to bring up the symbols menu for the @ key). Press , then select Send and press again. Tip: Press [Options], then select Search in the To: screen to bring up your Contacts list. Then choose the mobile number or email address for the contact you wish to send it to. It will be entered in the To: screen automatically. v CONFIDENTIAL 1 - 4 QUICKSTART GUIDE 4: MULTIMEDIA MESSAGING Life is more than just text. With Multimedia Messaging you can now send video clips, pictures and sounds as well! Your handset is already enabled to send and receive Multimedia Messaging, but if you have any problems call your local Vodafone customer services. G Message: T9 Abc 32KB 34/2000 Hi there - wait til you see this! | Options Clear G Message: T9 Abc 32KB 34/2000 Options OK Picture Sound Video Clip Message Template Text Template Preview Message Select Back iv 1. Create a new Multimedia message: Select Messages in the main Menu (or press the key in Standby mode). Select Multimedia Messages, then Create Message. 2. Write your message: Use the keypad to write your text. To enter punctuation or other characters, press the key, then select the symbol you want. For a space, press . Tip: To turn Predictive Text (T9) off and on while entering text, press and hold the key (you'll see the T9 symbol at the top of the screen). Press and hold the key to cycle through the Input Method (capitals, numeric, etc.). 3. Add your video clip: ( symbol in message menu bar) Press [Options] and select Video Clip. Highlight the clip you want to send. Press , then press [Back]. Tip: To send video you may have to adjust the setting. Select Multimedia Messages in the Messages menu, then press [Options]. Choose Settings, Slide Show then make sure that Off is selected. 4. Add your picture: ( symbol in message menu bar) Press [Options] and select Picture. Highlight the picture you want, press [Back]. , then press QUICKSTART GUIDE 5: Vodafone live! Vodafone live! is a mobile internet portal which is your gateway to a new world of information, games, music and sevices. New Messages Chat Download Games More... My Vodafone Help & Search This works very like an ordinary web browser. Use the navigation keys to highlight the item you want to select, then press to open that page. Press [Back] to go back a page. Press [Options] for the Browser Option menu. Connect to Vodafone live!: Simply press the key (under the Navigation key) to connect you to the Vodafone live! main menu. To exit, press the key. Tip: Your GX20 uses GPRS, a fast way of getting mobile information. Also, the connection is 'always on' - which means no wait for dialling up. You only pay for data you send or get, not how long you're connected. Or link directly to Vodafone live! services: In the main Menu, select the Vodafone live! section, and choose your service: Games: Online fun and games to download... Ringtones: Download music, sounds and ringtones. Pictures: Download images, animations and background wallpaper. News: Get the latest news as it happens... Sport: News, results and latest scores (with pictures). Find & Seek: Get the local information you need, wherever you are. Chat: Instant messaging and text chat with all your friends. Search: Find what you need in Vodafone live! Tip: Vodafone live! is growing and changing all the time, so these options may vary. Keep checking it out to see what's new. vi GX20
-
 1
1 -
 2
2 -
 3
3 -
 4
4 -
 5
5 -
 6
6 -
 7
7 -
 8
8 -
 9
9 -
 10
10 -
 11
11 -
12
-
13
-
14
-
15
-
16
-
17
-
18
-
19
-
20
-
21
-
22
-
23
-
24
-
25
-
26
-
27
-
28
-
29
-
30
-
31
-
32
-
33
-
34
-
35
-
36
-
37
-
38
-
39
-
40
-
41
-
42
-
43
-
44
-
45
-
46
-
47
-
48
-
49
-
50
-
51
-
52
-
53
-
54
-
55
-
56
-
57
-
58
-
59
-
60
-
61
-
62
-
63
-
64
-
65
-
66
-
67
-
68
-
69
-
70
-
71
-
72
-
73
-
74
-
75
-
76
-
77
-
78
-
79
-
80
-
81
-
82
-
83
-
84
-
85
-
86
-
87
-
88
-
89
-
90
-
91
-
92
-
93
-
94
-
95
-
96
-
97
-
98
-
99
-
100
-
101
-
102
-
103
-
104
-
105
-
106
-
107
-
108
-
109
-
110
-
111
-
112
-
113
-
114
-
115
-
116
-
117
-
118
-
119
-
120
-
121
-
122
-
123
-
124
-
125
-
126
-
127
-
128
-
129
-
130
-
131
-
132
-
133
-
134
-
135
-
136
-
137
-
138
-
139
-
140
-
141
-
142
-
143
-
144
-
145
-
146
-
147
-
148
-
149
-
150
-
151
-
152
-
153
-
154
-
155
-
156
-
157
-
158
-
159
-
160
-
161
-
162
-
163
-
164
-
165
-
166
-
167
-
168
 |
 |
