Sharp LC-15L1US LC-15L1U-S Operation Manual - Page 31
Transmission Setting Continued
 |
View all Sharp LC-15L1US manuals
Add to My Manuals
Save this manual to your list of manuals |
Page 31 highlights
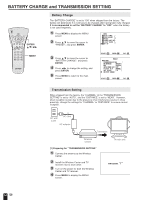
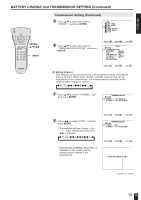
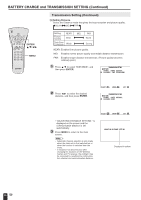
BATTERY CHARGE and TRANSMISSION SETTING (Continued) POWER SLEEP DISPLAY ENTER PIC. FLIP MUTE BRIGHT TV/VIDEO MENU VOL CH FLASHBACK ENTER/ a/b/c/d MENU Transmission Setting (Continued) [3] Setting Distance Select the Distance mode that gives the best reception and picture quality. NEAR MID FAR Setting NEAR MID FAR Picture Quality Best Worst Data Error Correction Weak Strong NEAR: Enables finer picture quality. MID: Enables normal picture quality and middle distance transmission. FAR: Enables longer distance transmission. (Picture quality becomes relatively poor.) 1 Press a/b to select "DISTANCE", and then press ENTER. TRANSMISSION SETTING RE TURN CHANNEL [ AUTO] STATUS: A DI STANCE [ FAR] STATUS: NEAR 2 Press c/d to select the desired distance, and then press ENTER. SELECT : ENTER : ENTER EX I T : MENU TRANSMISSION SETTING RE TURN CHANNEL [ AUTO] STATUS : A DI STANCE [NEAR] • "ADJUSTING DISTANCE SETTING." is displayed on the screen and the communication distance is set automatically. 3 Press MENU to return to the main screen. Note: • Automatic channel selection is only made when the main unit is first switched on or when the function is selected from the menu. • If reception has become poor after changing the locations of the Wireless Center and TV receiver, the problem may be corrected by resetting the communication channel and communication distance. SELECT : ENTER : ENTER EX I T : MENU ADJUST I NG D I STANCE SETT I NG. Displayed in yellow 30
-
 1
1 -
2
-
3
-
4
-
5
-
6
-
7
-
8
-
9
-
10
-
11
-
12
-
13
-
14
-
15
-
16
-
17
-
18
-
19
-
20
-
21
-
22
-
23
-
24
-
25
-
 26
26 -
 27
27 -
 28
28 -
 29
29 -
 30
30 -
 31
31 -
 32
32 -
 33
33 -
 34
34 -
 35
35 -
 36
36 -
37
-
38
-
39
-
40
-
41
-
42
-
43
-
44
-
45
-
46
-
47
-
48
-
49
-
50
-
51
-
52
-
53
-
54
-
55
-
56
-
57
-
58
-
59
-
60
-
61
-
62
-
63
-
64
-
65
-
66
-
67
-
68
-
69
 |
 |
