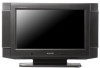
Sharp LC-22L50M-BK Operation Manual - Page 3
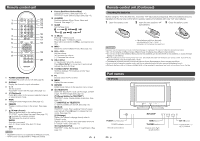
Remote control unit, Remote control unit Continued, Part names - menu
 |
UPC - 735732516320
View all Sharp LC-22L50M-BK manuals
Add to My Manuals
Save this manual to your list of manuals |
Page 3 highlights
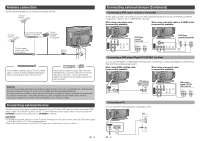
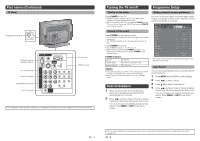
Remote control unit 9 Colour (Red/Green/Yellow/Blue) Used for Sort menu. (See page 9 and 10.) TELETEXT* mode: Select a page. (See page 13.) 1 2 10 11 12 10 AV MODE Switches between Movie, Music, News and Personal. (See page 11.) 13 11 SLEEP 14 Set the Sleep timer. 3 - : - - 0:30 1:00 2:00 1:30 15 4 12 e (Mute) 16 Press e s Mutes sound. 5 17 Press e again s Restores sound. 6 18 Mute will be cancelled if the VOLk is pressed at any time. 7 13 MPX** Select the sound multiplex mode. (See page 13.) 8 19 14 VOLk/VOLl Set the volume. 9 (k) Increase the volume. (l) Decrease the volume. 20 15 CHr/CHs TV input mode: Select the channel. Press CHr/CHs for more than 3 seconds will activate the Auto CH Scan. 16 TV/VIDEO (INPUT SOURCE) Switches between TV broadcast and AV input programmes. 1 POWER (STANDBY/ON) To switch the power on and off. (See page 8.) 2 DISPLAY Display the channel or input information. 3 0-9 Set the channel. TELETEXT* mode: Set the page. (See page 13.) 4 A (Flashback) Press A to return to the previous selected channel or external input mode. 5 WIDE Change the wide image mode. (See page 12.) 6 FREEZE Freeze a motion picture on the screen. (See page 13.) 7 a/b/c/d (Cursor) Select a desired item on the setting screen. TELETEXT* mode: Select the page. (See page 13.) (a) Increase the channel number. (b) Decrease the channel number. ENTER Execute a command. Auto CH Scan mode: Stop Auto CH Scan. 8 EXIT Exit menu screen. NOTE 17 PC Directly select the PC terminal. 18 MENU Display the menu screen. 19 RETURN MENU mode: Return to the previous menu screen. 20 m (TELETEXT*) Select the TELETEXT* mode. (all TV image, all TEXT image, TV/TEXT image) (See page 13.) k (Reveal hidden for TELETEXT*) TELETEXT* mode: Display hidden characters. (See page 13.) [ (SUBTITLE for TELETEXT*) To turn the subtitles on and off. (See page 13.) 3 (Hold) TELETEXT* mode: Stop updating Teletext* pages automatically. Press 3 again to release the hold mode. (See page 13.) 1 (Subpage) Display the Teletext* subpage directly when in Teletext* mode. Display current Teletext* clock information when not in Teletext* mode. (See page 13.) v (Top/Bottom/Full) TELETEXT* mode: Set the area of magnification. (See page 13.) * TELETEXT function is not applicable for Philippines market. ** MPX function is not applicable for Philippines market. 5 Remote control unit (Continued) Inserting the batteries Before using the TV for the first time, insert two "AA" size batteries (supplied). When the batteries become depleted and the remote control fails to operate, replace the batteries with new "AA" size batteries. 1 Open the battery cover. 2 Insert the two supplied "AA" 3 Close the battery cover. size batteries. • Place batteries with their terminals corresponding to the (e) and (f) indications in the battery compartment. CAUTION Improper use of batteries can result in chemical leakage or explosion. Be sure to follow the instructions below. • Do not mix batteries of different types. Different types of batteries have different characteristics. • Do not mix old and new batteries. Mixing old and new batteries can shorten the life of new batteries or cause chemical leakage in old batteries. • Remove batteries as soon as they have worn out. Chemicals that leak from batteries can cause a rash. If you find any chemical leakage, wipe thoroughly with a cloth. • The batteries supplied with this product may have a shorter life expectancy due to storage conditions. • If you will not be using the remote control unit for an extended period of time, remove the batteries from it. • Batteries (battery pack or batteries installed) shall not be exposed to excessive heat such as sunshine, fire or the like. Part names TV (Front) POWER (On/Off) button POWER indicator Remote control sensor 6 MENU button TV/VIDEO button Channel down (s)/ up (r) buttons M.P. IN button Volume down (f)/ up (e) buttons
-
 1
1 -
 2
2 -
 3
3 -
 4
4 -
 5
5 -
 6
6 -
 7
7 -
 8
8
 |
 |
