Sharp LC-22L50M-BK Operation Manual - Page 7
Connecting a PC Picture menu, Teletext* function, Picture and still image, Feature menu Continued - price
 |
UPC - 735732516320
View all Sharp LC-22L50M-BK manuals
Add to My Manuals
Save this manual to your list of manuals |
Page 7 highlights
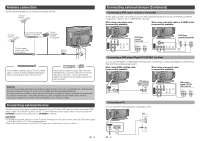
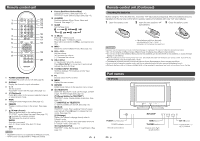
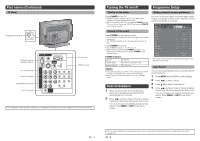
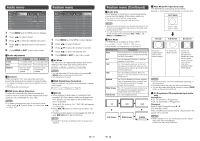
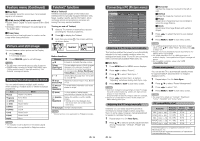
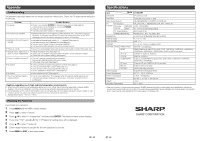
Feature menu (Continued) Teletext* function H Blue Back Automatically turns the screen blue if a broadcast signal is not received. H HDMI Audio (HDMI input mode only) • Digital: Select "Digital" for audio signal via the HDMI terminal. • Analogue: Select "Analogue" for audio signal via the AUDIO jack. H Power Save Reduces the picture brightness to create a softer image while saving electricity. What is Teletext? Teletext broadcasts pages of information and entertainment to specially equipped television sets. News, weather reports, sports information, stock exchange prices and programme previews are among the many services available. Turning on and off Teletext 1 Select a TV channel or external input source providing the Teletext programme. 2 Press m to display the Teletext. 3 Each time you press m, the screen switches as shown below. Picture and still image You can freeze a motion picture on the Display. 1 Press FREEZE. • A still image displays. 2 Press FREEZE again to exit still image. NOTE • The still image automatically goes out after 30 minutes. • FREEZE doesn't function for HDMI/COMPONENT input (1080p resolution) and PC input (all resolution). "Not Available" message will appear. Switching the analogue audio format You can switch between multiple audio modes when watching a multiple audio or stereo broadcast programme. Icon Mode b (red) Nicam Force Mono b (green) Force Mono (white) Stereo (red) Nicam Stereo I (white) Dual I II (white) Dual II I (red) Nicam Dual I II (red) Nicam Dual II empty Mono TELETEXT TELETEXT Button functions Buttons Description a/b Increase or decrease the page number. Colour (Red/Green/ Yellow/Blue) You can select a group or block of pages displayed in the coloured brackets at the bottom of the screen by pressing the corresponding Colour (Red/Green/ Yellow/Blue) on the remote control unit. 0 - 9 Directly select any page from 100 to 899 by using 0 - 9. v (Top/ Switch the Teletext image to Top, Bottom Bottom/Full) or Full. k (Reveal hidden TELETEXT) To reveal hidden information such as an answer to a quiz. 3 (Hold) To stop updating Teletext pages automatically or release the hold mode. [ (Subtitle for TELETEXT) Display the subtitle or exit the subtitle screen. • Subtitle will not be displayed when the service does not contain subtitle information. 1 (Subpage) Change subpage display. NOTE * Teletext function is not applicable for Philippines market. NOTE • The reception mode is depend on the receiving signal. ** MPX function is not applicable for Philippines market. 13 Connecting a PC (Picture menu) MENU[Picture] Picture Audio Contrast Brightness Colour Backlight Auto Sync. Horizontal Vertical Phase Clock Colour Temp. Power Management Reset Setup [ 30] [0] [0] [0] Feature [0] [0] [0] [0] On Adjusting the PC image automatically This function enables the screen to be automatically adjusted to its best possible condition when the analogue terminals of the TV and PC are connected with a commercially available RGB cable, etc. H Auto Sync. 1 Press MENU and the MENU screen displays. 2 Press c/d to select "Picture". 3 Press a/b to select "Auto Sync.". 4 Press c/d and Auto Sync. is started. "Adjusting" will shown during Auto Sync. only. 5 Press MENU or EXIT to exit menu screen. NOTE • Auto Sync. is likely to succeed when an input PC image has wide vertical stripes (e.g. pattern with high contrast stripes, or cross-hatched). It may fail when an input PC image is solid (low contrast). • Be sure to connect the PC to the TV and switch it on before starting Auto Sync. Adjusting the PC image manually Ordinarily you can easily adjust the picture as necessary to change image position using Auto Sync. In some cases, however, manual adjustment is needed to optimise the image. 1 Repeat steps 1 to 2 in Auto Sync.. 2 Press a/b to select a specific adjustment item among "Horizontal", "Vertical", "Phase" and "Clock". 14 H Horizontal Centres the image by moving it to the left or right. H Vertical Centres the image by moving it up or down. H Phase Adjust when characters have low contrast or when the image flickers. H Clock Adjust when the image flickers with vertical stripes. 3 Press c/d to adjust the item to your desired position. 4 Press MENU or EXIT to exit menu screen. NOTE • For resetting all adjustment items to the factory preset values, press a/b to select "Reset", and then press c/d to select "On". • Images may not be displayed properly depending on the settings and/or input signals. • For certain resolution of PC or HDMI input which TV unable to display, "Incompatible Input Signal" message will appear. • For compatible resolution, please refer to PC compatibility chart. Power management You can set the TV to automatically standby mode for approximately 4 seconds when no image is displayed on PC. 1 Repeat steps 1 to 2 in Auto Sync.. 2 Press a/b to select "Power Management". 3 Press c/d to select "On". 4 Press MENU or EXIT to exit menu screen. NOTE • See page 10 for details on "Contrast", "Brightness", "Colour", "Backlight" and "Colour Temp.". PC compatibility chart Resolution Horizontal Frequency VGA 640 g 480 31.5 kHz SVGA 800 g 600 37.9 kHz XGA 1024 g 768 48.4 kHz WXGA 1360 g 768 47.7 kHz SXGA 1280 g 1024 64.0 kHz Vertical Frequency 60 Hz 60 Hz 60 Hz 60 Hz 60 Hz VESA Standard Power Management is a registered trademark of Sun Microsystems, Inc. VGA and XGA are registered trademarks of International Business Machines Corp.
-
 1
1 -
 2
2 -
 3
3 -
 4
4 -
 5
5 -
 6
6 -
 7
7 -
 8
8
 |
 |
