Sharp LC-42LE540U LC-42LE540U LC-46LE540U Operation Manual - Page 55
Troubleshooting
 |
View all Sharp LC-42LE540U manuals
Add to My Manuals
Save this manual to your list of manuals |
Page 55 highlights
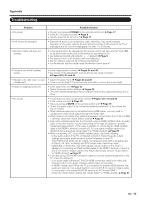
Appendix Troubleshooting Problem • No power • Unit cannot be operated. • Remote control unit does not operate. Possible Solution • Check if you pressed POWER on the remote control unit. Page 17 • Is the AC cord disconnected? Page 8 • Has the power been turned on? Page 17 • External influences such as lightning, static electricity, may cause improper operation. In this case, operate the unit after first turning off the power of the TV or unplugging the AC cord and replugging it in after 1 or 2 minutes. • Is the equipment to be operated by the remote control unit set correctly? Press TV to set the remote control unit to the setting for operating the TV. • Are batteries inserted with polarity (e, f) aligned? Page 9 • Are batteries worn out? (Replace with new batteries.) • Are you using it under strong or fluorescent lighting? • Is a fluorescent light illuminated near the remote control sensor? • Picture is cut off/with sidebar screen. • Is the image position correct? Pages 21 and 46 • Are screen mode adjustments such as picture size made correctly? Pages 20 to 21 and 24 • Strange color, light color, or color • Adjust the picture tone. Pages 24 and 25 misalignment • Is the room too bright? The picture may look dark in a room that is too bright. • Power is suddenly turned off. • Is the sleep timer set? Page 18 • Check the power control settings. Pages 25 • The unit's internal temperature has increased. Remove any objects blocking vent or clean. • No sound • Is connection to other components correct? Pages 12 to 16 and 42 • Is the volume too low? Page 18 • Have you pressed MUTE on the remote control unit? Page 18 • Check the audio output of the connected external equipment. Is the volume too low or muted? • When external equipment is connected via an HDMI cable, you may need to configure the audio to be output through the HDMI cable. • When audio is not output from external equipment connected to the PC IN or HDMI 1 terminal, check the "Audio Select" setting. Page 27 • Even when external equipment is connected using an HDMI-certified cable, an audio cable connection may be required depending on the type of equipment and the media being played back. In this case, in addition to connecting an HDMI-certified cable to the HDMI 1 terminal, connect a Ø 3.5 mm stereo minijack cable to the AUDIO IN terminal and set "Audio Select" to "HDMI+Analog". Page 27 • When connecting a PC via an HDMI-certified cable, check the following: - Is the audio output of the PC configured correctly? Check the audio output settings and output audio format in Sound Properties on the PC. Only PCM format audio can be output. Compressed audio (with a sampling rate of 32kHz, 44.1kHz, or 48kHz) and DTS format audio cannot be output. - Depending on the board, only video signals may be output. In this case, in addition to connecting an HDMI-certified cable to the HDMI 1 terminal, connect a Ø 3.5 mm stereo minijack cable to the AUDIO IN terminal and set "Audio Select" to "HDMI+Analog". Page 27 • If you are using a DVI-HDMI conversion cable to connect external equipment to the TV, check the following: - Is an audio cable connected? The DVI-HDMI conversion cable is for video only. Connect a Ø 3.5 mm stereo minijack cable to listen to the audio. - Is HDMI 1 being used? When the TV is connected to another HDMI terminal, the audio and video are not output together even if a Ø 3.5 mm stereo minijack cable is connected to the shared AUDIO IN terminal for PC IN and HDMI 1. - Check the "Audio Select" setting. Set "Audio Select" to "HDMI+Analog". Page 27 55
-
 1
1 -
2
-
3
-
4
-
5
-
6
-
7
-
8
-
9
-
10
-
11
-
12
-
13
-
14
-
15
-
16
-
17
-
18
-
19
-
20
-
21
-
22
-
23
-
24
-
25
-
26
-
27
-
28
-
29
-
30
-
31
-
32
-
33
-
34
-
35
-
36
-
37
-
38
-
39
-
40
-
41
-
42
-
43
-
44
-
45
-
46
-
47
-
48
-
49
-
 50
50 -
 51
51 -
 52
52 -
 53
53 -
 54
54 -
 55
55 -
 56
56 -
 57
57 -
 58
58 -
 59
59 -
 60
60 -
61
-
62
-
63
 |
 |
