Sharp LL-S201A Operation Manual - Page 8
Part Names
 |
View all Sharp LL-S201A manuals
Add to My Manuals
Save this manual to your list of manuals |
Page 8 highlights
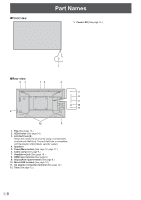
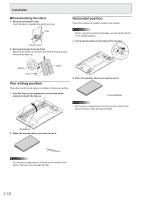
nFront view Part Names 1. Power LED (See page 13.) 1 nRear view 43 12 4 7 8 9 10 11 5 12 6 1. Flap (See page 12.) 2. VESA holes (See page 24.) 3. Anti-theft hole ( ) Allows the monitor to be secured using a commercially available anti-theft lock. The anti-theft hole is compatible with Kensington's MicroSaver security system. 4. Speakers 5. Power/Menu button (See page 13, page 17.) 6. Cable clamp (See page 9.) 7. Headphone jack (See page 10.) 8. HDMI input terminal (See page 9.) 9. DisplayPort input terminal (See page 9.) 10. Micro-USB terminal (See page 10.) 11. AC adapter connection terminal (See page 10.) 12. Tabs (See page 12.) E8
-
 1
1 -
2
-
 3
3 -
 4
4 -
 5
5 -
 6
6 -
 7
7 -
 8
8 -
 9
9 -
 10
10 -
 11
11 -
 12
12 -
 13
13 -
14
-
15
-
16
-
17
-
18
-
19
-
20
-
21
-
22
-
23
-
24
-
25
-
26
 |
 |

8
E
n
Front view
1
1. Power LED
(See page 13.)
Part Names
n
Rear view
3
4
2
1
4
7
8
9
10
11
5
12
6
1. Flap
(See page 12.)
2. VESA holes
(See page 24.)
3. Anti-theft hole (
)
Allows the monitor to be secured using a commercially
available anti-theft lock. The anti-theft hole is compatible
with Kensington’s MicroSaver security system.
4. Speakers
5. Power/Menu button
(See page 13, page 17.)
6. Cable clamp
(See page 9.)
7. Headphone jack
(See page 10.)
8. HDMI input terminal
(See page 9.)
9. DisplayPort input terminal
(See page 9.)
10. Micro-USB terminal
(See page 10.)
11. AC adapter connection terminal
(See page 10.)
12. Tabs
(See page 12.)