Sharp MD-M3 Operation Manual
Sharp MD-M3 Manual
 |
View all Sharp MD-M3 manuals
Add to My Manuals
Save this manual to your list of manuals |
Sharp MD-M3 manual content summary:
- Sharp MD-M3 | Operation Manual - Page 1
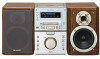
MD MICRO SYSTEM OPERATION MANUAL MODEL MD-M3H Thank you for purchasing this SHARP product. To obtain the best performance from this product, please read this manual carefully. It will guide you in operating your SHARP product. MD-M3H MD micro system consisting of MD-M3H MD (Main unit) and CP-M3H - Sharp MD-M3 | Operation Manual - Page 2
used in the course of a business, trade or profession. 3. To benefit from this guarantee, any fault which occurs must be notified to Sharp, or its appointed Service Facility within one year from the date this product was purchased. Proof of purchase must be provided. 4. The guarantee does not cover - Sharp MD-M3 | Operation Manual - Page 3
ANY DOUBT, CONSULT A QUALIFIED ELECTRICIAN. SERVICE INFORMATION In the unlikely event of your any material may require consent, which SHARP is unable to give. Please refer MD micro system only in accordance with tion by the timer mode or remote control. the instructions given in this manual - Sharp MD-M3 | Operation Manual - Page 4
the outer cover, as this may result in electric shock. Refer internal service to your local SHARP service facility. q Use the unit on a firm, level surface free from condensation inside the cabinet (CD pickup, MD pickup, etc.) or on the transmitter LED on the remote control. Condensation can cause - Sharp MD-M3 | Operation Manual - Page 5
Front panel 1. Power On/stand-by Button 2. (MD) Display Button 10 3. Timer Stand-by Indicator 4. MD Compornent 5. (MD) Record Button 1 11 6. (CD/MD/TUNER) Memory Button 2 12 7. (CD/MD) Stop Button 13 (TUNER) Tuning Down Button 3 14 8. (CD/MD) Play/Pause Button 15 (TUNER) Tuning Up - Sharp MD-M3 | Operation Manual - Page 6
FM Stereo Mode Indicator 7. (CD/MD) Disc Indicator 8. (CD/MD) Track Indicator 9. (CD/MD/TUNER) Memory Indicator 10. (CD/MD) Repeat Indicator 11. (CD/MD) Play/Pause Indicator 12. (MD) TOC Indicator 13. (CD/MD) Random Play Indicator 14. (CD/MD) Total Indicator 15. (CD/MD) Remaining Time Indicator 16 - Sharp MD-M3 | Operation Manual - Page 7
24 26 25 27 s Remote control 1. Remote Control Transmitter LED 2. CD/MD/TUNER) Memory Button q MD/CD Section 17. (CD/MD) Time Display Button 18. (CD/MD) Play Mode Button 19. (CD/MD) Track Down/Review Button 20. (CD/MD) Track Up/Cue Button 21. (MD) Record Button 22. (CD/MD) Stop Button 23. (CD/MD - Sharp MD-M3 | Operation Manual - Page 8
the speakers first. Then, connect the speaker wire to the terminals on the unit. q Connect the speakers to the main unit, and then use the system. If any of the speakers is not connected, the main unit or the speakers may malfunction or may be damaged. Notes: q Connect the black wire - Sharp MD-M3 | Operation Manual - Page 9
cushions to the bottom of the speaker to prevent it from sliding. s Placing the system 10 cm (4") 10 cm (4") DEMO ON OFF When the AC power lead is and the back at least 10 cm (4") away. Note: q Do not place the system or speakers near the Note: q When the unit is in the low power consumption mode - Sharp MD-M3 | Operation Manual - Page 10
use: q Replace the batteries if the operating distance is reduced or if the operation becomes erratic. q Periodically clean the transmitter LED on the remote control and the sensor on the main unit with a soft cloth. q Exposing the sensor on the main unit to strong light may interfere with - Sharp MD-M3 | Operation Manual - Page 11
SETTING THE CLOCK In this example, the clock is set for the 24-hour (0:00) system. 7Press the ENTER button. DISC TOC TRACK MEMORY RANDOM TOTAL REMAIN kHz REC MHz SLEEP 2 4,6,8 1 3,5,7,9 1 Press the ON/STAND-BY button to turn the power - Sharp MD-M3 | Operation Manual - Page 12
(Main unit operation) When the VOLUME control is turned clockwise, the volume will increase. When it is turned anti-clockwise, the volume will decrease. (Remote control operation) Press the VOLUME button to increase the volume and the VOLUME button to decrease the volume. Press the X-BASS button to - Sharp MD-M3 | Operation Manual - Page 13
2 Press the CD button. 3 Press the 7 CD EJECT button to open the CD compartment. 4 Place the CD on the spindle, label side up. 5 Close the CD compartment by firmy q When the unit is not being used, be sure to close the CD compartment. If it is left open, the lens may become covered with dust - Sharp MD-M3 | Operation Manual - Page 14
has a track name, the name will ap- 7 pear and scroll across the display. Then, the H 4 elapsed playing time will appear. q If the MD has no track names, the elapsed play- 2 ing time will appear. q When the last track has been played back, the unit will stop automatically. 2 H 4 1 DISC - Sharp MD-M3 | Operation Manual - Page 15
CONVENIENT CD AND MD OPERATION s APSS (Auto Program Search System) APSS automatically locates the beginning of any track. s Repeat and random play (Remote control operation) P-MODE H 2 4 5 3 06 5 3 2 4 MD 06 06 CD To listen again to the track being played: Press the 5 3 button for less - Sharp MD-M3 | Operation Manual - Page 16
Selector) (Remote control operation) CLEAR 4 2 3 7 1 6 1 Select the desired programme source, CD or MD, by pressing the CD or MD button. 2 display. q The programme contents will be erased. q When you open the CD compartment or a MiniDisc is ejected, the APMS mode will be cancelled. To check - Sharp MD-M3 | Operation Manual - Page 17
the pause mode, thd∫ ispla y will change. (Remote control operation) s Changing the display during MD playback Each time the DISPLAY button is pressed during playback playing time cannot be displayed. q Depending on a CD or MD to be played, the playing time display may not match the total playing - Sharp MD-M3 | Operation Manual - Page 18
press the TUNING (X or W) button again. q When an RDS (Radio Data System) station is tuned in, the frequency will be displayed first, and then the RDS TV or radio, move the unit as far away from these items as possible. Manual tuning: Press the TUNING (X or W) button as many times as required to - Sharp MD-M3 | Operation Manual - Page 19
(Continued) s Preset tuning You can store up to 40 stations in memory (40 stations consisting of any combination of AM and FM stations you like) and recall them. 3 2,4 3 2,4 To recall a memorised station: Press the PRESET (X or W) button for less than 0.5 seconds to select the desired station. - Sharp MD-M3 | Operation Manual - Page 20
RDS (Radio Data System) OPERATION RDS is a broadcasting service which a growing number of FM stations are now PTY (Programme Type) codes, TP (Traffic Programme) and TA (Traffic Announcement) With the MD-M3H, you can search for and receive the following PTY, TP and TA signals. NEWS: Short - Sharp MD-M3 | Operation Manual - Page 21
concerned with travel to near and far destinations, package tours and travel ideas and opportunities. Not for use for Announcements about problems, delays, or roadworks affecting immediate travel where TP/TA should be used. LEISURE: Programmes concerned with recreational activities in which the - Sharp MD-M3 | Operation Manual - Page 22
used for PTY searches, station select and EON switching.) When the ASPM button is pressed, whilst tuned to the FM band, the RDS (Radio Data System) function will automatically search for new RDS stations. Up to 40 stations can be stored in memory. (If you have already stored some stations in - Sharp MD-M3 | Operation Manual - Page 23
(Continued) s To specify station names and select stations manually (station select) You can receive for a desired station by specifying the station name (BBC R1, BBC R2, etc.) from among the stations that have been - Sharp MD-M3 | Operation Manual - Page 24
(Continued) To try to store a station name again, if the wrong name was stored in memory by mistake: When you store station names in memory using the ASPM function, the correct station names may not actually be stored if there is lots of noise or if the RDS station signal is too weak. In this case, - Sharp MD-M3 | Operation Manual - Page 25
(Continued) s To recall stations that have been stored in memory (PTY search) You can search a desired stations by specifying the programme type (news, sports, traffic programme, etc. ... see page 18-19) from among the stations that have been stored in memory. (ASPM is convenient for storing - Sharp MD-M3 | Operation Manual - Page 26
(Continued) s To manually recall the stations stored in memory When the station you are tuning in is not an RDS station or even if it is an RDS - Sharp MD-M3 | Operation Manual - Page 27
(Continued) s EON-PTY (Main unit operation) 4 2 5 When a programme of the type specified starts on an ON (other network) station, the unit will automatically switch to the station broadcasting the selected programme type, and "PTY" will flash. 3 6 When the programme specified for the ON sta- - Sharp MD-M3 | Operation Manual - Page 28
(Continued) s EON-TI (Main unit operation) 5 When a TA specifed starts on a other network station, the unit will automatically switch to that station, and "TI" will flash. 4 2 6 When the traffic announcement is over, the unit 3 will automatically return to the original station you were tuned - Sharp MD-M3 | Operation Manual - Page 29
of an ON (other network) station which was tuned in by the EON system and return to the original station you were receiving, press the EON button. unit switches automatically to "other network" station, if there is any problem with this station or the station cannot be received properly "WEAK SIG" - Sharp MD-M3 | Operation Manual - Page 30
recording numbers, track names, etc.) the sound CD First track Track A Second track Third track Track B Track C MD First track Track A Second track Track B and do NOT been encoded with the SCMS signal (Serial Copy Management System) impart shock to the unit. Otherwise, TOC will not Notes: be - Sharp MD-M3 | Operation Manual - Page 31
to enter the recording q The total the number of tracks previously recorded stand-by mode. and the available time remaining will be dis- 4 Press the CD 0 MD EDIT (HIGH or NORMAL) played, 4 seconds later, the unit will return to the original display. button. q Press the EDIT button to NORMAL for - Sharp MD-M3 | Operation Manual - Page 32
tracks for APMS playback. (Page 14) 2 Load a recordable MiniDisc. 3 Press the CD 0 MD EDIT (HIGH or NORMAL) button. q APMS playback will start, and recording will start Notes: q If recording does not begin, press the CD 0 MD EDIT (HIGH or NORMAL) button again. (See page 29.) q When repeat - Sharp MD-M3 | Operation Manual - Page 33
(Continued) s Recording from the built-in radio onto a MiniDisc 4 3 2 5 H To stop recording: Press the s button. After the track number has been written on the MiniDisc, the recording will stop. To record the track number whilst recording: The recording is performed as a single track. To - Sharp MD-M3 | Operation Manual - Page 34
can do You can create original discs using the MD editing function, on which you can change the order follow- ing the combined tracks will be decreased by one automatically. 1 2 3 4 AB CD 1 2 3 A B CD (Page 36) ERASE/ALL ERASE Tracks you want to erase can be erased one at a time - Sharp MD-M3 | Operation Manual - Page 35
(Continued) s To create a disc name A name for the whole disc. Disc names are displayed when an MD is inserted. (Remote control operation) NAME/ TOC EDIT / CLEAR DISPLAY ENTER 6 Press the ENTER button to enter the character. REC SLEEP q Repeat steps 4 to 6 above to enter the - Sharp MD-M3 | Operation Manual - Page 36
(Continued) s To create a track name Name each track. A track's name will be displayed whenever you select it and during playback. (Remote control operation) NAME/ TOC EDIT / CLEAR DISPLAY ENTER 5 Press the ENTER button to enter the character. REC SLEEP q Repeat steps 3 to 5 above to enter the - Sharp MD-M3 | Operation Manual - Page 37
(Continued) s To change disc names and track names (Remote control operation) NAME/ TOC EDIT CLEAR // / ENTER 5 3/ 2 4 To add a character: Example: To change "BET" to "BEST" 1 To change disc names, perform steps 1 - 3 on page 33. - Sharp MD-M3 | Operation Manual - Page 38
(Continued) s Divide (Remote control operation) s Combine (Remote control operation) 2 3,4 2 H 1 1 Play the track which you want to divide into two, and press the 0 6 button at the point where you want to divide the - Sharp MD-M3 | Operation Manual - Page 39
from analogue inputs cannot be combined with tracks recorded from CDs or MDs using the digital inputs. q Tracks recorded in the stereo cannot be used in the random play mode and APMS play mode. s Move (Remote control operation) 4 Select the new track position pressing the or button. q To cancel - Sharp MD-M3 | Operation Manual - Page 40
control operation) s All Erase (Remote control operation) 2 2 3,4 3,4 2 2 1 1 1 H To erase tracks one at a time: 1 Press the s button. q The total number of tracks and the total playing time on an MD will appear. 2 Press the NAME/TOC EDIT button, and within 10 seconds, select "ALL ERASE" - Sharp MD-M3 | Operation Manual - Page 41
the following preparations are required. I Load a CD, MD. I Preset the radio station. (Remote control operation) DISC TOC TRACK MEMORY RANDOM TOTAL TOC TRACK MEMORY RANDOM TOTAL REMAIN PLAY REC SLEEP I If not set manually, the ending time will automatically be set for one hour after the starting - Sharp MD-M3 | Operation Manual - Page 42
following preparations are required. q Load a CD, a recordable MD. q Preset the radio station. (Remote control operation) 3 5,6,7,8 4,5,6,7,8 7 Press the TOC TRACK MEMORY RANDOM TOTAL REMAIN REC REC SLEEP q If not set manually, the ending time will automatically be set for one hour after the starting - Sharp MD-M3 | Operation Manual - Page 43
the "TOC FULL *" or "DISC FULL" messages appear). s Sleep operation The radio, compact disc and MiniDisc can all be turned off automatically. (Remote control operation) TIMER SLEEP ENTER / 5 3 / 2 4 1 Play the desired sound source. 2 Press the SLEEP button. REC SLEEP SLEEP q If you do not need - Sharp MD-M3 | Operation Manual - Page 44
unit to the stand-by mode and turn off the power to the external units. Connecting to stereos or MD/CD players (equipment which can output analogue signals) The other MD/CD player To the output / headphone socket Commercially available lead with 3.5 mm (1/8") stereo mini-plug and RCA plugs RIGHT - Sharp MD-M3 | Operation Manual - Page 45
Manual recording You can start recording by yourself whilst listening to the playback from other equipment (tuner or CD the sound level using the VOLUME buttons on the remote control or the VOLUME control on this main to turn the power on. 2 Load a recordable MD. 3 Press the AUX button. 4 Press the - Sharp MD-M3 | Operation Manual - Page 46
. q Recording and playback use a digital system with a sound quality that is similar to is the same kind of optical disc as CDs. Playback is performed using an optical pickup. label on an MD cartridge, be sure to observe the following. If a label is not affixed properly, an MD may become jammed - Sharp MD-M3 | Operation Manual - Page 47
MD system, the delimiter of the recording area on an MD recorded from a CD (digital recording) MD which has been recorded or edited repeatedly may skip during fast reverse or fast forward. TROUBLESHOOTING s If a problem plug, then consult your SHARP dealer or service personnel. General Symptom q - Sharp MD-M3 | Operation Manual - Page 48
(Continued) CD Playback Symptom about 1 hour. MD recording and playback Symptom q A recording cannot be made. q Even though a disc has been loaded, "MD NO DISC" or Preset the channel again. q Redio programming. Remote control Symptom q The remote control does not function or does not operate properly. - Sharp MD-M3 | Operation Manual - Page 49
Trouble is found. MD NO DISC MECHA ERR* (*:Number or symbol) NAME FULL NOT AUDIO PLAYBACK MD PROTECTED q A MiniDisc has not been loaded. q The disc data cannot be read. q The disc data cannot be read. q There is a mechanical problem another disc. q Load a CD. q Reload the CD. q Replace the disc - Sharp MD-M3 | Operation Manual - Page 50
it may malfunction or the display may not function correctly. If such a problem occurs, do the following: 1 Press the ON/STAND-BY button to enter all data stored in memory including clock and timer settings, and tuner, MD and CD presets. s External care q Periodically wipe the cabinet with a soft - Sharp MD-M3 | Operation Manual - Page 51
part of our policy of continuous improvement, SHARP reserves the right to make design and specification 32 ohms) Input terminals: AUX; 500 mV/47 kohms q Speaker section Type: 2-way speaker system 12cm (4-3/4") woofer, 2cm (3/4") tweeter Maximum input power: 40 W Rated input power: 20 W - Sharp MD-M3 | Operation Manual - Page 52
MEMO 50
-
 1
1 -
 2
2 -
 3
3 -
 4
4 -
 5
5 -
 6
6 -
 7
7 -
8
-
9
-
10
-
11
-
12
-
13
-
14
-
15
-
16
-
17
-
18
-
19
-
20
-
21
-
22
-
23
-
24
-
25
-
26
-
27
-
28
-
29
-
30
-
31
-
32
-
33
-
34
-
35
-
36
-
37
-
38
-
39
-
40
-
41
-
42
-
43
-
44
-
45
-
46
-
47
-
48
-
49
-
50
-
51
-
52
 |
 |

MD MICRO SYSTEM
OPERATION MANUAL
MODEL
MD-M3H
Page
SPECIAL NOTES
..............................................
1
ACCESSORIES
.................................................
2
PRECAUTIONS
.................................................
2
NAMES OF CONTROLS AND INDICATORS
....
3-5
PREPARATION FOR USE
..............................
6-8
SETTING THE CLOCK
......................................
9
SOUND CONTROL
.........................................
10
COMPACT DISC OPERATION
........................
11
MINIDISC OPERATION
...................................
12
CONVENIENT CD AND MD OPERATIONS
....
13-15
RADIO OPERATION
..................................
16-17
RDS (Radio Data System) OPERATION
...
18-27
Page
RECORDING
..............................................
28-31
EDITING
.....................................................
32-38
TIMER OPERATION
...................................
39-41
USING EXTERNAL UNITS
........................
42-43
WHAT IS A MINIDISC?
...................................
44
MINIDISC SYSTEM LIMITATIONS
..................
45
TROUBLESHOOTING
................................
45-46
ERROR MESSAGES
.......................................
47
RESETTING THE MICROCOMPUTER
...........
48
MAINTENANCE
..............................................
48
SPECIFICATIONS
...........................................
49
CONTENTS
Thank you for purchasing this SHARP product.
To obtain the best performance from this product,
please read this manual carefully. It will guide you
in operating your SHARP product.
MD-M3H MD micro system consisting of
MD-M3H MD (Main unit) and
CP-M3H (Speaker system).