Sharp MX-850 MX-M850 MX-M950 MX-M1100 Operation Manual Suite - Page 357
Specify the destination., Display the original settings screen., Touch the [Condition Settings] key.
 |
View all Sharp MX-850 manuals
Add to My Manuals
Save this manual to your list of manuals |
Page 357 highlights
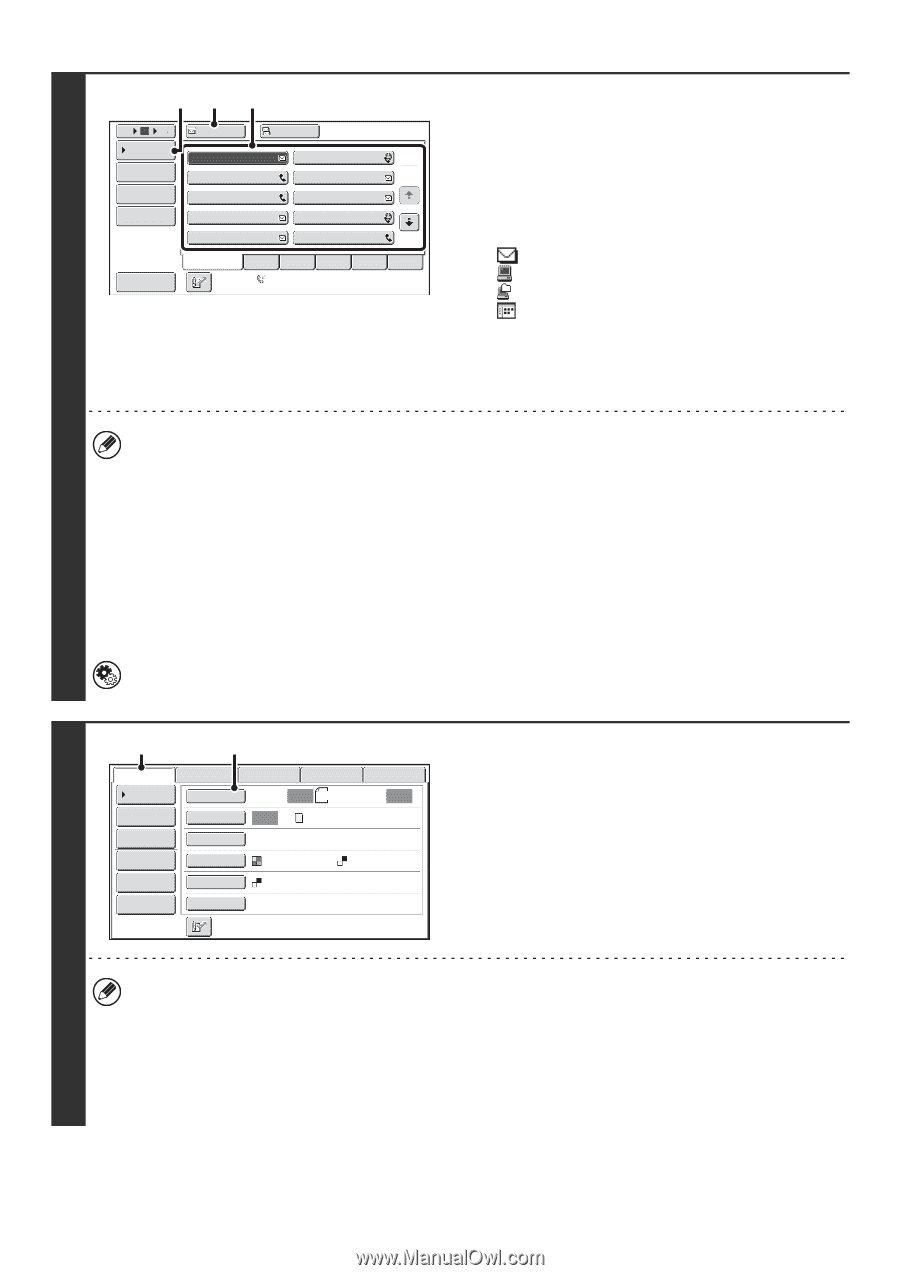
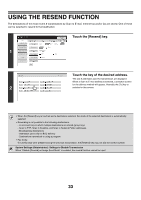
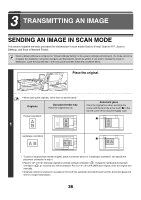
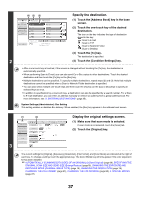
(4) (3) (2) 5 10 15 To Cc Condition Settings AAA AAA BBB BBB 1 Address Review 2 CCC CCC DDD DDD Address Entry Global Address Search EEE EEE GGG GGG FFF FFF HHH HHH III III JJJ JJJ Sort Address Frequent Use ABCD EFGHI JKLMN Auto Reception Fax Memory:100% OPQRST UVWXYZ 2 Specify the destination. (1) Touch the [Address Book] key in the base screen. (2) Touch the one-touch key of the desired destination. The icon on the key indicates the type of destination stored in the key. :Scan to E-mail :Scan to FTP :Scan to Network Folder :Scan to Desktop (3) Touch the [To] key. The destination is specified. (4) Touch the [Condition Settings] key. • After a one-touch key is touched, if the screen is changed without touching the [To] key, the destination is automatically specified. • When performing Scan to E-mail, you can also send Cc or Bcc copies to other destinations. Touch the desired destination and then touch the [Cc] key or the [Bcc] key. • Multiple destinations can be specified. To specify multiple destinations, repeat steps (2) and (3). Note that multiple destinations cannot be specified when a Scan to Network Folder destination is specified. • You can also select multiple one-touch keys and then touch the [To] key (or the [Cc] or [Bcc] key) to specify all selected keys at once. • In addition to specification by a one-touch key, a destination can also be specified by a search number. For a Scan to E-mail destination, you can enter an address manually or retrieve an address from a global address book. For more information, see "2. ENTERING DESTINATIONS" (page 25). System Settings (Administrator): Bcc Setting This setting enables or disables Bcc delivery. When enabled, the [Bcc] key appears in the address book screen. (1) (2) Display the original settings screen. Scan Internet Fax Address Book Original Fax Scan: Data Entry USB Mem. Scan Auto 8½x11 Send: Auto Address Entry Exposure Auto Text Send Settings Resolution 200X200dpi (1) Make sure that scan mode is selected. If scan mode is not selected, touch the [Scan] tab. (2) Touch the [Original] key. Address Review File Format PDF PDF File Color Mode Mono2 Quick File Special Modes 3 The current settings for [Original], [Exposure], [Resolution], [File Format], and [Color Mode] are indicated at the right of each key. To change a setting, touch the appropriate key. The [Color Mode] key will only appear if the color expansion kit has been installed. ☞ AUTOMATICALLY SCANNING BOTH SIDES OF AN ORIGINAL (2-Sided Original) (page 69), SPECIFYING THE ORIGINAL SCAN SIZE AND SEND SIZE (Enlarge/Reduce) (page70), CHANGING THE EXPOSURE AND EXPOSURE MODE (ORIGINAL IMAGE TYPE) (page 76), CHANGING THE RESOLUTION (page 78), CHANGING THE FILE FORMAT (page 81), CHANGING THE COLOR MODE (page 85), 4. SPECIAL MODES (page 87) 37
-
 1
1 -
2
-
3
-
4
-
5
-
6
-
7
-
8
-
9
-
10
-
11
-
12
-
13
-
14
-
15
-
16
-
17
-
18
-
19
-
20
-
21
-
22
-
23
-
24
-
25
-
26
-
27
-
28
-
29
-
30
-
31
-
32
-
33
-
34
-
35
-
36
-
37
-
38
-
39
-
40
-
41
-
42
-
43
-
44
-
45
-
46
-
47
-
48
-
49
-
50
-
51
-
52
-
53
-
54
-
55
-
56
-
57
-
58
-
59
-
60
-
61
-
62
-
63
-
64
-
65
-
66
-
67
-
68
-
69
-
70
-
71
-
72
-
73
-
74
-
75
-
76
-
77
-
78
-
79
-
80
-
81
-
82
-
83
-
84
-
85
-
86
-
87
-
88
-
89
-
90
-
91
-
92
-
93
-
94
-
95
-
96
-
97
-
98
-
99
-
100
-
101
-
102
-
103
-
104
-
105
-
106
-
107
-
108
-
109
-
110
-
111
-
112
-
113
-
114
-
115
-
116
-
117
-
118
-
119
-
120
-
121
-
122
-
123
-
124
-
125
-
126
-
127
-
128
-
129
-
130
-
131
-
132
-
133
-
134
-
135
-
136
-
137
-
138
-
139
-
140
-
141
-
142
-
143
-
144
-
145
-
146
-
147
-
148
-
149
-
150
-
151
-
152
-
153
-
154
-
155
-
156
-
157
-
158
-
159
-
160
-
161
-
162
-
163
-
164
-
165
-
166
-
167
-
168
-
169
-
170
-
171
-
172
-
173
-
174
-
175
-
176
-
177
-
178
-
179
-
180
-
181
-
182
-
183
-
184
-
185
-
186
-
187
-
188
-
189
-
190
-
191
-
192
-
193
-
194
-
195
-
196
-
197
-
198
-
199
-
200
-
201
-
202
-
203
-
204
-
205
-
206
-
207
-
208
-
209
-
210
-
211
-
212
-
213
-
214
-
215
-
216
-
217
-
218
-
219
-
220
-
221
-
222
-
223
-
224
-
225
-
226
-
227
-
228
-
229
-
230
-
231
-
232
-
233
-
234
-
235
-
236
-
237
-
238
-
239
-
240
-
241
-
242
-
243
-
244
-
245
-
246
-
247
-
248
-
249
-
250
-
251
-
252
-
253
-
254
-
255
-
256
-
257
-
258
-
259
-
260
-
261
-
262
-
263
-
264
-
265
-
266
-
267
-
268
-
269
-
270
-
271
-
272
-
273
-
274
-
275
-
276
-
277
-
278
-
279
-
280
-
281
-
282
-
283
-
284
-
285
-
286
-
287
-
288
-
289
-
290
-
291
-
292
-
293
-
294
-
295
-
296
-
297
-
298
-
299
-
300
-
301
-
302
-
303
-
304
-
305
-
306
-
307
-
308
-
309
-
310
-
311
-
312
-
313
-
314
-
315
-
316
-
317
-
318
-
319
-
320
-
321
-
322
-
323
-
324
-
325
-
326
-
327
-
328
-
329
-
330
-
331
-
332
-
333
-
334
-
335
-
336
-
337
-
338
-
339
-
340
-
341
-
342
-
343
-
344
-
345
-
346
-
347
-
348
-
349
-
350
-
351
-
 352
352 -
 353
353 -
 354
354 -
 355
355 -
 356
356 -
 357
357 -
 358
358 -
 359
359 -
 360
360 -
 361
361 -
 362
362 -
363
-
364
-
365
-
366
-
367
-
368
-
369
-
370
-
371
-
372
-
373
-
374
-
375
-
376
-
377
-
378
-
379
-
380
-
381
-
382
-
383
-
384
-
385
-
386
-
387
-
388
-
389
-
390
-
391
-
392
-
393
-
394
-
395
-
396
-
397
-
398
-
399
-
400
-
401
-
402
-
403
-
404
-
405
-
406
-
407
-
408
-
409
-
410
-
411
-
412
-
413
-
414
-
415
-
416
-
417
-
418
-
419
-
420
-
421
-
422
-
423
-
424
-
425
-
426
-
427
-
428
-
429
-
430
-
431
-
432
-
433
-
434
-
435
-
436
-
437
-
438
-
439
-
440
-
441
-
442
-
443
-
444
-
445
-
446
-
447
-
448
-
449
-
450
-
451
-
452
-
453
-
454
-
455
-
456
-
457
-
458
-
459
-
460
-
461
-
462
-
463
-
464
-
465
-
466
-
467
-
468
-
469
-
470
-
471
-
472
-
473
-
474
-
475
-
476
-
477
-
478
-
479
-
480
-
481
-
482
-
483
-
484
-
485
-
486
-
487
-
488
-
489
-
490
-
491
-
492
-
493
-
494
-
495
-
496
-
497
-
498
-
499
-
500
-
501
-
502
-
503
-
504
-
505
-
506
-
507
-
508
-
509
-
510
-
511
-
512
-
513
-
514
-
515
-
516
-
517
-
518
-
519
-
520
-
521
-
522
-
523
-
524
-
525
-
526
-
527
-
528
-
529
-
530
-
531
-
532
-
533
-
534
-
535
-
536
-
537
-
538
-
539
-
540
-
541
-
542
-
543
-
544
-
545
-
546
-
547
-
548
-
549
-
550
-
551
-
552
-
553
-
554
-
555
-
556
-
557
-
558
-
559
-
560
-
561
-
562
-
563
-
564
-
565
-
566
-
567
-
568
-
569
-
570
-
571
-
572
-
573
-
574
-
575
-
576
-
577
-
578
-
579
-
580
-
581
-
582
-
583
-
584
-
585
-
586
-
587
-
588
-
589
-
590
-
591
-
592
-
593
-
594
-
595
-
596
-
597
-
598
-
599
-
600
-
601
-
602
-
603
-
604
-
605
-
606
-
607
-
608
-
609
-
610
-
611
-
612
-
613
-
614
-
615
-
616
-
617
-
618
-
619
-
620
-
621
-
622
-
623
-
624
-
625
-
626
-
627
-
628
-
629
-
630
-
631
-
632
-
633
-
634
-
635
-
636
-
637
-
638
-
639
-
640
-
641
-
642
-
643
-
644
-
645
-
646
-
647
-
648
-
649
-
650
-
651
-
652
-
653
-
654
-
655
 |
 |