Sharp MX-M620N Operation Manual - Page 79
Loading paper, Manual operation of the inserter
 |
View all Sharp MX-M620N manuals
Add to My Manuals
Save this manual to your list of manuals |
Page 79 highlights
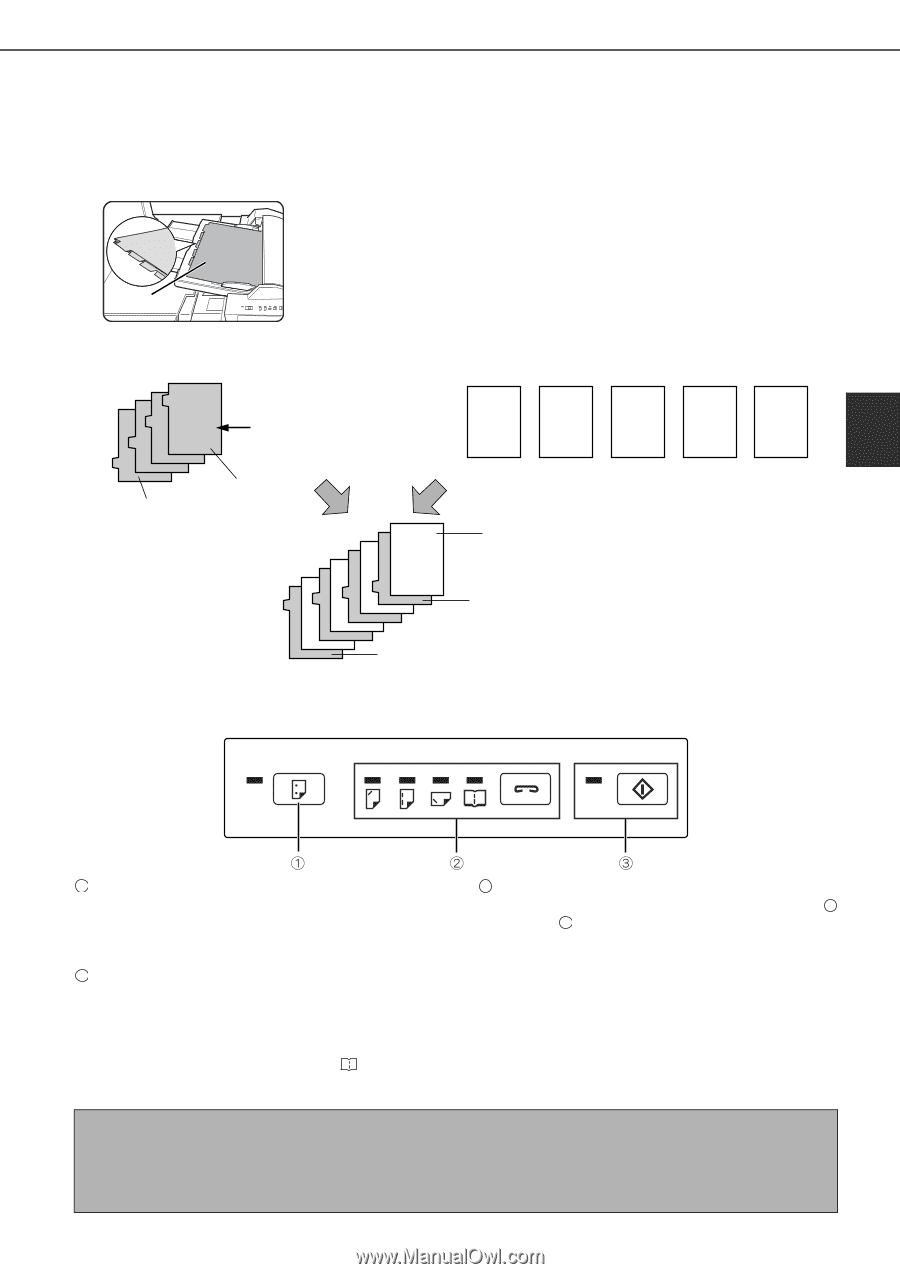
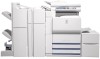
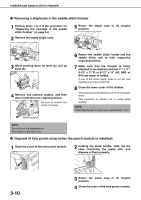
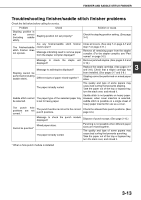
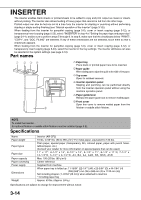
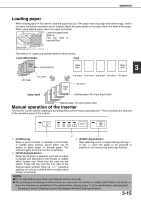
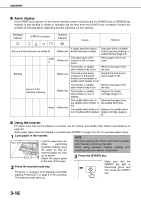
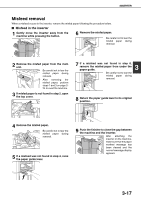
INSERTER Loading paper When loading paper in the inserter, load the paper face up. If the paper has a top edge and bottom edge, load in the same top-bottom orientation as the original. Adjust the paper guide on the paper tray to the width of the paper. When using tabbed paper, place the paper as follows: Load the paper back side up. The top side is inserted first. Back side The relation of copies and tabbed sheets is shown below. Load tabbed paper Copy Back side Inserted first. Back side Back side 3 4th sheet 1st sheet Copy result 1st sheet 2nd sheet 3rd sheet 4th sheet 5th sheet Back side 5th sheet Tabbed paper 4th sheet (back side) Tabbed paper 1st sheet (back side) Manual operation of the inserter The inserter can be used for stapling or punching without performing a copy operation. These functions are selected at the operation panel of the inserter. 1 [PUNCH] key When a punch module is installed on the finisher or saddle stitch finisher, punch holes can be added to blank paper or printed paper. The indicator lights when this function is selected. 2 [STAPLE] key/indicator When this function is selected, each set of output is stapled and delivered to the finisher or saddle stitch finisher tray. (Note that the sets are not offset.) Press this key until the icon light of the desired staple position lights up. (" " pamphlet stapling can only be selected when a saddle stitch finisher is installed) 3 [START] key/indicator After selecting punch or staple settings with key 1 or key 2 , place the paper to be punched or stapled on the inserter tray and press this key. NOTES ● Do not use tabbed paper when operating the inserter manually. ● The punching and stapling functions cannot be used when the finisher or saddle stitch finisher has failed, or when the functions are prohibited* in the administrator settings (page 11 of the administrator settings guide). * Disabling of stapler/Disabling of punch/Disabling of finisher/Disabling of inserter 3-15
-
 1
1 -
2
-
3
-
4
-
5
-
6
-
7
-
8
-
9
-
10
-
11
-
12
-
13
-
14
-
15
-
16
-
17
-
18
-
19
-
20
-
21
-
22
-
23
-
24
-
25
-
26
-
27
-
28
-
29
-
30
-
31
-
32
-
33
-
34
-
35
-
36
-
37
-
38
-
39
-
40
-
41
-
42
-
43
-
44
-
45
-
46
-
47
-
48
-
49
-
50
-
51
-
52
-
53
-
54
-
55
-
56
-
57
-
58
-
59
-
60
-
61
-
62
-
63
-
64
-
65
-
66
-
67
-
68
-
69
-
70
-
71
-
72
-
73
-
 74
74 -
 75
75 -
 76
76 -
 77
77 -
 78
78 -
 79
79 -
 80
80 -
 81
81 -
 82
82 -
 83
83 -
 84
84 -
85
-
86
-
87
-
88
-
89
-
90
-
91
-
92
-
93
-
94
-
95
-
96
-
97
-
98
-
99
-
100
-
101
-
102
-
103
-
104
-
105
-
106
-
107
-
108
-
109
-
110
-
111
-
112
-
113
-
114
-
115
-
116
-
117
-
118
-
119
-
120
-
121
-
122
-
123
-
124
-
125
-
126
-
127
-
128
-
129
-
130
-
131
-
132
-
133
-
134
-
135
-
136
-
137
-
138
-
139
-
140
-
141
-
142
-
143
-
144
-
145
-
146
-
147
-
148
-
149
-
150
-
151
-
152
-
153
-
154
-
155
-
156
-
157
-
158
-
159
-
160
-
161
-
162
-
163
-
164
-
165
-
166
-
167
-
168
-
169
-
170
-
171
-
172
-
173
-
174
-
175
-
176
-
177
-
178
-
179
-
180
-
181
-
182
-
183
-
184
-
185
-
186
-
187
-
188
-
189
-
190
-
191
-
192
-
193
-
194
-
195
-
196
-
197
-
198
-
199
-
200
 |
 |