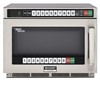
Sharp R-CD2200M R-CD1200M , R-CD1800 , R-CD-2200M Operation Manual - Page 25
Oven Interior, Air Intake Filter - microwave filter
 |
View all Sharp R-CD2200M manuals
Add to My Manuals
Save this manual to your list of manuals |
Page 25 highlights
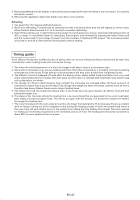
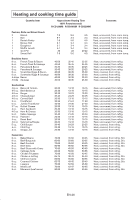
Oven Interior 1) For easy cleaning, wipe any spatters or spills with a soft damp cloth or sponge at the end of each day. For heavier spills, use mild soap and rinse thoroughly with hot water. 2) At least once a week, remove the splash cover and the oven ceiling cover, and then clean them. SPLASH COVER Remove the splash cover as shown in Fig. 2. Wash in a mild detergent solution. Don't use detergent with orange oil, as the splash cover may melt. OVEN CEILING COVER (Frame + Cover) Remove the oven ceiling cover as shown in Fig. 2 and separate the frame from the cover. COVER: Wipe any grease, spills or spatters on the oven ceiling cover with a soft cloth dampened with a mild detergent solution. Don't soak the oven ceiling cover in detergent or wash it. FRAME: Wipe any grease, spills or spatters on the frame with a soft cloth dampened with a mild detergent solution. Scrape hardened spills or spatters with a plastic spatula. Don't use metallic brushes or sharp-edged tools, as scratches on the frame may cause the frame to warp or break during heating. To remove hardened spills or spatters, soak the frame in a mild detergent solution for a short period of time. Don't use detergent with orange oil, as the frame may melt. ANTENNA COVER If antenna cover has grease, spills or spatters, wipe antenna cover with a soft cloth dampened with a mild detergent solution. Don't use metallic brushes or sharp-edged tools, as scratches on the antenna cover may cause the cover to warp or break during heating. How to remove the oven ceiling cover Remember to unplug the power cord. Turn the 2 tabs holding the oven ceiling cover to the oven cavity ceiling as shown in Fig. 2, then gently pull the cover downwards to separate from the oven cavity ceiling. Then separate the cover from the frame. It is held in place by 4 catches. How to remove the splash cover Remember to unplug the power cord. Turn the knob holding the splash cover to the ceiling of the oven as shown in Fig. 3 and remove it from the ceiling of the oven. How to install the oven ceiling cover Remember to unplug the power cord. Replace the cover in the frame. Insert projection A (2) into the 2 holes in the rear cavity wall and then insert projection B (2) into the 2 holes in the oven cavity ceiling as shown in Fig. 2. Then slide the tabs in place. How to install the splash cover Remember to unplug the power cord. Then insert the knob into the hole of splash cover as shown in Fig. 4 and turn it as shown in Fig. 3. Insert the splash cover projection into the hole in the rear cavity wall as shown in Fig. 2 and then replace the knob in the hole through the splash cover. Turn knob as shown in Fig. 4 to hold the splash cover in place. 3) Wipe any grease, spills or spatters on the door seal surfaces with a soft damp cloth or sponge so that they do not build up. The door seals must always be free of grease and/or spatters so that the door closes properly. Build-up could result in leakage of microwave energy from the oven. CERAMIC SHELF Wipe spills or spatters immediately with a soft cloth or sponge dampened with a mild detergent solution. Do not allow grease, spills, or spatters to build up. Do not use abrasive or harsh cleaners, scouring pads, metallic brushes or sharp-edged tools. Take care when cleaning to not damage the silicone seal. Operating the unit with excessive buildup may result in cracking or breakage of the ceramic shelf. Do not operate the unit with a cracked or broken ceramic shelf. Door Wipe the door and window on both sides frequently with a soft damp cloth or sponge to remove any spills or spatters. Always keep the door seals and seal surfaces clean so that any grease, spills or spatters are not allowed to build up. Build-up could result in leakage of microwave energy from the oven. Air Intake Filter Clean at least every two weeks (equivalent to 100 hours usage) or more often for heavy use. See Custom Help 8 Air Intake Filter Counter on page EN-14. Loosen the screw holding the air intake filter to the oven and move the air intake filter to the left a little bit to remove the air intake filter from the pin. Wash the air intake filter in mild soapy water, rinse and dry with a soft cloth. After cleaning and drying completely, re-install the air intake filter. NOTES: 1. Take care not to misplace the tiny knob used to fasten the splash cover. 2. The screw and the knob can be loosened and tightened either by hand or by using a coin. 3. Install the oven ceiling cover properly. Operating the oven with an incorrectly installed oven ceiling cover may damage the components in the oven cavity and shorten the expected life span of your oven. 4. When the oven ceiling cover is not installed properly, the display will show error code "EE0". To clear the error code, press the STOP/CLEAR pad and re-install the oven ceiling cover properly. EN-24
-
 1
1 -
2
-
3
-
4
-
5
-
6
-
7
-
8
-
9
-
10
-
11
-
12
-
13
-
14
-
15
-
16
-
17
-
18
-
19
-
 20
20 -
 21
21 -
 22
22 -
 23
23 -
 24
24 -
 25
25 -
 26
26 -
 27
27 -
 28
28 -
 29
29 -
 30
30 -
31
-
32
-
33
-
34
-
35
-
36
-
37
-
38
-
39
-
40
-
41
-
42
-
43
-
44
-
45
-
46
-
47
-
48
-
49
-
50
-
51
-
52
-
53
-
54
-
55
-
56
-
57
-
58
-
59
-
60
-
61
-
62
-
63
-
64
-
65
-
66
-
67
-
68
-
69
-
70
-
71
-
72
-
73
-
74
-
75
-
76
-
77
-
78
-
79
-
80
-
81
-
82
-
83
-
84
-
85
-
86
-
87
-
88
-
89
-
90
-
91
-
92
 |
 |
