Sharp XL-HF200P XL-HF200P Operation Manual - Page 12
Setting the clock Remote control only, Listening to the radio
 |
UPC - 074000369726
View all Sharp XL-HF200P manuals
Add to My Manuals
Save this manual to your list of manuals |
Page 12 highlights
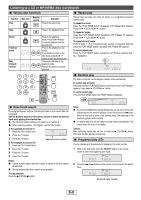
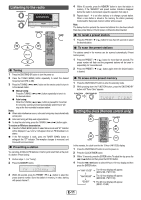
Listening to the radio RRMCGA232AWSA ■ Tuning 1 Press the ON/STAND-BY button to turn the power on. 2 Press the TUNER (BAND) button repeatedly to select the desired frequency band (FM or AM). 3 Press the TUNING ( or ) button on the remote control to tune in to the desired station. ● Manual tuning: Press the TUNING ( or ) button repeatedly to tune in to the desired station. ● Auto tuning: When the TUNING ( or ) button is pressed for more than 0.5 seconds, scanning will start automatically and the tuner will stop at the first receivable broadcast station. Notes: ● When radio interference occurs, auto scan tuning may stop automatically at that point. ● Auto scan tuning will skip weak signal stations. ● To stop the auto tuning, press the TUNING ( or ) button again. To receive an FM stereo transmission: ● Press the TUNER (BAND) button to select stereo mode and "ST" indicator will be displayed. " " and " " will appear when an FM broadcast is in stereo. ● If the FM reception is weak, press the TUNER (BAND) button to extinguish the "ST" indicator. The reception changes to monaural, and the sound becomes clearer. ■ Presetting a station You can store 40 AM and FM stations in memory and recall them at the push of a button. (Preset tuning) 1 Perform steps 1 - 3 in "Tuning". 2 Press the MEMORY button. 3 Within 30 seconds, press the PRESET ( or ) button to select the preset channel number. Store the stations in memory, in order, starting with preset channel 1. 4 Within 30 seconds, press the MEMORY button to store that station in memory. If the "MEMORY" and preset number indicators disappear before the station is memorized, repeat the operation from step 2. 5 Repeat steps 1 - 4 to set other stations, or to change a preset station. When a new station is stored in the memory, the station previously memorized for that preset channel number will be erased. Note: The backup function protects the memorized stations for a few hours should there be a power failure or the AC power cord become disconnected. ■ To recall a preset station 1 Press the PRESET ( or ) button for less than 0.5 seconds to select the desired station. ■ To scan the preset stations The stations saved in the memory can be scanned automatically. (Preset memory scan) 1 Press the PRESET ( or ) button for more than 0.5 seconds. The preset number will flash and the programed stations will be tuned in sequentially, for 5 seconds each. 2 Press the PRESET ( or ) button again when the desired station is located. ■ To erase entire preset memory 1 Press the ON/STAND-BY button to enter the stand-by mode. 2 While pressing down the FUNCTION button, press the ON/STAND-BY button until "Tuner Clear" appears. FUNCTION ON/STAND-BY Setting the clock (Remote control only) In this example, the clock is set for the 12-hour (AM 12:00) display. 1 Press the ON/STAND-BY button to turn the power on. 2 Press the CLOCK/TIMER button. 3 Within 10 seconds, press the ENTER button. To adjust the day, press the or button and then press the ENTER button. 4 Press the or button to select 24-hour or 12-hour display and then press the ENTER button. The 12-hour display will appear. (AM 12:00 - PM 11:59) The 12-hour display will appear. (AM 00:00 - PM 11:59) The 24-hour display will appear. (00:00 - 23:59) E-11
-
 1
1 -
2
-
3
-
4
-
5
-
6
-
 7
7 -
 8
8 -
 9
9 -
 10
10 -
 11
11 -
 12
12 -
 13
13 -
 14
14 -
 15
15 -
 16
16
 |
 |