Sharp XL-HF200P XL-HF200P Operation Manual - Page 5
System connections continued
 |
UPC - 074000369726
View all Sharp XL-HF200P manuals
Add to My Manuals
Save this manual to your list of manuals |
Page 5 highlights
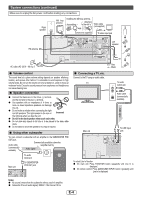
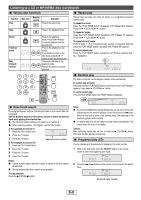
System connections (continued) Make sure to unplug the AC power cord before making any connections. Right speaker Installing the AM loop antenna AM loop antenna < Assembling > < Attaching to the wall > Video cable (not supplied) wall screws (not supplied) To video input jack FM antenna Left speaker AC outlet (AC 120 V ~ 60 Hz) ■ Volume control The sound level at a given volume setting depends on speaker efficiency, location, and various other factors. It is advisable to avoid exposure to high volume levels. Do not turn the volume on to full at switch on. Listen to music at moderate levels. Excessive sound pressure from earphones and headphones can cause hearing loss. ■ Speaker connection ● Connect the black wire to the minus (-) terminal, and the red wire to the plus (+) terminal. ● Use speakers with an impedance of 4 ohms or more, as lower impedance speakers can damage the unit. ● Do not make a mistake when connecting the right and left speakers. The right speaker is the one on Incorrect the right side when you face the unit. ● Do not let the bare speaker wires touch each other. ● Do not allow any objects to fall into or to be placed in the bass reflex ducts. ● Do not stand or sit on the speakers.You may be injured. ■ Using other subwoofer You can connect a subwoofer with an amplifier to the SUBWOOFER PRE OUT jack. Commercially available subwoofer Audio cable (amplifier built in) (commercially available) Audio signal To audio input jack Main unit To SUBWOOFER PRE OUT jack ■ Connecting a TV, etc. Connect to the TV using an audio cable. TV Red Black To audio output jack Audio cable (commercially available) Audio signal Main unit To LINE input jack To select Line In function: ● On main unit: Press FUNCTION button repeatedly until Line In is displayed. ● On remote control: Press AUDIO/LINE (INPUT) button repeatedly until Line In is displayed. Notes: ● No sound is heard from the subwoofer without a built-in amplifier. ● Subwoofer Pre-out (audio signal): 200mV / 10k ohms at 70 Hz. E-4
-
 1
1 -
 2
2 -
 3
3 -
 4
4 -
 5
5 -
 6
6 -
 7
7 -
 8
8 -
 9
9 -
 10
10 -
 11
11 -
12
-
13
-
14
-
15
-
16
 |
 |
