Sharp XL-HP707 XL-HP707 Operation Manual - Page 29
ONCE ON or DAILY ON, and press the MEMORY/SET button.
 |
View all Sharp XL-HP707 manuals
Add to My Manuals
Save this manual to your list of manuals |
Page 29 highlights
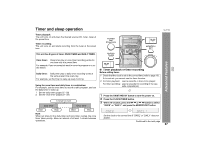
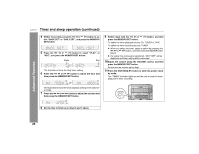
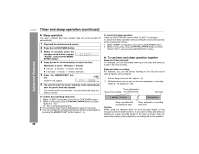
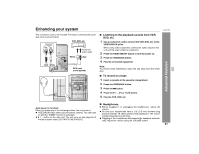
XL-HP707 Advanced Features 12When the preset time is reached, playback or recording will start. The volume will increase gradually until it reaches the preset volume. 13When the timer end time is reached, the system will enter the power stand-by mode automatically. Once timer: The timer will be canceled. Daily timer: The timer will operate at the same time every day. It will continue until the daily timer setting is canceled. Cancel the daily timer when it is not used. Note: When performing timer playback or recording using another unit connected to the VIDEO/AUX IN jacks, select "VIDEO" in step 9. This unit will turn on or enter the power stand-by mode automatically, however, the connected unit will not turn on or off. Checking the timer setting in the timer stand-by mode: 1 Press the CLOCK/TIMER button. 2 Within 10 seconds, press the or button to select "ONCE" or "DAILY", and press the MEMORY/SET button. 3 Within 10 seconds, press the or button to select "ONCE CAL" or "DAILY CAL", and press the MEMORY/SET but- ton. The unit returns to the timer stand-by mode after displaying the settings in order. Canceling the timer setting in the timer stand-by mode: 1 Press the CLOCK/TIMER button. 2 Within 10 seconds, press the or button to select "ONCE" or "DAILY", and press the MEMORY/SET button. 3 Within 10 seconds, press the or button to select "ONCE OFF" or "DAILY OFF", and press the MEMORY/SET but- ton. Timer will be canceled (the setting will not be canceled). Reusing the memorized timer setting: The timer setting will be memorized once it is entered. To reuse the same setting, perform the following operations. 1 Turn the power on and press the CLOCK/TIMER button. 2 Within 10 seconds, press the or button to select "ONCE" or "DAILY", and press the MEMORY/SET button. 3 Within 10 seconds, press the or button to select "ONCE ON" or "DAILY ON", and press the MEMORY/SET button. 4 Press the ON/STAND-BY button to enter the power stand-by mode. Note: The timer can also be set with the remote control. 29
-
 1
1 -
2
-
3
-
4
-
5
-
6
-
7
-
8
-
9
-
10
-
11
-
12
-
13
-
14
-
15
-
16
-
17
-
18
-
19
-
20
-
21
-
22
-
23
-
 24
24 -
 25
25 -
 26
26 -
 27
27 -
 28
28 -
 29
29 -
 30
30 -
 31
31 -
 32
32 -
 33
33 -
 34
34 -
35
-
36
 |
 |