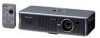
Sharp XR-1S XR-1S , XR-1X Operation Manual - Page 18
Part Names and Functions Continued
 |
UPC - 074000364103
View all Sharp XR-1S manuals
Add to My Manuals
Save this manual to your list of manuals |
Page 18 highlights
Part Names and Functions (Continued) Numbers in Z refer to the main pages in this operation manual where the topic is explained. ON/STANDBY button 26 For turning the power on and putting the projector into standby mode. INPUT 1, 2, and 3 29 buttons For switching to the respective input modes. AUTO SYNC button 32 For automatically adjusting images when connected to a com- puter. RESIZE button 30 For switching the screen size (NORMAL, BORDER, etc.). PICTURE MODE 32 buttons For switching the picture mode. Volume buttons 29 For adjusting the speaker sound level. Note • All the buttons on the remote control, except the MOUSE/Adjustment button, are made of luminous rubber, that is visible in the dark. (The luminous light weakens over time.) Inserting the Lithium Battery 36 MENU/HELP button 51 For displaying adjustment and setting screens, and help screen. 33 36 MOUSE/Adjustment buttons (P/R/O/Q) • For moving the computer cursor when connecting the projector USB terminal to the computer with RGB/ USB cable. • For selecting menu items. 33 L CLICK/ENTER button • For the Left click when 36 connecting the projector USB terminal to the computer with RGB/USB cable. • For setting items selected or adjusted on the menu. 33 R CLICK/RETURN button 36 • For the Right click when connecting the projector USB terminal to the computer with RGB/USB cable. • For undoing an operation or returning to the previous display. 32 FREEZE button For freezing images. 29 AV MUTE button For temporarily displaying the black screen and turning off the sound. 1 While pressing the tab (1), pull the battery holder (2). 2 Pull the battery holder. 3 Insert the supplied lithium battery (CR2025). • Insert the lithium battery with the + side of the battery facing the + mark of the battery holder. + mark 4 Insert the battery holder into the remote control. 14
-
 1
1 -
2
-
3
-
4
-
5
-
6
-
7
-
8
-
9
-
10
-
11
-
12
-
 13
13 -
 14
14 -
 15
15 -
 16
16 -
 17
17 -
 18
18 -
 19
19 -
 20
20 -
 21
21 -
 22
22 -
 23
23 -
24
-
25
-
26
-
27
-
28
-
29
-
30
-
31
-
32
-
33
-
34
-
35
-
36
-
37
-
38
-
39
-
40
-
41
-
42
-
43
-
44
-
45
-
46
-
47
-
48
-
49
-
50
-
51
-
52
-
53
-
54
-
55
-
56
-
57
-
58
-
59
-
60
-
61
-
62
-
63
-
64
-
65
-
66
-
67
-
68
-
69
-
70
 |
 |
