Sharp XR10XL PG-MB56X , PG-MB66X Operation Manual - Page 32
Switching the Input Mode, Adjusting the Volume - remote
 |
UPC - 074000364530
View all Sharp XR10XL manuals
Add to My Manuals
Save this manual to your list of manuals |
Page 32 highlights
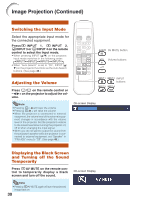
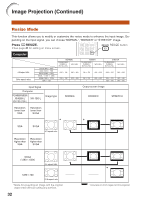
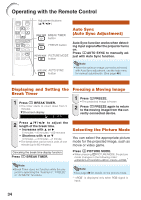
Image Projection (Continued) Switching the Input Mode Select the appropriate input mode for the connected equipment. PressC INPUT 1, C INPUT 2, DINPUT 3 or EINPUT 4 on the remote control to select the input mode. • When pressing INPUT (P/R) on the projector, input mode switches in the following order: INPUT1 INPUT2 INPUT3 INPUT4 . • When "Auto Search" is set to "On", INPUT (P/ R) on the projector functions as the Auto Search buttons. (See page 43.) Adjusting the Volume Press K/L on the remote control or -O/Q+ on the projector to adjust the volume. Note • Pressing K/-O will lower the volume. • Pressing L/Q+ will raise the volume. • When the projector is connected to external equipment, the volume level of the external equipment changes in accordance with the volume level of the projector. Set the projector's volume to the lowest level when turning the projector on/ off or when changing the input signal. • When you do not want to output the sound from the projector's speaker while the projector is connected to external equipment, set "Speaker" in "PRJ-ADJ" menu to "Off". (See page 43.) On-screen Display Displaying the Black Screen and Turning off the Sound Temporarily Press MAV MUTE on the remote control to temporarily display a black screen and turn off the sound. On-screen Display Note • Pressing MAV MUTE again will turn the projected image back on. 30 AV MUTE button Volume buttons INPUT buttons
-
 1
1 -
2
-
3
-
4
-
5
-
6
-
7
-
8
-
9
-
10
-
11
-
12
-
13
-
14
-
15
-
16
-
17
-
18
-
19
-
20
-
21
-
22
-
23
-
24
-
25
-
26
-
 27
27 -
 28
28 -
 29
29 -
 30
30 -
 31
31 -
 32
32 -
 33
33 -
 34
34 -
 35
35 -
 36
36 -
 37
37 -
38
-
39
-
40
-
41
-
42
-
43
-
44
-
45
-
46
-
47
-
48
-
49
-
50
-
51
-
52
-
53
-
54
-
55
-
56
-
57
-
58
-
59
-
60
-
61
-
62
-
63
-
64
-
65
-
66
-
67
-
68
-
69
-
70
 |
 |
