Sharp XR10XL PG-MB56X , PG-MB66X Operation Manual - Page 5
How to Read this Operation Manual, For Future Reference - reset lamp
 |
UPC - 074000364530
View all Sharp XR10XL manuals
Add to My Manuals
Save this manual to your list of manuals |
Page 5 highlights
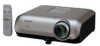
Introduction How to Read this Operation Manual I The specifications are slightly different, depending on the model. However, you can connect and operate all models in the same manner. • In this operation manual, the illustration and the screen display are simplified for explanation, and may differ slightly from the actual display. Using the Menu Screen ENTER button Adjustment buttons (P/R/O/Q) MENU/HELP button Adjustment buttons (P/R/O/Q) MENU/HELP button ENTER button RETURN button • Press l RETURN to return to the previous screen when the menu is displayed. Menu Selections (Adjustments) Example: Adjusting "Bright". • This operation can also be performed by using the buttons on the projector. 1 Press BMENU. • The "Picture" menu screen for the selected input mode is displayed. Example: "Picture" screen menu for INPUT 1 (RGB) mode Menu item 2 Press Q or O and select "Picture" to adjust. Picture SCR - ADJ PRJ - ADJ Picture Mode Contrast Bright Red Blue CLR Temp Bright Boost Lamp Setting Reset 0 0 0 0 7500K 1 Standard Bright Help SEL./ADJ. ENTER END Useful Features Buttons used in this operation Button used in this step On-screen display 37 Info ........Indicates safeguards for using the projector. Note .........Indicates additional information for setting up and operating the projector. For Future Reference Maintenance P. 47 Troubleshooting PP. 61 and 62 Index P. 66 3
-
 1
1 -
 2
2 -
 3
3 -
 4
4 -
 5
5 -
 6
6 -
 7
7 -
 8
8 -
 9
9 -
 10
10 -
 11
11 -
12
-
13
-
14
-
15
-
16
-
17
-
18
-
19
-
20
-
21
-
22
-
23
-
24
-
25
-
26
-
27
-
28
-
29
-
30
-
31
-
32
-
33
-
34
-
35
-
36
-
37
-
38
-
39
-
40
-
41
-
42
-
43
-
44
-
45
-
46
-
47
-
48
-
49
-
50
-
51
-
52
-
53
-
54
-
55
-
56
-
57
-
58
-
59
-
60
-
61
-
62
-
63
-
64
-
65
-
66
-
67
-
68
-
69
-
70
 |
 |