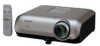
Sharp XR10XL PG-MB56X , PG-MB66X Operation Manual - Page 48
Troubleshooting with the “Help” menu, Utilizing the “Help” menu functions, Utilizing - + troubleshooting
 |
UPC - 074000364530
View all Sharp XR10XL manuals
Add to My Manuals
Save this manual to your list of manuals |
Page 48 highlights
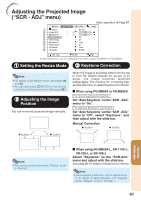
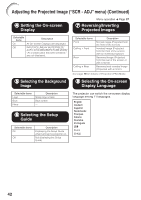
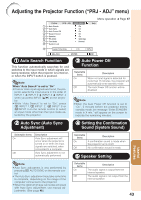
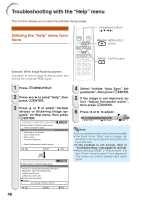
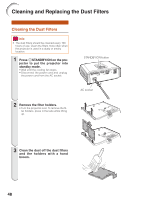
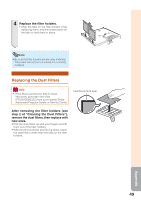
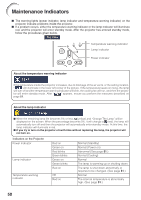
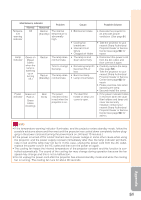
Troubleshooting with the "Help" menu This function advises you to solve the problems during usage. Utilizing the "Help" menu functions Adjustment buttons (P/R/O/Q) MENU/HELP button ENTER button Example: When image flickering appears Operation to solve image flickering when projecting the computer RGB signal. 1 Press BMENU/HELP. 2 Press O or Q to select "Help", then press hENTER. 3 Press P or R to select "Vertical stripes or flickering image ap- pears" on Help menu, then press hENTER. Picture SCR - ADJ PRJ - ADJ Vertical stripes or flickering image appear There is no picture or audio Vertical stripes or flickering image appear Data image is not centered Color is faded or poor Picture is dark The image is distorted Help Reset all adjustments to default settings SEL. ENTER END 46 Vertical stripes or flickering image appear Initiate "Auto Sync" Adjustments. If there is no change after performing "Auto Sync" adjustments, adjust the following items. Adjust vertical noise Adjust horizontal noise Reset the 2 items above Return Cur. sig. freq: H 43 kHz / V 60 Hz Help SEL. ENTER END 4 Select "Initiate "Auto Sync" Adjustments", then press hENTER. 5 If the image is not improved, select "Adjust horizontal noise.", then press hENTER. 6 Press O or Q to adjust. Phase SEL./ADJ. 0 Rtn. Menu Help END Note • You can adjust the items with check marks (✔). • The items in the "Help" menu change, de- pending on the input signal or setting that you have selected. • If the problem is not solved, refer to "Troubleshooting". (see pages 61 and 62) • When selecting "sRGB" in "Picture Mode", the item "Color is faded or poor" is not displayed. This means you cannot change input signal types.
-
 1
1 -
2
-
3
-
4
-
5
-
6
-
7
-
8
-
9
-
10
-
11
-
12
-
13
-
14
-
15
-
16
-
17
-
18
-
19
-
20
-
21
-
22
-
23
-
24
-
25
-
26
-
27
-
28
-
29
-
30
-
31
-
32
-
33
-
34
-
35
-
36
-
37
-
38
-
39
-
40
-
41
-
42
-
 43
43 -
 44
44 -
 45
45 -
 46
46 -
 47
47 -
 48
48 -
 49
49 -
 50
50 -
 51
51 -
 52
52 -
 53
53 -
54
-
55
-
56
-
57
-
58
-
59
-
60
-
61
-
62
-
63
-
64
-
65
-
66
-
67
-
68
-
69
-
70
 |
 |
