Sharp XV-Z9000U XV-Z9000U Operation Manual - Page 15
Connecting to a Computer - sharpvision projector
 |
UPC - 074000358126
View all Sharp XV-Z9000U manuals
Add to My Manuals
Save this manual to your list of manuals |
Page 15 highlights
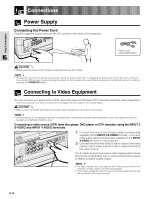
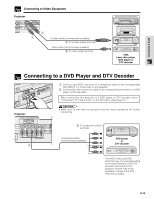
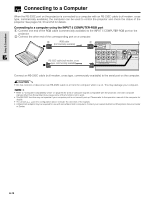
Setup & Connections Connecting to a Computer When the RS-232C port on the projector is connected to a computer with an RS-232C cable (null modem, cross type, commercially available), the computer can be used to control the projector and check the status of the projector. See pages 52, 53 and 54 for details. Connecting to a computer using the INPUT 5 COMPUTER-RGB port 1 Connect one end of the RGB cable (commercially available) to the INPUT 5 COMPUTER-RGB port on the projector. 2 Connect the other end of the corresponding port on a computer. 2 RGB cable 1 (commercially available) RS-232C cable (null modem, cross type, commercially available) Connect an RS-232C cable (null modem, cross type, commercially available) to the serial port on the computer. CAUTION • Do not connect or disconnect an RS-232C cable to or from the computer while it is on. This may damage your computer. • Refer to "Computer Compatibility Chart" on page 56 for a list of computer signals compatible with the projector. Use with computer signals other than those listed may cause some of the functions not to work. • The RS-232C function may not operate if your computer port is not correctly set up. Please refer to the operation manual of the computer for details. • The arrows (→, ↔) in the configuration above indicate the direction of the signals. • A Macintosh adaptor may be required for use with some Macintosh computers. Contact your nearest Authorized SharpVision Service Center or Dealer. E-15
-
 1
1 -
2
-
3
-
4
-
5
-
6
-
7
-
8
-
9
-
 10
10 -
 11
11 -
 12
12 -
 13
13 -
 14
14 -
 15
15 -
 16
16 -
 17
17 -
 18
18 -
 19
19 -
 20
20 -
21
-
22
-
23
-
24
-
25
-
26
-
27
-
28
-
29
-
30
-
31
-
32
-
33
-
34
-
35
-
36
-
37
-
38
-
39
-
40
-
41
-
42
-
43
-
44
-
45
-
46
-
47
-
48
-
49
-
50
-
51
-
52
-
53
-
54
-
55
-
56
-
57
-
58
-
59
-
60
-
61
 |
 |
