Singer 1 One Instruction Manual 14 - Page 42
fabric, handling, Maniement, tissu, manejo, tejido
 |
View all Singer 1 One manuals
Add to My Manuals
Save this manual to your list of manuals |
Page 42 highlights
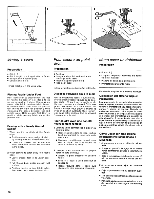
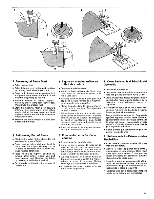
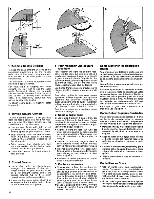
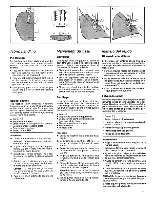
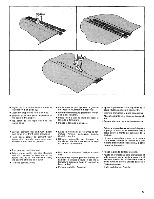
- ' 1 , 2 3 . , L) ,-4 F G H, \ N. .r Ll cl. 1 3 4- 5 ,-, ' \ fabric handling Pin Basting Pin basting is a time saver and can be used when you sew easy-to-handle fabrics. Use fine pins and place them so that: • They are at right angles to the presser foot and just nip into the fabric at the stitching line, as illustrated. • They do not extend beyond both sides of the presser foot. Never place pins on the underside of the fabric in -contact with the feed. • Sew, pulling pins out of fabric as you stitch. We do not recommend sewing over pins. Speed Basting The basting stitch produces temporary long stitches in a variety of lengths. A few of the many sewing jobs for which you will find speed basting particularly useful are: Joining seams for trial fittings, basting pleats, hems and seams. • Stitch: G • Stitch width: 5 only • Stitch length: to suit application or fabric • General purpose needle plate • General purpose foot • Speed range: MIN Procedure • Thread the machine in the usual way. 1. Select G I speed basting and set stitch width dial at 5. • Adjust stitch length. Stitches approximately 2.5 cm (1 inch) long are recommended for seam basting. • Adjust upper thread tension. The longer the stitch, the lighter the tension should be. 2.. Stitch slowly. If stitches are more than 1.5 cm (1/2 inch) long support the fabric in front and back of the foot. Caution: Do not pull the fabric while you are stitching as this may deflect the needle, causing it to break. 3. Take a few short stitches to secure end of basting. Maniement du tissu manejo del tejido Epinglage L'epinglage vous fait gagner du temps et peut etre utilise avec des tissus faciles manier. Utilisez des epingles fines et placez-les de la facon suivante: • Elles sont a angles droit du pied presseur et sont piquees dans le tissu sur la ligne de couture, comme illustre. • Elles ne depas§ent pas les bords du pied presseur. Ne placez jamais d'epingles a l'envers du tissu en contact avec l'entrainement. • Piquez en retirant les epingles du tissu au fur et a mesure. Nous vous deconseillons de piquer sur les epingles. Hilvanado con alfileres El hilvanado con alfileres ahorra tiempo y puede ser empleado para coser tejidos faciles a manejar. Emplee alfileres finos y situelos de manera que: • Forman angulos rectos con eI prensatelas y apenas penetran en el material en la linea de costura, como se ilustra. • No se extienden mas alla de ambos lados del prensatelas. Nunca situe alfileres en el lado inferior del material, en contacto con la alimentaci0n. • Cosa y saque los alfileres del material segCin progrese la puntada. Faufilage Le point de bati est un long point pro- visoire. II est, en particulier tres utile pour ('assemblage de pieces de vetement, en vue d'un essayage, pour batir des ourlets, des coutures ou des plis. • Point: G • Largeur de point: 5 uniquement • Longueur de point: en fonction de l'ouvrage et du tissu • Plaque a aiguille universelle • Pied universel • Vitesse: MIN Procedure: • Enfilez la machine de la maniere habituelle. 1. Selectionnez le point de bati G 1 et mettez le cadran de largeur de point sur 5. • Reglez la longueur de point. Nous vous recommandons des points d'environ 2,5 cm. • Reglez la tension du fil d'aiguille. Plus le point sera long, plus la tension sera legere. 2. Piquez lentement. Si les points ont plus de 1,5 cm de long, maintenez le tissu a l'avant et a l'arriere du pied. Attention: Ne tirez pas sur le tissu pendant que vous piquez, cela peut tordre l'aiguille ou la casser. 3. Faites quelques points courts pour renforcer la fin du point de bati. Hilvanado rapido Este tipo de puntada produce puntos temporalmente largos en una variedad de longitudes. Usted encontrara el hilvanado rapid() particularmente util para: Efectuar dobladillos para cortes de prueba, hilvanar pliegues, bordes y costuras. • Punto: G • Ancho del punto: 5 solamente • Longitud del punto: de acuerdo con la aplicaci0n o la tela • Plancha de aguja para uso general • Prensatelas para uso general • Rango de velocidad: MIN Procedimiento • Haga el enhembrado de la maquina de la manera usual. 1. Seleccione Gi hilvanado rapid° y ponga el disco del ancho del punto en 5. • Ajuste Ia longitud del punto. Para el hilvanado de costuras, se recomiendan puntos de 2,5 cms. aproximadamente. • Ajuste la tension del hilo superior. Una tension debil corresponde a un punto largo. 2. Cosa lentamente. Si los puntos exceden 1,5 cms., soporte la tela en frente y detras del prensatelas. CUIDADO: No estire la tela durante la costura puesto que puede ser que esto desvie la aguja y cause su rotura. 3. Haga algunos puntos cortos para reforzar la extremidad del hilvanado. 41
-
 1
1 -
2
-
3
-
4
-
5
-
6
-
7
-
8
-
9
-
10
-
11
-
12
-
13
-
14
-
15
-
16
-
17
-
18
-
19
-
20
-
21
-
22
-
23
-
24
-
25
-
26
-
27
-
28
-
29
-
30
-
31
-
32
-
33
-
34
-
35
-
36
-
 37
37 -
 38
38 -
 39
39 -
 40
40 -
 41
41 -
 42
42 -
 43
43 -
 44
44 -
 45
45 -
 46
46 -
 47
47 -
48
-
49
-
50
-
51
-
52
-
53
-
54
-
55
-
56
-
57
-
58
-
59
-
60
-
61
-
62
-
63
-
64
-
65
-
66
-
67
-
68
-
69
-
70
-
71
-
72
-
73
-
74
-
75
-
76
-
77
-
78
-
79
-
80
-
81
-
82
-
83
-
84
-
85
-
86
-
87
-
88
-
89
-
90
 |
 |
