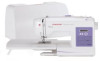
Singer Fashion Mate 5560 User Manual - Page 12
Inserting the Bobbin
 |
View all Singer Fashion Mate 5560 manuals
Add to My Manuals
Save this manual to your list of manuals |
Page 12 highlights
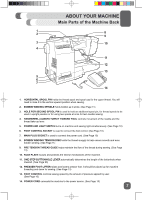
2 GETTING READY TO SEW Inserting the Bobbin ⚠ Turn power switch off before inserting or removing the bobbin. 1. Take off the removable storage compartment. 2. Open the hinged cover. 3. Pull the bobbin case latch to remove the bobbin case from the bobbin holder. 4. Hold the bobbin case in one hand, then insert the bobbin so that the thread runs clockwise, as shown in the illustration. 5. First, bring the thread into the small slit (A) on the side of the bobbin case. Then, bring it underneath the metal guide, continuing until it is comes out of the opening at the bottom of the metal guide. You should feel it and hear it click in place. If it does not click in place, the machine will not sew. After clicking the thread in place, pull the thread in the direction shown (B). A B 6. Once the bobbin has been placed in the bobbin case, hold the bobbin case by the latch so that the latch is pointing toward you. Insert into the bobbin case holder so that the metal extension is positioned at 12 o'clock. You should feel the bobbin case become seated securely in place. Release the latch. → The bobbin case must be properly seated into the holder or the machine will not sew. After placing it into the holder and releasing the tab, if the bobbin case seems loose, if it falls to one side, or if it is not pushed all the way in, remove it. Hold it by the latch and reinsert it until it is securely in place. 12
-
 1
1 -
2
-
3
-
4
-
5
-
6
-
 7
7 -
 8
8 -
 9
9 -
 10
10 -
 11
11 -
 12
12 -
 13
13 -
 14
14 -
 15
15 -
 16
16 -
 17
17 -
18
-
19
-
20
-
21
-
22
-
23
-
24
-
25
-
26
-
27
-
28
-
29
-
30
-
31
-
32
-
33
-
34
-
35
-
36
-
37
-
38
-
39
-
40
-
41
-
42
-
43
-
44
-
45
-
46
-
47
-
48
-
49
-
50
-
51
-
52
-
53
-
54
-
55
-
56
-
57
-
58
-
59
-
60
-
61
-
62
-
63
-
64
-
65
-
66
-
67
-
68
-
69
-
70
-
71
-
72
-
73
-
74
-
75
-
76
-
77
-
78
-
79
-
80
-
81
-
82
-
83
-
84
-
85
-
86
-
87
-
88
-
89
-
90
-
91
-
92
-
93
-
94
-
95
-
96
-
97
-
98
-
99
-
100
-
101
-
102
-
103
-
104
 |
 |
