Singer Fashion Mate 5560 User Manual - Page 7
Main Parts of the Machine Back
 |
View all Singer Fashion Mate 5560 manuals
Add to My Manuals
Save this manual to your list of manuals |
Page 7 highlights
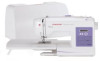
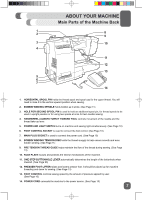
ABOUT YOUR MACHINE Main Parts of the Machine Back 1 2 8 9 3 10 4 11 12 13 5 6 7 14 1. HORIZONTAL SPOOL PIN holds the thread spool and spool cap for the upper thread. You will need to raise it to the vertical upward position when sewing. 2. BOBBIN WINDING SPINDLE holds bobbin as it winds. (See Page 11) 3. HOLE FOR SECOND SPOOL PIN is used to hold an additional spool pin, for thread spools to be used in upright position or for using two spools at once for twin needle sewing. 4. HANDWHEEL (ALWAYS TURN IT TOWARD YOU), controls movement of the needle and the thread take-up lever. 5. POWER AND LIGHT SWITCH turns on machine and sewing light simultaneously. (See Page 10) 6. FOOT CONTROL SOCKET is used to connect the foot control. (See Page 10) 7. MAIN PLUG SOCKET is used to connect the power cord. (See Page 10) 8. BOBBIN WINDING TENSION DISK holds the thread snuggly to help ensure smooth and even bobbin winding. (See Page 11) 9. PRE-TENSION THREAD GUIDE helps maintain the flow of the thread during sewing. (See Page 13) 10. FACE PLATE houses and protects the interior mechanisms of the machine. 11. ONE STEP BUTTONHOLE LEVER automatically determines the length of the buttonhole when lowered. (See Page 23) 12. PRESSER FOOT LIFTER raises and lowers presser foot. It should be placed up for machine threading and down for sewing. (See Page 13) 13. FOOT CONTROL controls sewing speed by the amount of pressure applied by user. (See Page 10) 14. POWER CORD connects the machine to the power source. (See Page 10) 7
-
 1
1 -
 2
2 -
 3
3 -
 4
4 -
 5
5 -
 6
6 -
 7
7 -
 8
8 -
 9
9 -
 10
10 -
 11
11 -
 12
12 -
13
-
14
-
15
-
16
-
17
-
18
-
19
-
20
-
21
-
22
-
23
-
24
-
25
-
26
-
27
-
28
-
29
-
30
-
31
-
32
-
33
-
34
-
35
-
36
-
37
-
38
-
39
-
40
-
41
-
42
-
43
-
44
-
45
-
46
-
47
-
48
-
49
-
50
-
51
-
52
-
53
-
54
-
55
-
56
-
57
-
58
-
59
-
60
-
61
-
62
-
63
-
64
-
65
-
66
-
67
-
68
-
69
-
70
-
71
-
72
-
73
-
74
-
75
-
76
-
77
-
78
-
79
-
80
-
81
-
82
-
83
-
84
-
85
-
86
-
87
-
88
-
89
-
90
-
91
-
92
-
93
-
94
-
95
-
96
-
97
-
98
-
99
-
100
-
101
-
102
-
103
-
104
 |
 |
