Singer XL-420 FUTURA Instruction Manual - Page 26
Control Panel Functions
 |
View all Singer XL-420 FUTURA manuals
Add to My Manuals
Save this manual to your list of manuals |
Page 26 highlights
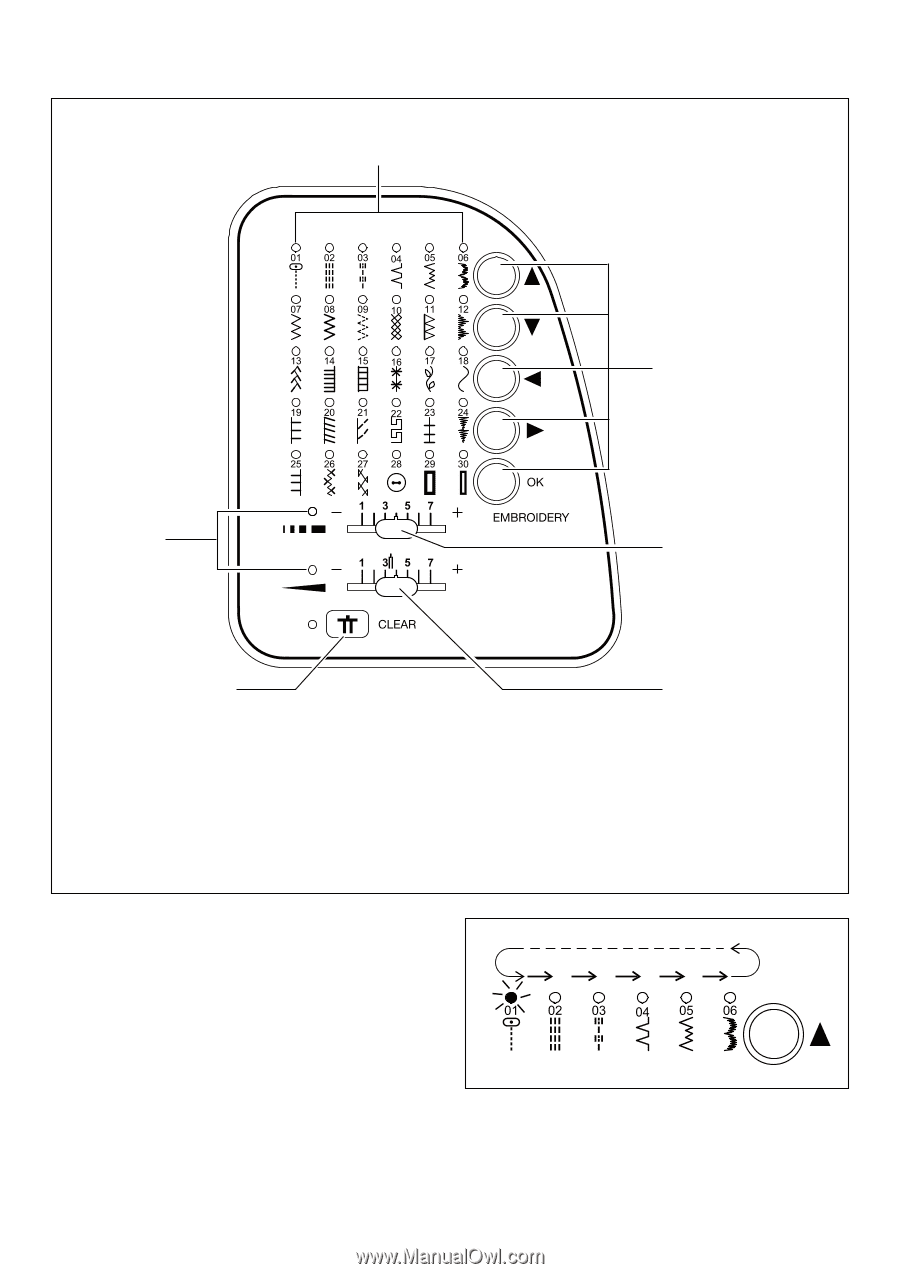
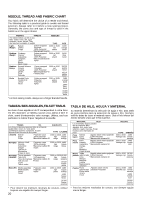
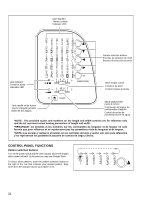
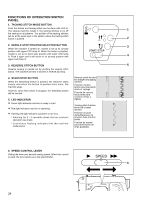
LED indicator Témoin a diode Indicador LED Pattern selection buttons Touches de sélection de motif Botones de selección de patrón LED indicator Témoin a diode Indicador LED Stitch length control Longueur de point Control longitud puntada Twin needle mode button Touche d'aiguille jumelée Boton de dos agujas Stitch width/needle position control Commande de largeur de point/position d'aiguille Control de ancho de puntada/posición de aguja *NOTE: The provided scales and numbers on the length and width controls are for reference only and do not represent actual sewing parameters of length and width. *REMARQUE: les échelles et les nombres sur les commandes de longueur et de largeur ne sont fournis que pour référence et ne représentent pas les paramètres réels de longueur et de largeur. *NOTA: Las escalas y números provistos en los controles de largo y ancho son sólo para referencia y no representan los parámetros actuales de costura de largo y ancho. CONTROL PANEL FUNCTIONS Pattern selection buttons Turn on the power switch and the LED indicator above the straight stitch pattern will be lit. At this point you may sew Straight Stitch. To select other patterns, push the pattern selection button to the right of the row that contains your desired pattern. Stop when the LED indicator above your pattern is lit. 24
-
 1
1 -
2
-
3
-
4
-
5
-
6
-
7
-
8
-
9
-
10
-
11
-
12
-
13
-
14
-
15
-
16
-
17
-
18
-
19
-
20
-
 21
21 -
 22
22 -
 23
23 -
 24
24 -
 25
25 -
 26
26 -
 27
27 -
 28
28 -
 29
29 -
 30
30 -
 31
31 -
32
-
33
-
34
-
35
-
36
-
37
-
38
-
39
-
40
-
41
-
42
-
43
-
44
-
45
-
46
-
47
-
48
-
49
-
50
-
51
-
52
-
53
-
54
-
55
-
56
-
57
-
58
-
59
-
60
-
61
-
62
-
63
-
64
-
65
-
66
-
67
-
68
-
69
-
70
-
71
-
72
-
73
-
74
-
75
-
76
-
77
-
78
-
79
-
80
-
81
-
82
-
83
-
84
-
85
-
86
-
87
-
88
-
89
-
90
-
91
-
92
-
93
-
94
-
95
-
96
-
97
-
98
-
99
-
100
-
101
-
102
-
103
-
104
-
105
-
106
-
107
-
108
-
109
-
110
-
111
-
112
-
113
-
114
-
115
-
116
-
117
-
118
-
119
-
120
-
121
-
122
-
123
-
124
 |
 |