Snapper 500Z Operater's Manual - Page 25
Inspect Muffler and Spark Arrester
 |
View all Snapper 500Z manuals
Add to My Manuals
Save this manual to your list of manuals |
Page 25 highlights
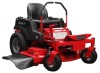
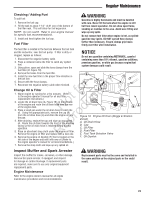
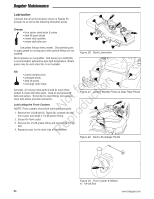
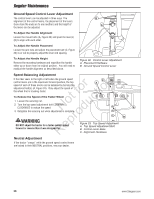
Regular Maintenance Checking / Adding Fuel To add fuel: 1. Remove the fuel cap. 2. Fill the tank to about 1-1/2" (3,81 cm) of the bottom of the filler neck. This will allow for fuel expansion. NOTE: Do not overfill. Refer to your engine manual for specific fuel recommendations. 3. Install and hand tighten the fuel cap. Fuel Filter WARNING Gasoline is highly flammable and must be handled with care. Never fill the tank when the engine is still hot from recent operation. Do not allow open flame, smoking or matches in the area. Avoid over-filling and wipe up any spills. Do not remove fuel filter when engine is hot, as spilled gasoline may ignite. DO NOT spread hose clamps further than necessary. Ensure clamps grip hoses firmly over filter after installation. The fuel filter is located in the fuel line between the fuel tank and the carburetor, near the fuel pump. If filter is dirty or NOTICE clogged, replace as follows: 1. Disconnect the negative battery cable. 2. Place a container below the filter to catch any spilled fuel. 3. Using pliers, open and slide the hose clamps from the fuel filter (D, Figure 19). Do not use gasoline containing METHANOL, gasohol containing more than 10% ethanol, gasoline additives, premium gasoline, or white gas because engine/fuel system damage could result. 4. Remove the hoses from the fuel filter. E 5. Install the new fuel filter in the proper flow direction in the fuel line. 6. Secure with the hose clamps. r n 7. Reconnect the negative battery cable when finished. fo tio Change Oil & Filter 1. Warm engine by running for a few minutes. (Refer to the engine operator's manual for oil and filter t c replacement instructions.) 2. Locate the oil drain hose (A, Figure 19) on the left side o u of the engine and route the oil drain hose over the rear of the engine deck. N d 3. Place a small pan under the oil drain hose to catch the oil. Using the appropriate tools, remove the cap (B) o from the oil drain hose (A) and drain the engine oil into r the pan. 4. After draining, replace the cap and wipe up any spilled p oil. Route the oil drain towards the front of the machine facing so the oil drain hose is retained during normal e operation. 5. Place an absorbent shop cloth under the engine oil filter. R Remove the engine oil filter and replace with a new one. F D B C Figure 19. Engine Oil Drain (Briggs & Stratton shown) A. Oil Drain Hose B. Cap C. Oil Filter D. Fuel Filter E. Fuel Tank Selection Valve A 6. Remove the engine oil dipstick (F) that is located on the F. Oil Dipstick left side of the engine and refill with new oil (Refer to the engine operator's manual for oil recommendations.) 7. Remove the shop cloth and wipe up any spilled oil. Inspect Muffler and Spark Arrester Inspect the muffler for cracks, corrosion, or other damage. Remove the spark arrester, if equipped, and inspect for damage or carbon blockage. If replacement parts are required, make sure to use only original equipment replacement parts. Engine Maintenance Refer to the engine owner's manual for all engine maintenance procedures and recommendations. WARNING Replacement parts must be the same and installed in the same position as the original parts or fire could result. 23
-
 1
1 -
2
-
3
-
4
-
5
-
6
-
7
-
8
-
9
-
10
-
11
-
12
-
13
-
14
-
15
-
16
-
17
-
18
-
19
-
 20
20 -
 21
21 -
 22
22 -
 23
23 -
 24
24 -
 25
25 -
 26
26 -
 27
27 -
 28
28 -
 29
29 -
 30
30 -
31
-
32
-
33
-
34
-
35
-
36
-
37
-
38
-
39
-
40
-
41
-
42
-
43
-
44
-
45
-
46
-
47
-
48
 |
 |