Sonos Control User Guide - Page 18
Adding a shared folder, Stop accessing a shared folder, Updating the music index - from other devices
 |
View all Sonos Control manuals
Add to My Manuals
Save this manual to your list of manuals |
Page 18 highlights
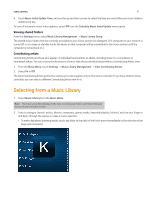
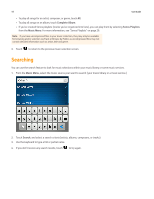
16 User Guide • To play music from imported playlists, drop the playlist file .PLS, .M3U or .WPL into the same music folder that you have shared to the Sonos system, update your music index, and the custom playlists will appear when you select Imported Playlists from the Music Menu. Music Library Setup Adding a shared folder 1. From the Music Menu, select Settings -> Music Library Management -> Music Library Setup. 2. Touch Add New Share. 3. Choose one of the following options: • Select Scan my network for shares to automatically scan for shared folders that are not currently being accessed. • Touch to select a folder from the displayed list. • If the folder does not require a user name and password, touch OK. • If the folder does require a username and password, use the keyboard to type them, and then touch OK. • Select Enter the location of a share if you prefer to enter the path. • Use the keyboard to type the path name for the share (path example: \\Name\Sharename, where Name is the network name for your computer or NAS device, and Sharename is the name of the top level shared folder, such as \\linkstation\music_share.) • If the folder does not require a user name and password, touch OK. • If the folder does require a username and password, use the keyboard to type them, and then touch OK. Stop accessing a shared folder 1. From the Music Menu, select Settings -> Music Library Management -> Music Library Setup. The shared music folders that are currently accessible to your Sonos system are displayed. 2. Select the folder you wish to stop using, and touch Remove. Your music folder will remain untouched on your computer. However, you will no longer be able to access it from the Sonos system. Updating the music index During the setup process, all of your available music folders are indexed for easy selection. If you add new music to a folder that is already indexed, you can simply update your music index to add the new music to your Sonos music library. 1. From the Music Menu, touch Settings. 2. Select Music Library Management -> Update Music Index Now. 3. Select Scan Now. The message, "updating music index" appears. When the message disappears, your new music is available. Scheduling automatic updates 1. From the Music Menu, touch Settings. 2. Touch Music Library Management. 3. Touch Schedule Music Index Update, and select On.
-
 1
1 -
2
-
3
-
4
-
5
-
6
-
7
-
8
-
9
-
10
-
11
-
12
-
 13
13 -
 14
14 -
 15
15 -
 16
16 -
 17
17 -
 18
18 -
 19
19 -
 20
20 -
 21
21 -
 22
22 -
 23
23 -
24
-
25
-
26
-
27
-
28
-
29
-
30
-
31
-
32
-
33
-
34
-
35
-
36
 |
 |
