Sony BDP BX2 Operating Instructions - Page 28
the player and your TV, and press, depending on the cables connected
 |
UPC - 027242765733
View all Sony BDP BX2 manuals
Add to My Manuals
Save this manual to your list of manuals |
Page 28 highlights
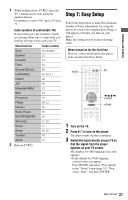
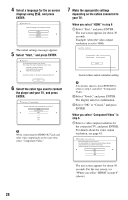
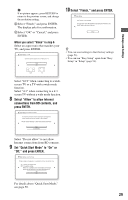
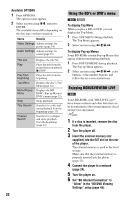
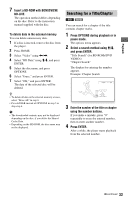
4 Select a language for the on-screen displays using M/m, and press ENTER. The initial settings message appears. 5 Select "Start," and press ENTER. 7 Make the appropriate settings depending on the cables connected to your TV. When you select "HDMI" in step 6 1 Select "Start," and press ENTER. The test screen appears for about 30 seconds. Example: when the video output resolution is set to 1080i 6 Select the cable type used to connect the player and your TV, and press ENTER. b When connecting the HDMI OUT jack and other video output jacks at the same time, select "Component Video." Current video output resolution setting b If no picture appears, press RETURN to return to step 6, and select "Component Video." 2 Select "Finish," and press ENTER. The display asks for confirmation. 3 Select "OK" or "Cancel," and press ENTER. When you select "Component Video" in step 6 1 Select a video output resolution for the connected TV, and press ENTER. For details about the video output resolution, see page 43. The test screen appears for about 30 seconds. For the test screen, see "When you select "HDMI" in step 6" (above). 28
-
 1
1 -
2
-
3
-
4
-
5
-
6
-
7
-
8
-
9
-
10
-
11
-
12
-
13
-
14
-
15
-
16
-
17
-
18
-
19
-
20
-
21
-
22
-
 23
23 -
 24
24 -
 25
25 -
 26
26 -
 27
27 -
 28
28 -
 29
29 -
 30
30 -
 31
31 -
 32
32 -
 33
33 -
34
-
35
-
36
-
37
-
38
-
39
-
40
-
41
-
42
-
43
-
44
-
45
-
46
-
47
-
48
-
49
-
50
-
51
-
52
-
53
-
54
-
55
-
56
-
57
-
58
-
59
-
60
-
61
-
62
-
63
-
64
-
65
-
66
-
67
-
68
-
69
-
70
-
71
-
72
-
73
-
74
-
75
-
76
-
77
-
78
-
79
 |
 |
