Sony BDV-N8100W Operating Instructions - Page 31
Step 5: Performing the Easy Setup
 |
View all Sony BDV-N8100W manuals
Add to My Manuals
Save this manual to your list of manuals |
Page 31 highlights
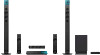
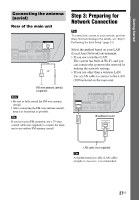
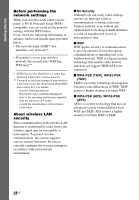
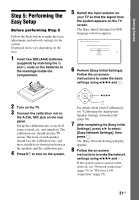
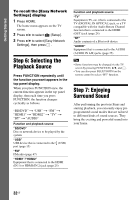
Getting Started Step 5: Performing the Easy Setup Before performing Step 5 Follow the Steps below to make the basic adjustments and network settings for the system. Displayed items vary depending on the area. 1 Insert two R03 (AAA) batteries (supplied) by matching the 3 and # ends on the batteries to the markings inside the compartment. 5 Switch the input selector on your TV so that the signal from the system appears on the TV screen. The [Easy Initial Settings] for OSD language selection appears. 6 Perform [Easy Initial Settings]. Follow the on-screen instructions to make the basic settings using B/V/v/b and . B/V/v/b 2 Turn on the TV. 3 Connect the calibration mic to the A.CAL MIC jack on the rear panel. Set up the calibration mic at ear level using a tripod, etc. (not supplied). The calibration mic should aim the TV screen. The front of each speaker should face the calibration mic, and there should be no obstruction between the speakers and the calibration mic. 4 Press [/1 to turn on the system. For details about [Auto Calibration], see "Calibrating the Appropriate Speaker Settings Automatically" (page 50). 7 After completing the [Easy Initial Settings], press V/v to select [Easy Network Settings], then press . The [Easy Network Settings] display appears. 8 Follow the on-screen instructions to make the network settings using B/V/v/b and . If the system cannot connect to the network, see "Network connection" (page 75) or "Wireless LAN connection" (page 75). 31US
-
 1
1 -
2
-
3
-
4
-
5
-
6
-
7
-
8
-
9
-
10
-
11
-
12
-
13
-
14
-
15
-
16
-
17
-
18
-
19
-
20
-
21
-
22
-
23
-
24
-
25
-
 26
26 -
 27
27 -
 28
28 -
 29
29 -
 30
30 -
 31
31 -
 32
32 -
 33
33 -
 34
34 -
 35
35 -
 36
36 -
37
-
38
-
39
-
40
-
41
-
42
-
43
-
44
-
45
-
46
-
47
-
48
-
49
-
50
-
51
-
52
-
53
-
54
-
55
-
56
-
57
-
58
-
59
-
60
-
61
-
62
-
63
-
64
-
65
-
66
-
67
-
68
-
69
-
70
-
71
-
72
-
73
-
74
-
75
-
76
-
77
-
78
-
79
-
80
-
81
-
82
-
83
-
84
-
85
-
86
-
87
-
88
 |
 |