Sony CCD-TRV238E User Manual - Page 22
Recording for a longer time
 |
View all Sony CCD-TRV238E manuals
Add to My Manuals
Save this manual to your list of manuals |
Page 22 highlights
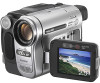
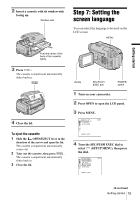
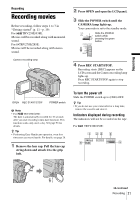
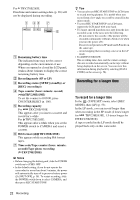
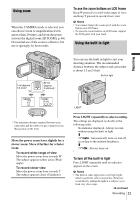
For TRV270E/285E: Date/time and camera settings data (p. 36) will not be displayed during recording. 1 23 7 60min SP REC 0:00:00 5 A Remaining battery time The indicated time may not be correct depending on the environment of use. When you opened or closed the LCD panel, it takes about 1 minute to display the correct remaining battery time. B Recording mode (SP or LP) C Recording status ([STBY] (standby) or [REC] (recording)) D Tape counter (hour: minute: second) ( TRV238E/438E) To set the counter to 0:00:00, press COUNTER RESET (p. 106). E Recording capacity For TRV238E/438E: This appears after you insert a cassette and record for a while. For TRV270E/285E: This appears after a while when you set the POWER switch to CAMERA and insert a cassette. F Hi8 format ( TRV238E/438E) This appears while recording Hi8 format tapes. G Time code/Tape counter (hour: minute: second)/Tape photo recording ( TRV270E/285E) b Notes • Before changing the battery pack, slide the POWER switch up to (CHG) OFF. • In the default setting, if you do not operate the camcorder for more than about 5 minutes, the power will automatically turn off to preserve battery power ([A.SHUT OFF], p. 58). To restart recording, slide the POWER switch down to select CAMERA, and then press REC START/STOP. z Tips • You can also use REC START/STOP on LCD frame to record moving pictures. It is useful when you record from a low-angle or record by yourself in the mirror mode. • To press REC START/STOP on LCD frame, support the LCD panel with your hand. • To ensure smooth transition on a tape from the last recorded scene to the next, note the following. - Do not remove the cassette. (The picture will be recorded continuously without a break even when you turn the power off.) - Do not record pictures in SP mode and LP mode on the same tape. - Avoid stopping then recording a movie in the LP mode. • For TRV270E/285E: The recording time, date, and the camera settings data are recorded automatically on the tape without being displayed on the screen. You can view this information during playback by selecting [DATA CODE] on the screen (p. 58). Recording for a longer time To record for a longer time In the (TAPE SET) menu, select [REC MODE], then [LP] (p. 53). In the LP mode, you can record longer than when recording in the SP mode (2 times longer for TRV238E/438E, 1.5 times longer for TRV270E/285E). A tape recorded in the LP mode should be played back only on this camcorder. 22 Recording
-
 1
1 -
2
-
3
-
4
-
5
-
6
-
7
-
8
-
9
-
10
-
11
-
12
-
13
-
14
-
15
-
16
-
 17
17 -
 18
18 -
 19
19 -
 20
20 -
 21
21 -
 22
22 -
 23
23 -
 24
24 -
 25
25 -
 26
26 -
 27
27 -
28
-
29
-
30
-
31
-
32
-
33
-
34
-
35
-
36
-
37
-
38
-
39
-
40
-
41
-
42
-
43
-
44
-
45
-
46
-
47
-
48
-
49
-
50
-
51
-
52
-
53
-
54
-
55
-
56
-
57
-
58
-
59
-
60
-
61
-
62
-
63
-
64
-
65
-
66
-
67
-
68
-
69
-
70
-
71
-
72
-
73
-
74
-
75
-
76
-
77
-
78
-
79
-
80
-
81
-
82
-
83
-
84
-
85
-
86
-
87
-
88
-
89
-
90
-
91
-
92
-
93
-
94
-
95
-
96
-
97
-
98
-
99
-
100
-
101
-
102
-
103
-
104
-
105
-
106
-
107
-
108
-
109
-
110
-
111
-
112
-
113
-
114
-
115
-
116
 |
 |