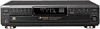
Sony CDP-CE545 Operating Instructions - Page 25
Labeling discs using the remote, Storing Information About CDs Custom Files
 |
View all Sony CDP-CE545 manuals
Add to My Manuals
Save this manual to your list of manuals |
Page 25 highlights
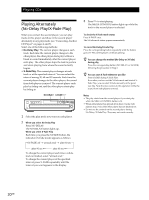
Storing Information About CDs (Custom Files) 5 Push l AMS L to select the character. The selected character lights up, and the flashing cursor appears to indicate the next space to be input. ALL DISCS DISC S 12345 CD1 12345 6 7 8 9 10 To insert a space Press M. If you have made a mistake Press m/M to flash the incorrect character, then input the correct character. 6 Repeat Steps 4 and 5 to input more characters. 7 Press MENU to store the Disc Name. Repeat Steps 1 to 7 to assign Disc Names to other discs. Labeling discs using the remote Z DISC/CAPS Number buttons NAME INPUT SPACE ENTER CLEAR m/M 1 Press DISC in Continuous Play Mode. 2 Press the number button of the disc you want to assign a Disc Name, and then ENTER. 3 Press NAME INPUT. The flashing cursor ( ) appears. 4 Press CAPS to find the letter type you want. Each time you press the button, the letter type changes cyclically among capital letters (ABC), small letters (abc) and numbers (123). To select a symbol, you have to select the capital or small letter type. 5 To input a letter, press the number button corresponding to the letter you want (indicated beside each number button). Each time you press the button, the letter changes cyclically among the ones indicated beside the button. To input symbols, press the number button 1 repeatedly until the symbol you want appears in the display. &!? ABC DEF GHI JKL MNO PQRS TUV WXYZ >10 ENTER Characters assigned to each number button Example: To select the letter E Press the number button 3 twice. t D t E t F Press 3. Press 3. Press 3. To insert a space, press SPACE once. To input a number, press the number button you want. 6 Press M to select the character. The selected character lights up, and the flashing cursor appears to indicate the next space to be input. You can also go to the next space by pressing other number buttons. 7 Repeat Steps 4 through 6 to input more characters. 8 Press NAME INPUT to store the Disc Name. Repeat Steps 1 through 8 to assign Disc Names to other discs. 25GB
-
 1
1 -
2
-
3
-
4
-
5
-
6
-
7
-
8
-
9
-
10
-
11
-
12
-
13
-
14
-
15
-
16
-
17
-
18
-
19
-
 20
20 -
 21
21 -
 22
22 -
 23
23 -
 24
24 -
 25
25 -
 26
26 -
 27
27 -
 28
28 -
 29
29 -
 30
30 -
31
-
32
-
33
-
34
-
35
-
36
-
37
-
38
-
39
-
40
-
41
-
42
-
43
-
44
-
45
-
46
-
47
-
48
-
49
-
50
-
51
-
52
-
53
-
54
-
55
-
56
-
57
-
58
-
59
-
60
-
61
-
62
-
63
-
64
-
65
-
66
-
67
-
68
-
69
-
70
-
71
-
72
-
73
-
74
-
75
-
76
-
77
-
78
-
79
-
80
-
81
-
82
-
83
-
84
-
85
-
86
-
87
-
88
 |
 |
